


A Beginner's Guide For Docker And Kubernetes
Getting started with Docker and Kubernetes while exploring the basic functionalities of these technologies


This article is an introduction into some basic concepts of Docker and Kubernetes. As I go ahead, I shall walk you through my story of exploring these technologies while also explaining why it is crucial to focus on these DevOps tools while also guiding you through getting started with the technologies.
DevOps is the combination of practices and tools designed to increase an organization's ability to deliver applications and services in a faster and better way so that the development and operational phases are executed in parallel. DevOps is basically an amalgamation of the words "development" and "operations"
Docker
Docker is a tool used to containerize your application, i.e. it packs the required code along with the dependencies required to operate an application. It has proved to be a boon for the software development field as it works on any machine. Now, let's get down to understanding how a docker solves this problem as well as surveying how to set it up.
Basically, an application needs various dependencies when it is being developed to function properly, and developers often face errors in running the code which may be related to his/her system. It is imperative to make changes and rectifications in the required places in order to go forward. This may affect the code and there might be chances that the application will only work on that particular machine because of which the application does not start when the code is passed and the debugging of errors on the other machine can become a cumbersome task.
Docker saves you from all these hassles as it runs your application in an isolated environment called containers under which you can install all the required dependencies. After that, you can create an image of that container and push it to the docker-hub (Similar to GitHub, wherein we maintain our code repository). The derived image is like a blueprint of the container's dependencies which you can share with your project partners without any hassle.
Steps to get started:
- To initialise, set up Docker on your machine by following this guide.
Next, start the docker engine on your machine.
Proceed to creating a basic project (I am taking an example of a node project).
Create a Dockerfile in the project directory.
Write the commands in Dockerfile for your application.
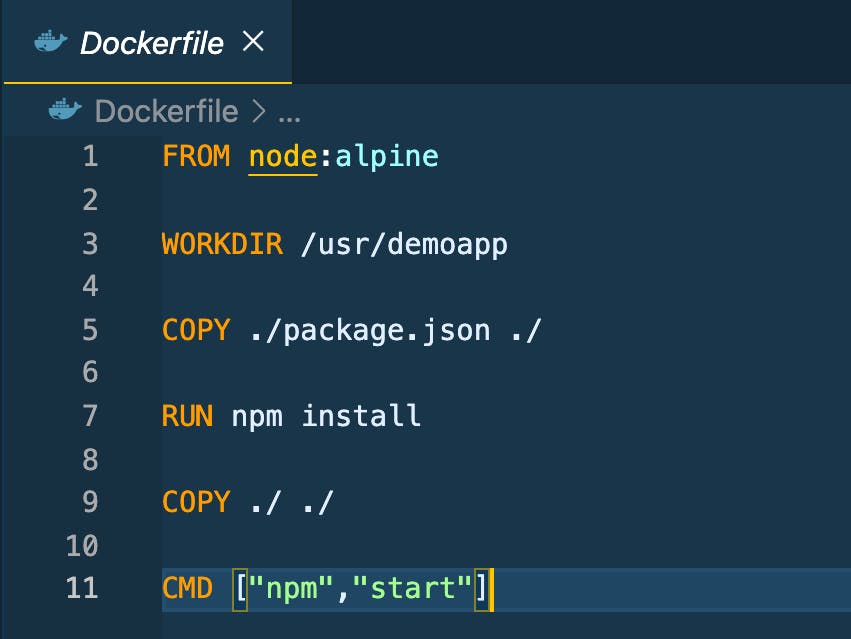
What this Dockerfile will do is that it will pull the node image from the Dockerhub to your machine and create a working directory for your project. Post this, the
copycommand will copy the files to the required directory and create a structure for the project inside the image.Next, open a terminal and shift to the project directory where you have created the file and build an image for your application by running the following command:
docker build -t demoproject:v1 .
- In this scenario,
docker buildis a command for creating an image of your app. You can explore your options by running the following command:
> docker build --help
- Proceed to specifying any tags after the image name and a colon. If you don't specify any tag, you would derive an default result. After the name and tag, we have to specify the path to look for Dockerfile using the following code:
> docker build [Option] [Path]
- We can also run an image in the container using the following command:
docker run -dp 3000:3000 demoproject:v1
- After executing the code, the container will have a random name. Use the following code if you also wish to specify the name for your container:
docker run -dp 3000:3000 --name mycontainer demoproject:v1
- This will create a container that exposes the port number 3000 on your
localhostso that you can access the application outside the container;-dpis a combination of two options (-dand-p).-dis used to run the container in detached mode, while-pis used to expose the container port. You can run containers by executing the following code:
docker ps
- Use the following code to stop a container:
docker stop mycontainer
- The containers will also need to be checked at regular intervals. Use the following code to achieve the desired result:
docker ps -a
Use the following code if you wish to remove a container:
docker rm mycontainerUse the code given below if you wish to list down the images:
docker images
- Use the following code to delete an image:
docker rmi [Image ID]
Kubernetes
Now that you have finished creating and running your container, you must know about its functionalities. When we create a production-ready application and deploy our code on servers, sometimes the code breaks down due to probable dependency or server issues because of which we need to deploy multiple app instances on the server to lower this downtime issue for users. But, this also can also lead to further problems as one app instance may take up more resources and others might crash due to that. Here comes Kubernetes to help us out!
Kubernetes is an orchestration tool that takes care of the containers running on the system. For instance, if one container goes down then Kubernetes will set up a new container according to the configuration to balance out the load because of which users don’t have to face downtime on their application. Kubernetes has its own components which help in managing these things, lets check them out as we proceed.
Pod
Docker containers run inside pods which are the smallest units amongst all of the Kubernetes components. The pod is an abstraction layer over the container because of which we don't have to interact with the container's technology. A pod runs inside a node which is basically a physical or virtual machine depending upon the cluster. Meanwhile, clusters are sets of nodes which run your containerised application. Whenever a node dies due to some issue, Kubernetes creates a new node with the same configuration. We may need to communicate with other containers in the case when the Backend talks to Frontend and vice-versa. Therefore, when we create pods, each pod gets an internal IP address through which they can communicate with each other.

But pods may die due to resource allocation and a new pod will be created to keep running the application. The new pod will get a new IP address as it is inconvenient to keep changing IP addresses each time a pod dies.
Service
A service, in Kubernetes, is basically a permanent IP address that gets associated with the pod. The lifecycle of services and pods are independent; for example, if a pod dies, then the service address will remain the same and will be associated with the new pod being created.
Deployment
Deployment represents a set of pods with no unique identities. Deployment runs multiple replicas of your application and automatically replaces any instances that fail or become unresponsive. In other words, a deployment is a management tool used to control the way pods behave.
Replica Sets
Replica sets are used to maintain the pods in node. Let's say you need five pods for your application, you don't necessarily have to create the five pods manually; instead, just mention the number of pods in the respective replica property. If any of the five pod dies, then the software will automatically create a new pod and will make sure that all of the pods are running properly.
Setting up Kubernetes locally
Kubectl is a command-line tool for Kubernetes to manage a cluster and the applications running inside it. You can take help from this link to start off with the installation process. Minikube is a tool that lets you run Kubernetes locally on your machine by letting it run single-node cluster for your development work. To create a cluster using minikube:
minikube start --driver=docker
- Use the following code to get to the next step and check out the status of your minikube:
minikube status
- Next, to stop the cluster from running for your application using the following code:
minikube stop
- The next step in the installation process is to list down all the pods in the component. Use the following code to do this:
kubectl get pods
- After this, list down the services being offered along with the deployments using the code given below:
kubectl get svc

kubectl get deployments
Creating a deployment
To create deployment first create a yaml file in the directory that specifies what type of deployment you want to create along with the name and other configurations.
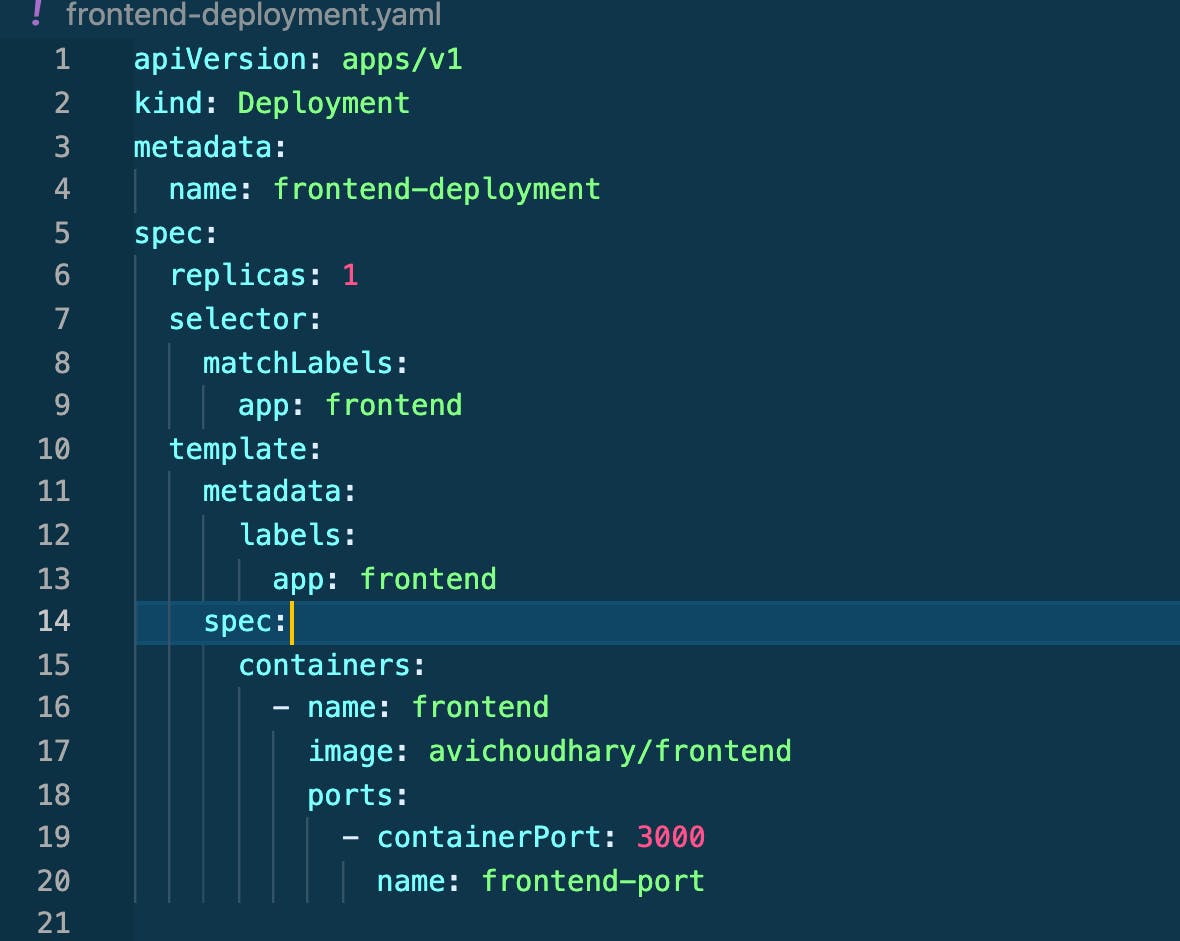
The above image shows the structure that you can follow to create a deployment file. To create a deployment, run the following command:
kubectl create -f frontend-deployment.yaml
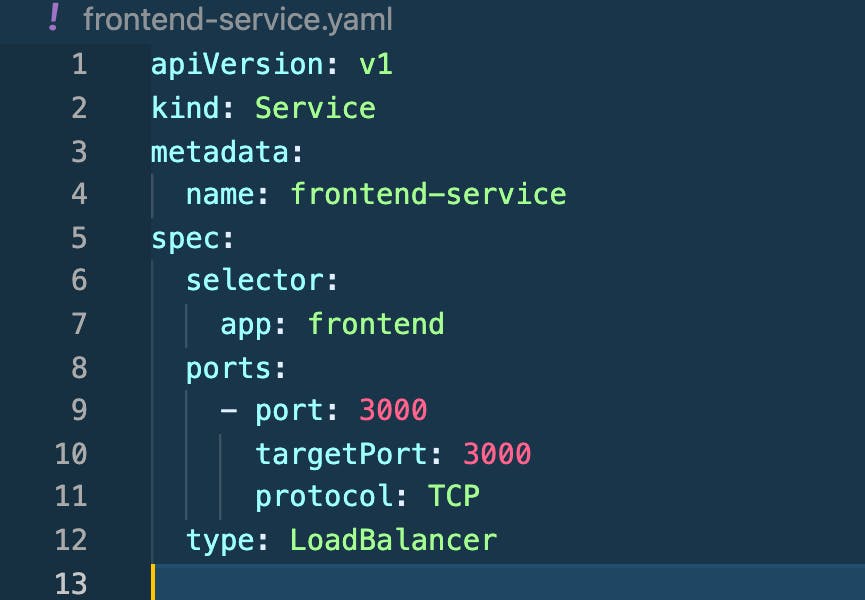
After execution, the deployment will be created and you can also check on its status using the get deployment command. Similar steps will be followed for creating services, i.e. you have to specify the configuration for a service in a ymal file and create it using the kubectl create command.
All this is done inside the cluster and these features of Kubernetes help in making sure make sure that an application is running properly without any issue as it allows for the scaling of applications in a very efficient manner.
Wrapping up
This wraps up our beginner's introduction for Docker and Kubernetes, both of which are very useful technologies that are going to stay in the market. The job market for these technologies is increasing day by day and learning these DevOps tools will enable you to produce great software which stands out. This article was just to give you a gist about the basics these tools. There is much more to explore about the topic which you can read about in the documentation.
Thank you for giving it a read, hope this will be helpful for you!
Ping me up here for any queries.