


This is the second part of the AWS Amplify for Flutter article series. To learn about Amplify and its initialization process, make your way through Part 1, which will also help you grasp a better understanding of this article.
DataStore Library
DataStore library is the latest addition to the Amplify serverless framework suite, which is an offline-first approach to create mobile and web apps. With DataStore, developers can add offline capabilities to their apps with just a few lines of code.
Amplify's DataStore will provide an on-device data storage service to read, write and observe data in online as well as offline mode and sync that data to a cloud database (DynamoDB) seamlessly. Data modeling in DataStore is done with GraphQL which creates models in the native language of your framework (JS, Java, Swift, Dart, etc.).
With DataStore, you can also create offline-only apps without an AWS account or without provisioning any backend service line like AWS AppSync or AWS DynamoDB. DataStore also includes Delta Sync and several auto conflict resolution strategies with GraphQL.
DataStore: Under The Hood
DataStore creates platform-specific model classes using the Amplify CLI command:
amplify codegen models.
This command starts with the GraphQL schema present in the Amplify directory and converts that scheme into model classes. Once models for the given schema are generated successfully, they are stored in project_root/models/{model_name}.{dart, js, java, etc..}. This model instance is then used with DataStore API to query, save, update, delete and observe changes in data.
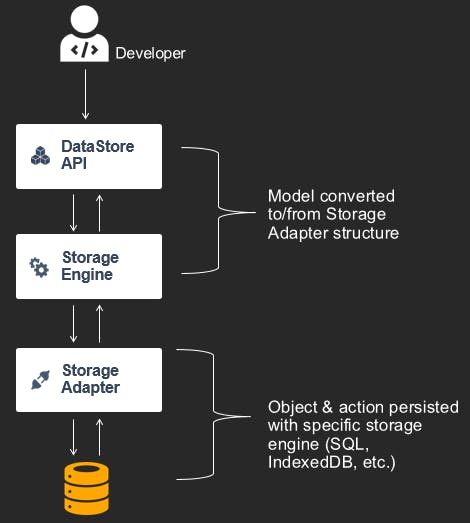
DataStore consists of a Storage Engine and a Storage Adaptor. The Storage Engine manages all the models created by the codegen command as well as system models which are used for metadata(settings) and queuing updates over the network when syncing with a remote database. The Storage Adaptor is an implementation of local database services like SQLite and IndexedDB.
DataStore uses an adaptor that is specific to framework language, like it uses IndexedDB for ReactJS and SQLite for Flutter & React Native.
Though note that these Adaptors are not highly specific to these local databases. In the future, other SQL or NoSQL adaptors can also be added via community contributions.
When a developer uses any DataStore API, it is the Storage Engine's responsibility to serialize and deserialize data corresponding to the adaptor (e.g. SQLite in Flutter) used in Storage Adaptor representation. This mostly includes conversion of GraphQL types to adaptor-specific datatypes (eg: Int to Int64) and vice-versa.
Syncing Data To Remote DB
If the developer prefers to use a remote DB, then Amplify CLI will use AWS AppSync with a GraphQL schema to create tables in DynamoDB. It also creates an additional table for Delta sync to keep versioning of data handy.
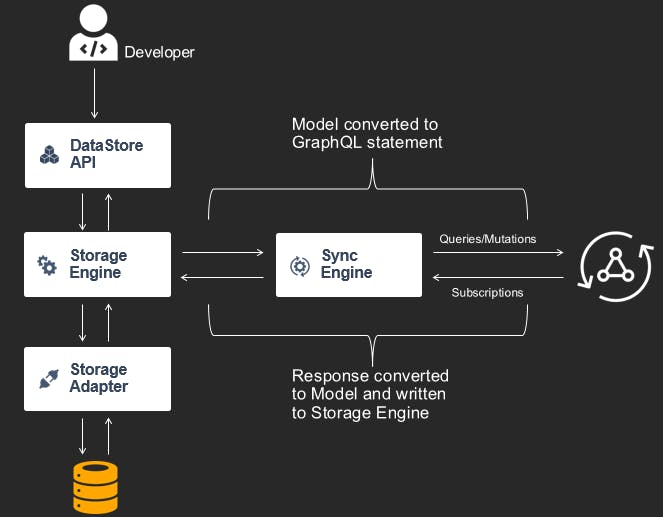
Once the Storage Engine has data, it calls the Sync Engine to sync that data with a remote database (if internet connectivity is available). The Sync Engine interfaces with the Storage Engine to get and publish updates with DynamoDB. Both the Sync Engine and Storage Engine use an observer pattern so that the Sync Engine publishes data whenever there is an update from the Storage Engine. This publication stream is subscribed by the Sync Engine as well as the DataStore API so that it can get real-time updates as well. Since DataStore API has subscribed with the publication stream, the developer knows when there is an update from the cloud by interacting with the DataStore API, and conversely, the Sync Engine knows when to communicate with Cloud and update data.
When the update comes from the Storage Engine to the Sync Engine, it converts that information from the Model repository to the GraphQL statement at runtime, which is later used by AWS AppSync. These generated GraphQL statements are used for Queries and Mutations. When the application is started for the first time, the Sync Engine will run GraphQL queries to hydrate the Storage Engine from the cloud using Base Query. After this, it will store the last sync time and from then on, when the device goes from offline mode to online mode, this last sync time will be used as an argument in Delta Query, so that this query will only return those changes that have been updated while the application was in offline mode.
By default, all the data is versioned by Sync Enabled Resolver in AWS AppSync using auto-increment counters. These counters cannot be updated by the client. Only server-side AppSync controllers can increment these counters. When new data is received by the Sync Engine from the Storage Engine, it checks the version counter with their local version counter. When there is an update from server-side, then AWS AppSync sends that data to the Storage Engine using the current version argument _version.
Integrating Amplify DataStore with Flutter
Prerequisites
- Install and Configure Amplify CLI (Read the first article of this series.)
Installing DataStore package
Add the following dependency in your pubspec.yaml file:
dependencies:
  flutter:
    sdk: flutter
  amplify_datastore: '<1.0.0'
Initializing & Provisioning AWS Resources
To use DataStore, first, the GraphQL API has to be added to your project. To do so, run the following command from your project root directory:
amplify add api

# for existing APIs
amplify update api
After running this command, CLI will ask you different questions as shown below:
When prompted to change
additional settings, chooseyesand then make sureconflict detectionis enabled. Conflict detection is required for the functioning of DataStore.
? Please select from one of the below-mentioned services:
    `GraphQL`
? Provide API name:
    `Flutter Demo app`
? Choose the default authorization type for the API
    `API key`
? Enter a description for the API key:
    `DemoAPIKey`
? After how many days from now the API key should expire (1-365):
    `365`
? Do you want to configure advanced settings for the GraphQL API
    `Yes, I want to make some additional changes.`
? Configure additional auth types?
    `No`
? Enable conflict detection?
    `Yes`
? Select the default resolution strategy
    `Auto Merge`
? Do you have an annotated GraphQL schema?
    `No`
? Choose a schema template
    `Single object with fields (e.g., “Todo” with ID, name, description)`
Data Persistence in DataStore
Since DataStore relies on platform-specific models, and to generate these models, Amplify requires GraphQL schemas. When DataStore is first initialized, a TODO app schema is already created in the amplify/backend/{api_name}/schema.graphql file. Now, there are two ways to create custom GraphQL schemas.
Editing
amplify/backend/{api_name}/schema.graphqldirectly and creating your desired schema.Using Amplify Admin UI and create your schema with GUI tools.
If you are using Admin UI to create your schema, then don't forget to run
amplify pullonce a schema is ready to fetch those updates inschema. graphql.
Code Generation Using CLI
Once, the schema is completed, Amplify CLI can be used to generate platform-specific models. In the project root directory, run the following command:
amplify codegen models
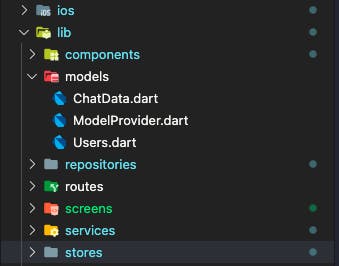
In case of Flutter, this command will create a
modelsfolder in./lib, which will have model class files for each schema.
Initializing DataStore in Flutter
To initialize any Amplify plugin, it has to be first registered in the Amplify.addPlugin() method.
Refer to the below code to initialize DataStore. This is explained more in-depth in the previous article.
import 'package:amplify_flutter/amplify.dart';
import 'package:amplify_datastore/amplify_datastore.dart';
import 'package:amplify_datastore_plugin_interface/amplify_datastore_plugin_interface.dart';

import 'amplifyconfiguration.dart';
import 'models/ModelProvider.dart';

class AmplifyDemoApp extends StatefulWidget {

    @override
    void initState() {
        super.initState();
        _configureAmplify();
    }

    void _configureAmplify() async {
        // Add the following line to add DataStore plugin to your app
        Amplify.addPlugin(AmplifyDataStore(modelProvider: ModelProvider.instance));

        try {
            await Amplify.configure(amplifyconfig);
        } on AmplifyAlreadyConfiguredException {
            print("Tried to reconfigure Amplify; this can occur when your app restarts on Android.");
        }
    }
}
ModelProvideris auto generated whenamplify codegen modelis executed.ModelProvideris required by DataStore for initialization.
CRUD operations on DataStore
Create
To write data to DataStore, pass the instance of the model in Amplify.DataStore.save():
Future addChatData({
    @required String message,
    @required String chatId,
    @required String senderId,
  }) async {
    Chatdata chat = Chatdata(
      createdAt: TemporalTimestamp.now(),
      updatedAt: TemporalTimestamp.now(),
      message: message,
      chatId: chatId,
      senderId: senderId,
    );
    await Amplify.DataStore.save(chat);
  }
Read / Query
In DataStore, queries are performed against the local store. Since the local store is always in sync with the cloud, you get accurate query results. To get all the rows, pass the classType variable from the specific model in Amplify.DataStore.query();:
Future<List<Chatdata>> getAllChatData() async {
    List<Chatdata> chatData = await Amplify.DataStore.query(Chatdata.classType);
    return chatData;
  }
Note that
Amplify.DataStore.query()will always return a list of models that are passed in.
Advanced Queries
Predicates can be used to query data from DataStore. Predicates act as a filter that matches data from the database. They're passed as arguments in the query() function.
Types of predicates:
Strings: eq | ne | le | lt | ge | gt | contains | notContains | beginsWith | between
Numbers: eq | ne | le | lt | ge | gt | between
Lists: contains | notContains
For example, if you want to fetch chats from a specific chatroom and then sort those results with respect to time, the query will look like this:
Future<List<Chatdata>> getChatData({@required String chatId}) async {
    List<Chatdata> chatData = await Amplify.DataStore.query(Chatdata.classType,
        where: Chatdata.CHATID.eq(chatId),
        sortBy: [Chatdata.CREATEDAT.descending()]);

    return chatData;
  }
Mulitple conditions can also be added by using
andandorin query arguments like this:
dart
List<Post> posts = await Amplify.DataStore.query(Post.classType,
    where: Post.RATING.eq(2).and(Post.STATUS.eq(PostStatus.PUBLISHED)));
dart
List<Post> posts = await Amplify.DataStore.query(Post.classType,
    where: Post.RATING.eq(2).or(Post.STATUS.eq(PostStatus.PUBLISHED)));
Pagination in DataStore
Pagination in DataStore can be implemented while performing a query. The query() function accepts a QueryPagination instance which requires a page parameter and an optional limit(starting at 0) parameter(default is 100).
List<Post> posts = await Amplify.DataStore.query(Post.classType,
    pagination: new QueryPagination(page:0, limit:100));
Update
Update query uses the same save() function. Amplify.DataStore.save() creates a new record in the database, but if the record already exists, then it updates that record. Refer the code below for examples:
dart
Future updateChats(String messageId, String updatedMessage) async {
    Chatdata messagedata = (await Amplify.DataStore.query(Chatdata.classType,
        where: Chatdata.ID.eq(messageId)))[0];
    await Amplify.DataStore.save(messagedata.copyWith(message: updatedMessage));
  }
To update, first fetch the item you want to update, then use this model in save query with copyWith() function to update the data in it.
Delete
To delete an item, simply pass the item you want to delete in the Amplify.DataStore.delete(); function:
Future deleteChats(List<String> messageIdList) async {
    for (String messageId in messageIdList) {
      Chatdata chatdata = (await Amplify.DataStore.query(Chatdata.classType,
          where: Chatdata.ID.eq(messageId)))[0];
      print("Deleting ==> ${chatdata.message}");
      await Amplify.DataStore.delete(chatdata);
    }
  }
Real time
Since DataStore uses GraphQL queries underneath, it can leverage Subscription from GraphQL to get updates in real-time. To achieve this, developers can subscribe to changes in each model.
Stream<SubscriptionEvent<Chatdata>> stream = Amplify.DataStore.observe(Chatdata.classType)
      ..listen(handleSubscription);

handleSubscription(SubscriptionEvent<Chatdata> event) async {
    if (event.eventType == EventType.delete) {
      print("Item to delete ==> ${event.item.toString()}" )
    } else if (event.eventType == EventType.update) {
      print("Item to update ==> ${event.item.toString()}" )
    } else if (event.eventType == EventType.create) {
      print("Item to create ==> ${event.item.toString()}" )
    }
  }
Clearing Local Data
There might be some cases where a developer wants to clear the local database and force fetch all the data via AppSync. Amplify.DataStore.clear() provides a way to do just this. Keep in mind that this is a destructive command but it will not affect remote data. When the next sync happens, AppSync will fetch the latest data from the remote database and repopulate the local database.
Make sure to call
Amplify.DataStore.clear()after every user logout.
Authorization Rules to Access Data from DataStore
Amplify DataStore gives developers few options through which they can restrict the access of create, update, read and delete operations on particular models.
Below is a high-level overview of authorization scenarios supported by Amplify:
Static Group Authorization - Only a specific group of users can access and make changes to that model.
Owner Based Authorization - This restricts the access to owners only and defines authorization rules for them.
Owner and Static Group Combined - Uses both Static Group Authorization and Owner Based Authorization to handle access control.
Public Authorization - This allows public access to that model type which is backed by an IAM user or API key.
Private Authorization - This allows any logged-in user to access that model which is backed by IAM and AWS Cognito User Pool.
These authorization rules can be implemented via the schema.graphql file. Below is an example of Owner and Static Group Combined authorization:
type YourModel @model @auth(rules: [{ allow: owner },
                                    { allow: groups, groups: ["Admin"]}]) {
...
}
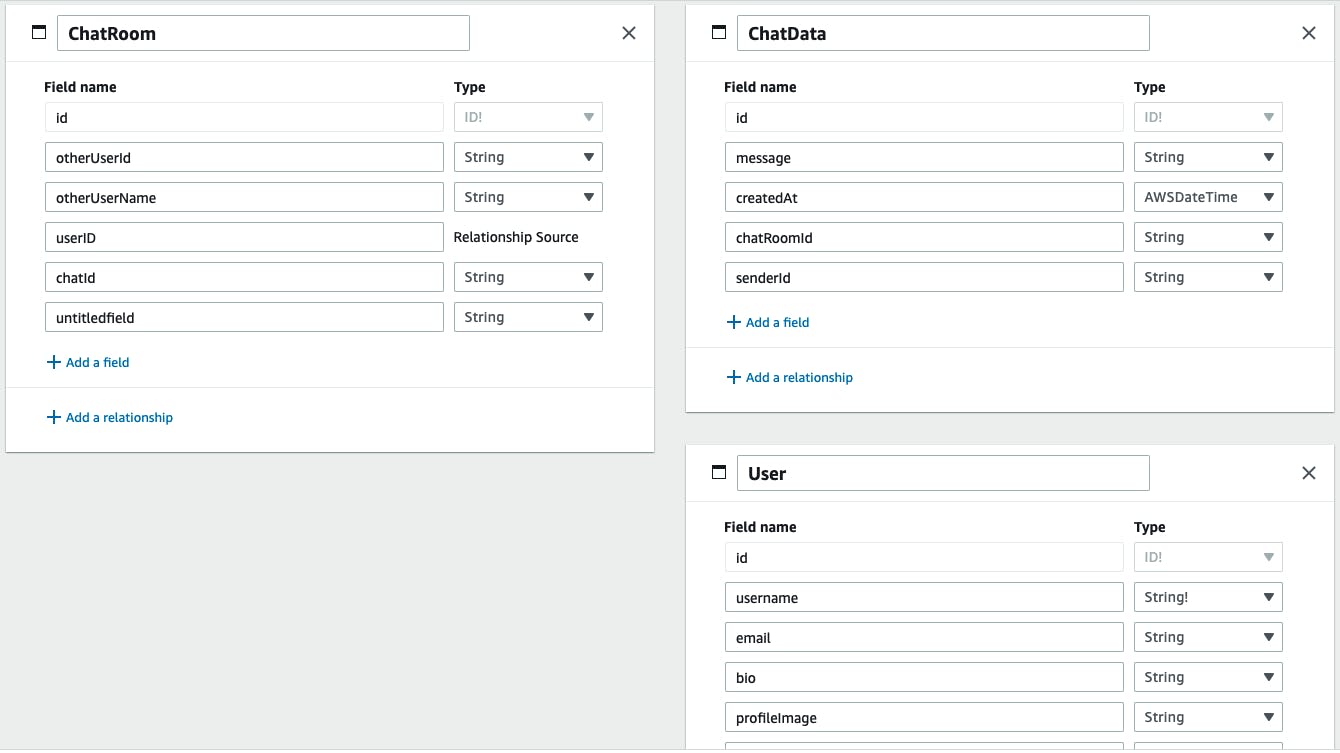
Updating Existing GraphQL Schema
If you want to update existing GraphQL schemas, first update amplify/backend/{api_name}/schema.graphql and then re-run amplify codegen models.
# Example
type ChatRoom
  @model
  @auth(rules: [{ allow: public }])
  @key(name: "byUser", fields: ["userID"]) {
  id: ID!
  otherUserId: String
  otherUserName: String
  userID: ID
  chatId: String
  untitledfield: String
}

type ChatData @model @auth(rules: [{ allow: public }]) {
  id: ID!
  message: String
  createdAt: AWSDateTime
  chatRoomId: String
  senderId: String
}

type User @model @auth(rules: [{ allow: public }]) {
  id: ID!
  username: String!
  email: String
  bio: String
  profileImage: String
  isVerified: Boolean
  createdAt: AWSDateTime
  chats: AWSJSON # ==> Updated field
  ChatRooms: [ChatRoom] @connection(keyName: "byUser", fields: ["id"])
}
This will first evaluate whether there are changes in the schema or not. If any changes are detected in the local schema, then it will create a versioned hash for it. If any such types are encountered while the app is running, then it will delete the local database data and do a full sync from AppSync.
Since these changes are made locally, AWS AppSync is not aware of them. To reflect these changes online, run amplify push to push these changes so that these updates can be then implemented in DynamoDB as well.
Demo App Using Amplify DataStore (Whatsapp Clone)
Source code is available here - https://github.com/GeekyAnts/flutter_amplify_datastore_demo
That's all for Amplify DataStore. Thank you so much for reading 😁. If you like this article, then please leave a 👍 and come say hi on Twitter.