

Improve Web App Performance Using Lighthouse
Learn how to improve your application's performance using Lighthouse tools in this concise guide


The performance of an application can be considered as the most important factor for starting or boosting one's business. Google flags a website as slow if the load time is greater than 3 seconds and the web application's performance goes up or down accordingly. A good web app is considered to have very low render time and data loading time. It should also offer better user engagement during load time along with a highly secure and compatible response UI
In this article you'll learn how to increase web app performance using Lighthouse tools.
Prerequisites:
Install Lighthouse with Webpack 4. It is compulsory to run your first Lighthouse performance check in the console of your app(Lighthouse tab) in the most optimised production environment. Take a record of the performance.
What is Lighthouse?
Lighthouse is an open-source tool that allows us to measure web performance with two main components. It gives a score from 0 to 100 based on your page's web performance along with a report with practical tips on how to improve your page's performance. An example of the report is shown below:
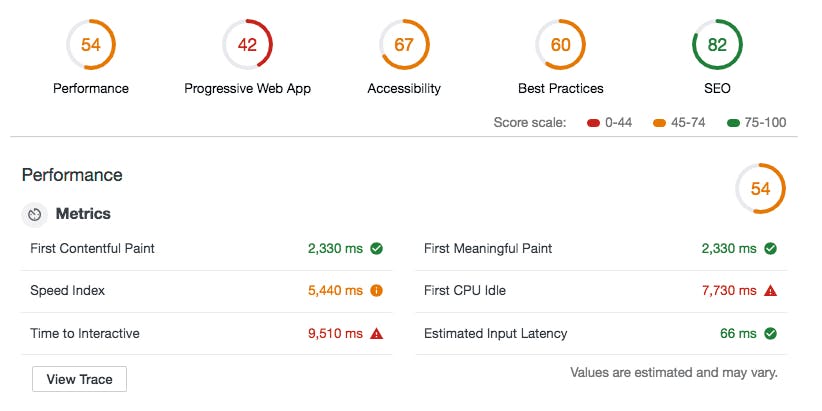
Some of the performance matrices shown are defined below :
- First Contentful Paint : Amount of time taken to render UI (text, images or graphs) for the first time (in Sec).
First Meaningful Paint : Amount of time taken to render complete Interactive UI (in Sec).
Speed Index : Amount of time taken to render the last UI component (in Sec).
First CPU Idle : Measures when a page is minimally interactive, or when the window is quiet enough to handle user input.
Time to Interactive : Amount of time taken for a page to become fully interactive (In sec).
- Estimated Input Latency : It is an estimate of how long your app takes to respond to user input during the busiest 5 second window of page load.
Optimization techniques used :
1. Using the most optimized and production build :
The size of the bundle.js can be considered as the most important factor of reducing the app’s load time. In order to get the most efficient bundle size, one should use the app in its production environment(comes with default compression plugin) rather than during development.
Add the React development tool to verify whether your current URL is using a production build or not.
For creating the most optimized build please refer here .
2. Using a powerful compression tool :
In this step, we have to use a most powerful and widely used compression tool (i.e, Gzip plugin) to proceed. The main motive of this is to compress the size of bundle.js and prepare compressed versions of the assets to serve them with content coding. Install using the command given below:
npm i compression-webpack-plugin
Then, add the plugin to your web pack configuration . For example, Webpack.config.js
const CompressionPlugin = require("compression-webpack-plugin");
module.exports = {
  plugins: [new CompressionPlugin()],
};
Next, run your webpack. For more info on Gzip , refer here. You can also consider using Brotli (developed by Google) here.
3. Using webpack-bundle-analyzer :
Now that we are done with assigning the bundle size, we need to analyze our internally-used libraries using webpack-bundle-analyzer. We can analyze our internal usage (size) in different components. For example, if using moment.js is taking a longer time, it can be replaced using newDate().
4. Remove unused JS using code splitting :
You never need to ship more code than necessary to your users, so split your bundles to make sure this never happens. The React.lazy method makes it easy to code-split a React application on a component level using dynamic imports. See how this is done using the code below:
import React, { lazy } from 'react';
const AvatarComponent = lazy(() => import('./AvatarComponent'));
const DetailsComponent = () => (
  <div>
    <AvatarComponent />
  </div>
)
A large React application will usually consist of many components, utility methods and third-party libraries. If an effort isn't made to try to load different parts of an application only when they're needed, a single bundle of JavaScript will be shipped to your users as soon as they load the first page. This can affect page performance significantly. The React.lazy function provides a built-in way to separate components in an application into separate chunks of JavaScript with very little legwork. You can then take care of loading states when you couple it with the suspense component.
You can handle loading failures using Suspense. Refer here to see how this is done.
5. Removing duplicates and redundant JS modules from the app :
In this step, you'll learn how to remove redundant JS modules from your app. JavaScript bundles on a majority of web pages which are typically built by importing code from popular libraries, dependencies, and packages. This can often result in your page inheriting duplicate modules from multiple sources. Removing duplicate modules in JavaScript bundles ensures you don't ship unnecessary JavaScript code to your visitors. The lower the JavaScript payload delivered, the faster the browser execution process when loading your page.
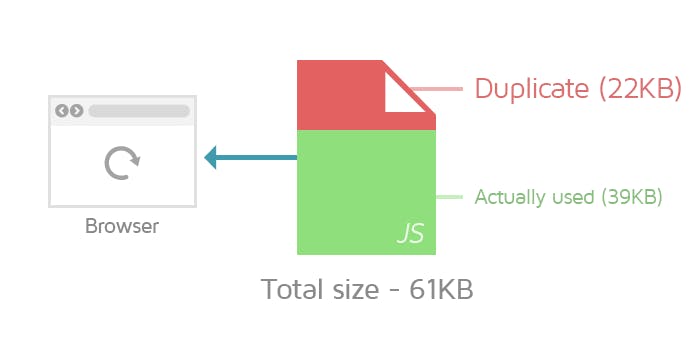 In the above scenario, page visitors will have to unnecessarily download more JJS code than required causing it to increase load time.
Polyfills and transforms enable legacy browsers to use new JavaScript features. However, this isn't necessary for modern browsers. For your bundled JavaScript, adopt a modern script deployment strategy using module/no module feature detection to reduce the amount of code shipped to modern browsers, while retaining support for legacy browsers.
6. Removing unused elements using efficient caching policy : We can remove unused and duplicate CSS, resize and compress the image. We can use a WebP form while setting elements to have explicit height/width for any UI component (to reduce layout shifts and improve CLS). Also, add caching wherever required as this increases the web browser's behaviour of storing static assets and network responses in temporary storage. This saves a lot of time and resources. Do not forget to hydrate and rehydrate storage whenever required (based on conditions).
Some small but important best practices than can improve the app's performance are:
Reducing large network payloads.
Reduce time spent on parsing, compiling and executing js wherever possible.
Using forms, Images (image size, alt, aspect ratio, etc.), CSS and related tags in the most efficient way as per their official documentations.
No use of HTTPS as it is linked to cross-origin destinations which use 3rd party FE libraries having no vulnerabilities.
Following the best coding practices.
Summary :
After performing all the aforementioned performance-reduction techniques correctly, we'll achieve a reduced bundle size and decreased speed index which would ultimately reduce the load time while increasing application performance. Lighthouse is an excellent tool that guides us to get through our application performance while decreasing the load time & tremendously enhancing the user’s experience to a large extent.
Hope this article helped you understand the topic better. Happy reading!