Introduction:
This article will explain the basics of the new Navigator API in Flutter, that is Navigator 2.0.
Table Of Contents:
- Gaps in Navigator 1.0.
- Requirements to bridge those gaps.
- Navigator 2.0.
- How does Navigator 2.0 work?
- Drawbacks Of Navigator 2.0
- Conclusion
Gaps In Navigator 1.0
- It is imperative: It follows the opposite of the declarative approach, which means that you have to define all the objects or the states in the widgets and the widgets will display whatever content you ask it to display. Moreover, if someone wants to remove some routes in the middle, doing so through an imperative approach wouldn't be very easy and modifying the imperative approach would not scale for a lot of use cases because usually, one API fits for a single use case.

- Access to the route stack: The route stack can not be accessed inside Navigator 1.0.
- Operating System Events: Navigator 1.0 does not have a good way of handling the operating system event. As an example. let's say a user presses the back key on Android and the developer has a
multiplenavigator. There is no good way to navigate through multiple routes. - Web Support: Navigator 1.0 does not have good web support, as the forward button does not work, the back button seldom works and if it is pressed too many times, the code breaks.
Requirements To Bridge Those Gaps.

In my opinion, two simple implementations can bridge the gaps that exist in the first iteration of Navigator:
In my opinion, two simple implementations can bridge the gaps that exist in the first iteration of Navigator:
- A Declarative model, that user can have access with and can modify the route stack freely, and...
- A systematic way to handle more operating system events.
Navigator 2.0
Navigator 2.0 is a declarative API which sets the history stack of the Navigator and has a Router widget to configure the Navigator based on app state and system events.
Navigator 2.0 has been deemed as 'complicated' by a lot of people, and rightfully so, owing to the massive boilerplate that it generates, but Navigation 2.0 actually makes life a lot easier and has a better implementation for the infamous 'Android back' button.
NOTE : The complete source code for the following article is present here
How does Navigator 2.0 work?
Navigator 2.0 consists of two APIs:
- Page API
- Router API
Page API
Page API is a new declarative API in the navigator widgets. It defines the routes and the pages that are used in the app.
The Navigator widget has two new arguments passed in its constructor :
pages(Page Class): It is a list of pages where each page essentially describes the configuration for a Route .onPopPage: A callback function for the imperativepop.
Page Class
A page creates a route that gets placed on the route stack. Each page takes a key so that when Navigator uses this page to update, it could differentiate between the pages. For instance: If the navigator already has an existing list and you give it a new list, then the associated key is used to decide if the page in the new list is corresponding to a certain page in the old list or not. Then, you can decide to update, pop, re-push or perform any action on it.
Hence, the navigator will be able to differentiate between pages.
Backwards Compatibility
You can use Page API and navigator push and pop at the same time as Page API is backwards compatible, which also means that you can use it with imperative API.
Define a global key for the NavigatorState and use it while building the Navigator.
final GlobalKey<NavigatorState> navigatorKey = GlobalKey<NavigatorState>();
Use the above Global Key in the Navigator constructor and provide the list of pages along with the routes of the application in the page class.
Navigator(
    key: navigatorKey,
    pages:  <Page<void>>[
        MaterialPage(key: ValueKey('home'), child: MyHomePage()),
        if (_myRoute ==  MyRoute.gallery)
        MaterialPage(key: ValueKey('gallery'), child: GalleryPage(_tab)),
        if (_myRoute ==  MyRoute.seeAll)
        MaterialPage(key: ValueKey('seeAll'), child: MyLinkPage()),
        if (_myRoute ==  MyRoute.more)
        MaterialPage(key: ValueKey('seeAll/more'), child: ContentDetail()),
    ],
    onPopPage: _handlePopPage,
)
OnPopPage:
Whenever you use the Page API, you must provide this callback in order to handle the imperative pop on the page based route (route created by Page API) and according to the result that we get after calling router.didPop(), we can update the page.
bool  _handlePopPage(Route<dynamic> route, dynamic result) {
    final  bool success = route.didPop(result);
    if (success) {
        _myRoute =  MyRoute.home;
        notifyListeners();
    }
    return success;
}
Router API
This is a new widget that handles the operating system events and can change the configuration of the Navigator in response to them. Furthermore, it wraps a Navigator and configures its current list of pages based on the current app state.
=> The operating system events that can be handled by the Router API include:
- Android back button intent.
- Operating system set initial route -> is usually called when there is deep linking in iOS or Android.
- Operating system push route -> is usually called when there is deep linking in iOS or Android.
- URL update(in web app).
=> When the user directly types the URL, it will send that request as a push route or send an initial route intent to the Flutter Framework.
=> The router usually builds a Navigator with the Page API. This is where Router API and Page API meet.
To wire up all the events, the router will take in these delegates:
-RouteInformationProvider: Serves as a bridge to send the route information between the operating system and the router. Sends route Information back and forth from the OS to router.
MyConfiguration is the structure class for the whole application, as below:
class MyConfiguration {
    const  MyConfiguration(this.myRoute, this.tab);
    final  MyRoute myRoute;
    final  int tab;
}
RouteInformationParser: It parses the route information provided by theRouteInformationProviderand will hand the configuration to the router delegate.
parseRouteInformation will convert the given route information into parsed data to pass to RouterDelegate.
class  MyRouteInformationParser extends RouteInformationParser<MyConfiguration> {
    @override
    Future<MyConfiguration> parseRouteInformation(RouteInformation routeInformation) async {
        final  String routeName = routeInformation.location;
        if (routeName ==  '/')
            return  MyConfiguration(MyRoute.home, routeInformation.state);
        else  if (routeName ==  '/gallery')
            return  MyConfiguration(MyRoute.gallery, routeInformation.state);
        else  if (routeName ==  '/seeAll')
            return  MyConfiguration(MyRoute.seeAll, routeInformation.state);
        else  if (routeName ==  '/seeAll/more')
            return  MyConfiguration(MyRoute.more, routeInformation.state);
        throw  'unknown';
    }
    @override
    RouteInformation  restoreRouteInformation(MyConfiguration configuration) {
        switch (configuration.myRoute) {
            case  MyRoute.home:
                return  RouteInformation(location:  '/', state: configuration.tab);
            case  MyRoute.gallery:
                return  RouteInformation(location:  '/gallery', state: configuration.tab);
            case  MyRoute.seeAll:
                return  RouteInformation(location:  '/seeAll', state: configuration.tab);
            case  MyRoute.more:
                return  RouteInformation(location:  '/seeAll/more', state: configuration.tab);
        }
        throw  'unknown';
    }
}
-BackButtonDispatcher: It propagates the android back button to the router of your choice. It uses ChildBackButtonDispatcher to propagate to the sub-routers.
RouterDelegate: It is the center place to handle all incoming operating system events. It includes the parsed result fromRouteInformationParseras well as the back button in turn from theBackButtonDispatcherand finally, it creates widgets mainly Navigator for the router subtree. setNewRoutePathis called by the Router when theRouter.routeInformationProviderreports that a new route has been pushed to the application by the operating system. class MyRouterDelegate extends RouterDelegate<MyConfiguration> with ChangeNotifier, PopNavigatorRouterDelegateMixin<MyConfiguration> { @override final GlobalKey<NavigatorState> navigatorKey = GlobalKey<NavigatorState>(); MyRoute get myRoute => _myRoute; MyRoute _myRoute; set myRoute(MyRoute value) { if (_myRoute == value) return; _myRoute = value; notifyListeners(); } int get tab => _tab; int _tab = 0; set tab(int value) { if (_tab == value) return; _tab = value; notifyListeners(); } @override Future<void> setNewRoutePath(MyConfiguration configuration) async { _myRoute = configuration.myRoute; _tab = configuration.tab ?? 0; } @override MyConfiguration get currentConfiguration => MyConfiguration(myRoute, tab); bool _handlePopPage(Route<dynamic> route, dynamic result) { final bool success = route.didPop(result); if (success) { _myRoute = MyRoute.home; notifyListeners(); } return success; } @override Widget build(BuildContext context) { return Navigator( key: navigatorKey, pages: <Page<void>>[ MaterialPage(key: ValueKey('home'), child: MyHomePage()), if (_myRoute == MyRoute.gallery) MaterialPage(key: ValueKey('gallery'), child: GalleryPage(_tab)), if (_myRoute == MyRoute.seeAll) MaterialPage(key: ValueKey('seeAll'), child: SeeAllPage()), if (_myRoute == MyRoute.more) MaterialPage(key: ValueKey('seeAll/more'), child: ContentDetail()), ], onPopPage: _handlePopPage, ); } }
Program Flow

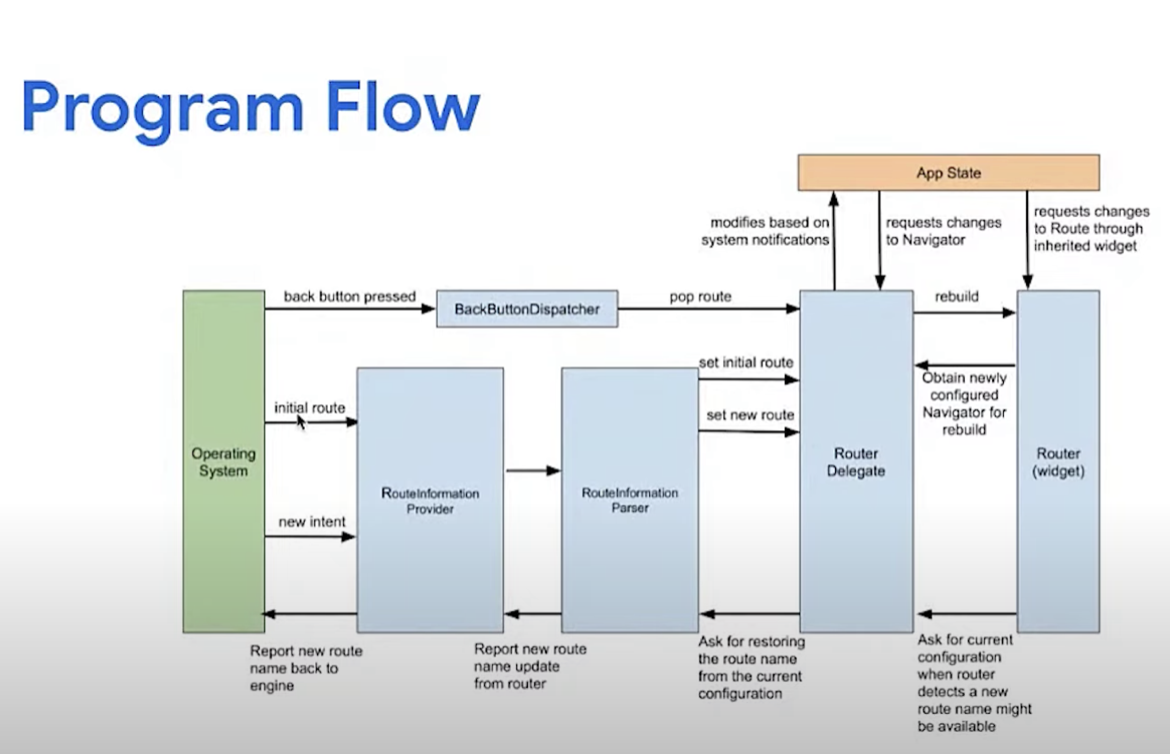
The Router widget basically wraps up all the four different delegates and wires all the arrows together. The first program flow is from the left-hand side. The operating system will send the initial route to the RouteInformationProvider, which will then hand that initial route to the RouteInformationParser to parse it. Once the RouteInformationParser parses a route, it will send the result to the RouterDelegate which will set the initial callback and then receive the parsed result. After that, it will configure itself and at some point, the router will ask the RouterDelegate to build a Navigator.
The second program flow also starts from the operating system on the left-hand side, and if you see the top most arrow, there's a backButtonPush that corresponds to the back button on Android. It will be captured by the BackButtonDispatcher and at this point, the RouterDelegate will receive this intent and then it will update itself. Then, the router will ask the RouterDelegate to build a new navigator for it.
The third program flow is a backward arrow all the way from the router widget back to the operating system. This program flow is for web applications, where the router wants to update the URL when it detects that the route information might have changed as a result of the router rebuild. So, whenever the router rebuilds, it will ask RouterDelegate about its current configuration, which will provide that configuration as feedback to the RouteInformationParser. It will restore that configuration back to route information and send it back to RouteInformationProvider, which will send that back to the operating system to perform the update.
Additional Tips:
Navigator 2.0 implements the router URL update methods:
RouterDelegate.currentConfiguration: Called by the Router when it detects a route information that may have changed as a result of rebuild. RouteInformationParser.restoreRouteInformation: Restores the route information from the given configuration. This may return null, in which case the browser history will not be updated. PlatformRouteInformationProvider: The browser will create entries whenever the URL changes. If you don't want that, useRouter.navigateorRouter.neglect.
All browser navigations will be sent to the Router through RouterDelegate.setNewRoute which is called by the Router when the Router.routeInformationProvider reports that a new route has been pushed to the application by the operating system.

Drawbacks Of Navigator 2.0
Since Navigator 2.0 is fairly recent, there sure are some drawbacks in it that are worth a mention:
- Firstly, it is quite complex and not very easy to grasp, like other Flutter concepts.
- It involves more boilerplate code as compared to its previous version.
Conclusion
Navigator 2.0 has indeed solved all the problems that existed in Navigator 1.0. It has majorly solved the multiple navigator routing issue in Flutter web and has also managed to handle the operating system events quite well.
Thank you so much for reading, I hope this article has broadened your horizon about Flutter Navigator 2.0 and prompted you to give it a shot. ❤️

