NFT Project Series Part 3: Build The Backend Server
Learn how to create a backend server in Supabase, Firebase, Mongo, and MySQL using Node.js and Express
Table of contents
- Installing Tools And Initializing Our Node App
- Creating A Simple Express Server
- Testing Our Simple Server Using ThunderClient REST API Extension
- Installing Mongo And Creating Mongo Linked Full Fledged Backend
- Installing MySQL And Sequelize And Creating MySQL Linked Full Fledged Backend
- Installing Firebase Client And Creating Firebase Linked Full Fledged Backend
- Installing Supabase And Creating Supabase Linked Full Fledged Backend
- Final Words
In the previous part of the series, we learned a few concepts of data communication and designed a simple data model for our app. In this article, we will write the code to build our app in the backend. And trust me, it's a lot of code!
Installing Tools And Initializing Our Node App
Let's start with installing our code editor VSCode.
- Once, that is installed, we open it and create a new folder named
nft-project-series. - Within that folder, we create another folder named
backend. - Yet inside that folder, we create another folder named
traditional.
Inside this traditional folder, we will initialize our node app by running:
npm init -y
If we get an error, it suggests that we don't have Node.js installed. Therefore, we need to install node.js LTS version. The latest, the better.
- Once installed, re-open your terminal or command prompt and run the above command again.
This will create a
package.jsonfile in your directory which we will edit in our code editor:
...
"scripts": {
    "start": "node server.js",
    "dev": "nodemon server.js"
  }
...
Here, we are editing the scripts part. Other parts can be left as they are. Once we have done that, we will save it and install express, dotenv, cors, and nodemon.
To do that, first run the following command:
npm install express dotenv cors
Then separately run the following command:
npm install -D nodemon
Once all of these are completed, we will have a package.json file as mentioned below:
{
  "name": "traditional",
  "version": "1.0.0",
  "main": "index.js",
  "license": "MIT",
  "scripts": {
    "start": "node server.js",
    "dev": "nodemon server.js"
  },
  "dependencies": {
    "cors": "^2.8.5",
    "dotenv": "^14.2.0",
    "express": "^4.17.2",
  },
  "devDependencies": {
    "nodemon": "^2.0.15"
  }
}
Note: We can create a
package.jsonfile manually inside a folder and paste the above content in it and then simply runnpm installto setup everything quickly. This is useful when we put our code in github or other version control where we don't upload bignode_modulesfiles but justpackage.json, so that other people can quickly install it in their systems.
Alright! At this point, you will have two files and one folder inside your traditional folder.
- Files:
package.jsonandpackage-lock.json - Folder:
node_modules
Creating A Simple Express Server
Let's begin creating our simple express server now. Inside the traditional folder, create a new file server.js. Inside it, write the following code:
require('dotenv').config();
const express = require('express');
const cors = require('cors');
const app = express();

app.use(cors());
app.use(express.json());

app.get('/nft', async (req, res) => {
  res.status(200).json({
    success: true,
    message: 'NFT read successfully!',
    data: [],
  });
});

app.post('/nft', async (req, res) => {
  return res.status(201).json({
    success: true,
    message: 'NFT creation successfully!',
    data: req.body,
  });
});

const port = process.env.PORT || 5000;
app.listen(port, () => {
  console.log(`Server is running on http://localhost:${port}`);
});
Let's go line by line:
require('dotenv').config();
Here, we are setting up dotenv package feature to read the values of constants and secrets defined in our .env file. This is used in getting the value of port at the bottom in line:
const port = process.env.PORT || 5000;
app.listen(port, () => {
  console.log(`Server is running on http://localhost:${port}`);
});
Any secrets, say SECRET_NAME for example, defined in .env file can be accessed using process.env.SECRET_NAME. So, create a new file .env and within that put this secret:
PORT=5000
In line 2, we are importing/requiring the express package. In line 3, we import cors package and finally, instantiate the express package in line 4, as follows:
const express = require('express');
const cors = require('cors');
const app = express();
After that, we use the middleware present inside the imported packages:
app.use(cors());
app.use(express.json());
CORS (Cross-origin resource sharing) is used to allow safe or whitelisted domain to interact with the API points.
Express JSON middleware is used to parse the incoming request body in JSON format for easy data play. Without this line, post request parameters won't be available in request body from the frontend to backend.
Finally, in the middle, we have API points defined:
app.get('/nft', async (req, res) => {
  res.status(200).json({
    success: true,
    message: 'NFT read successfully!',
    data: [],
  });
});

app.post('/nft', async (req, res) => {
  return res.status(201).json({
    success: true,
    message: 'NFT creation successfully!',
    data: req.body,
  });
});
We use app.get() to create a HTTP GET API Point and app.post() to create a HTTP POST API Point. The get API point is simply receiving the request and then sending back a STATUS 200 response with 3 data parameters, namely: success flag, message string, and data array.
The post API point is doing the same except that in data, it's sending back the same request body parameters it has received. The above express.json() middleware is used to read req.body parameters coming from frontend. Also, the STATUS 201 is what is sent in post response indicating a new entry has been created.
Testing Our Simple Server Using ThunderClient REST API Extension
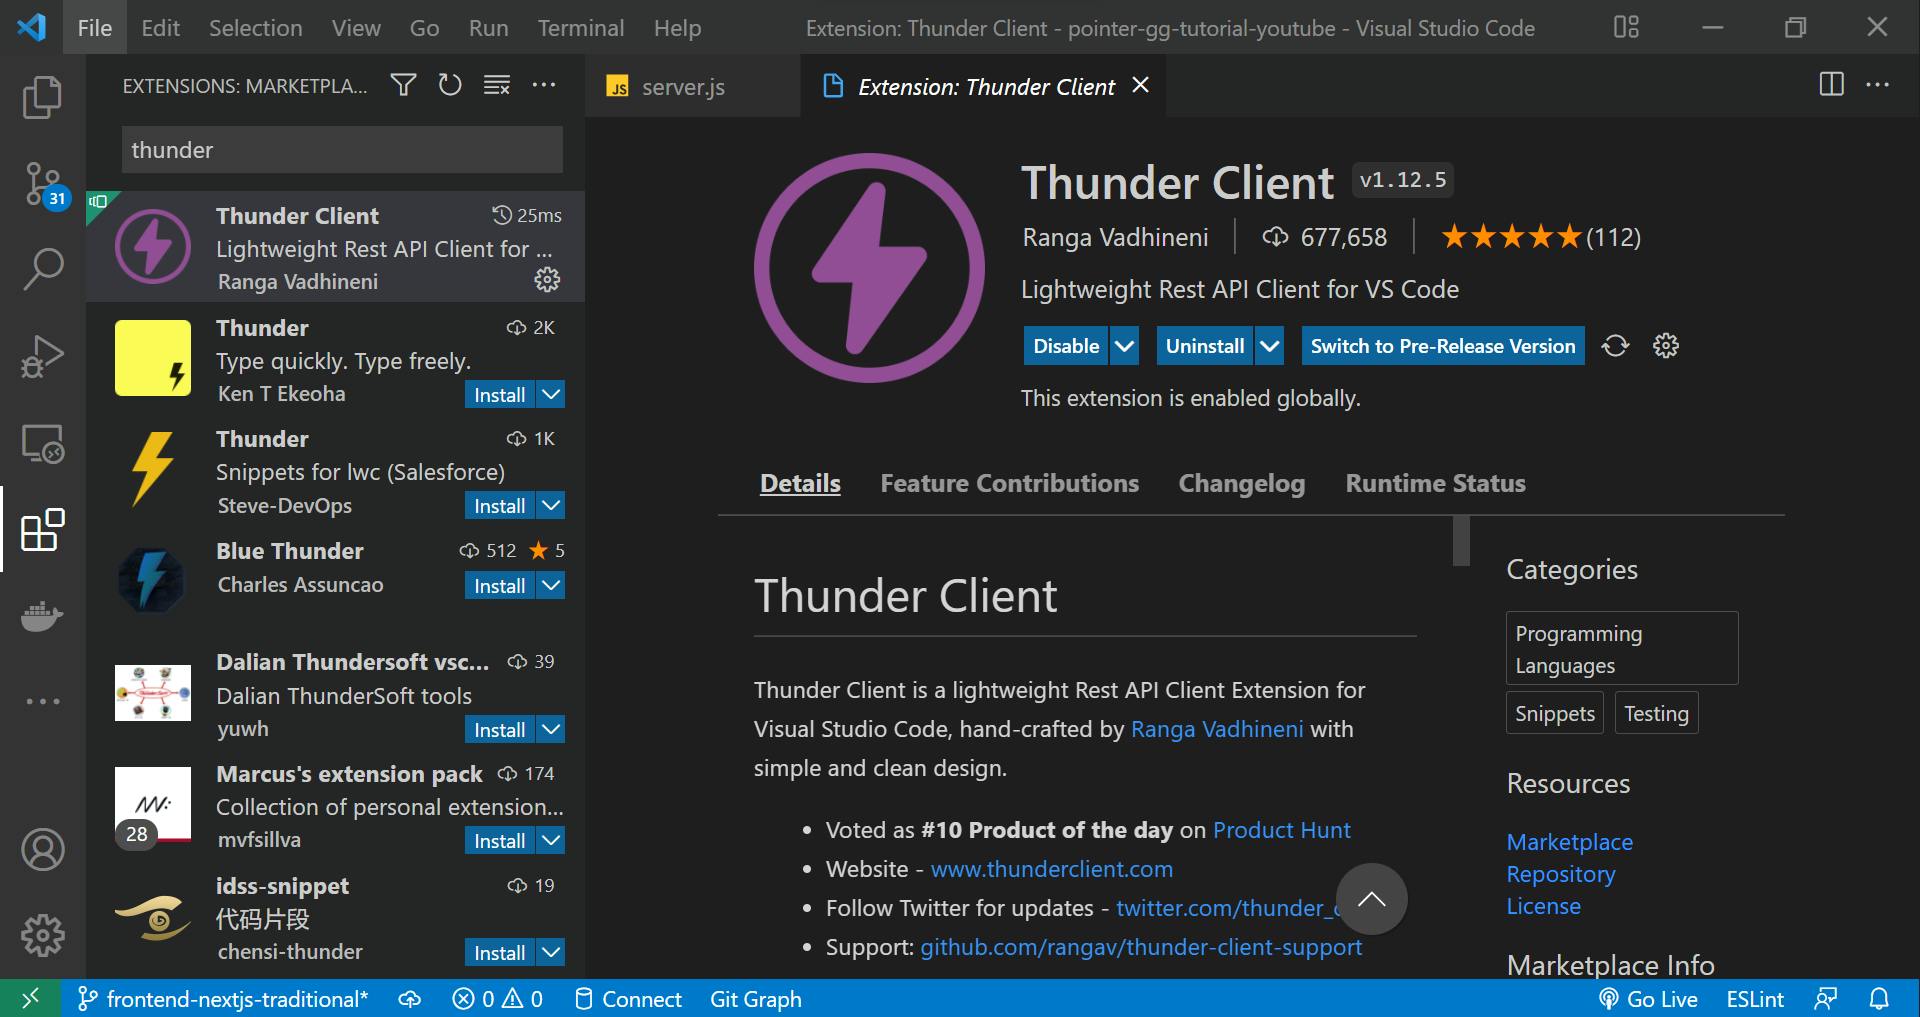 The first thing we need is the
 ThunderClient Extension shown in the above image. Once installed, we open the extension and go to the collections tab.
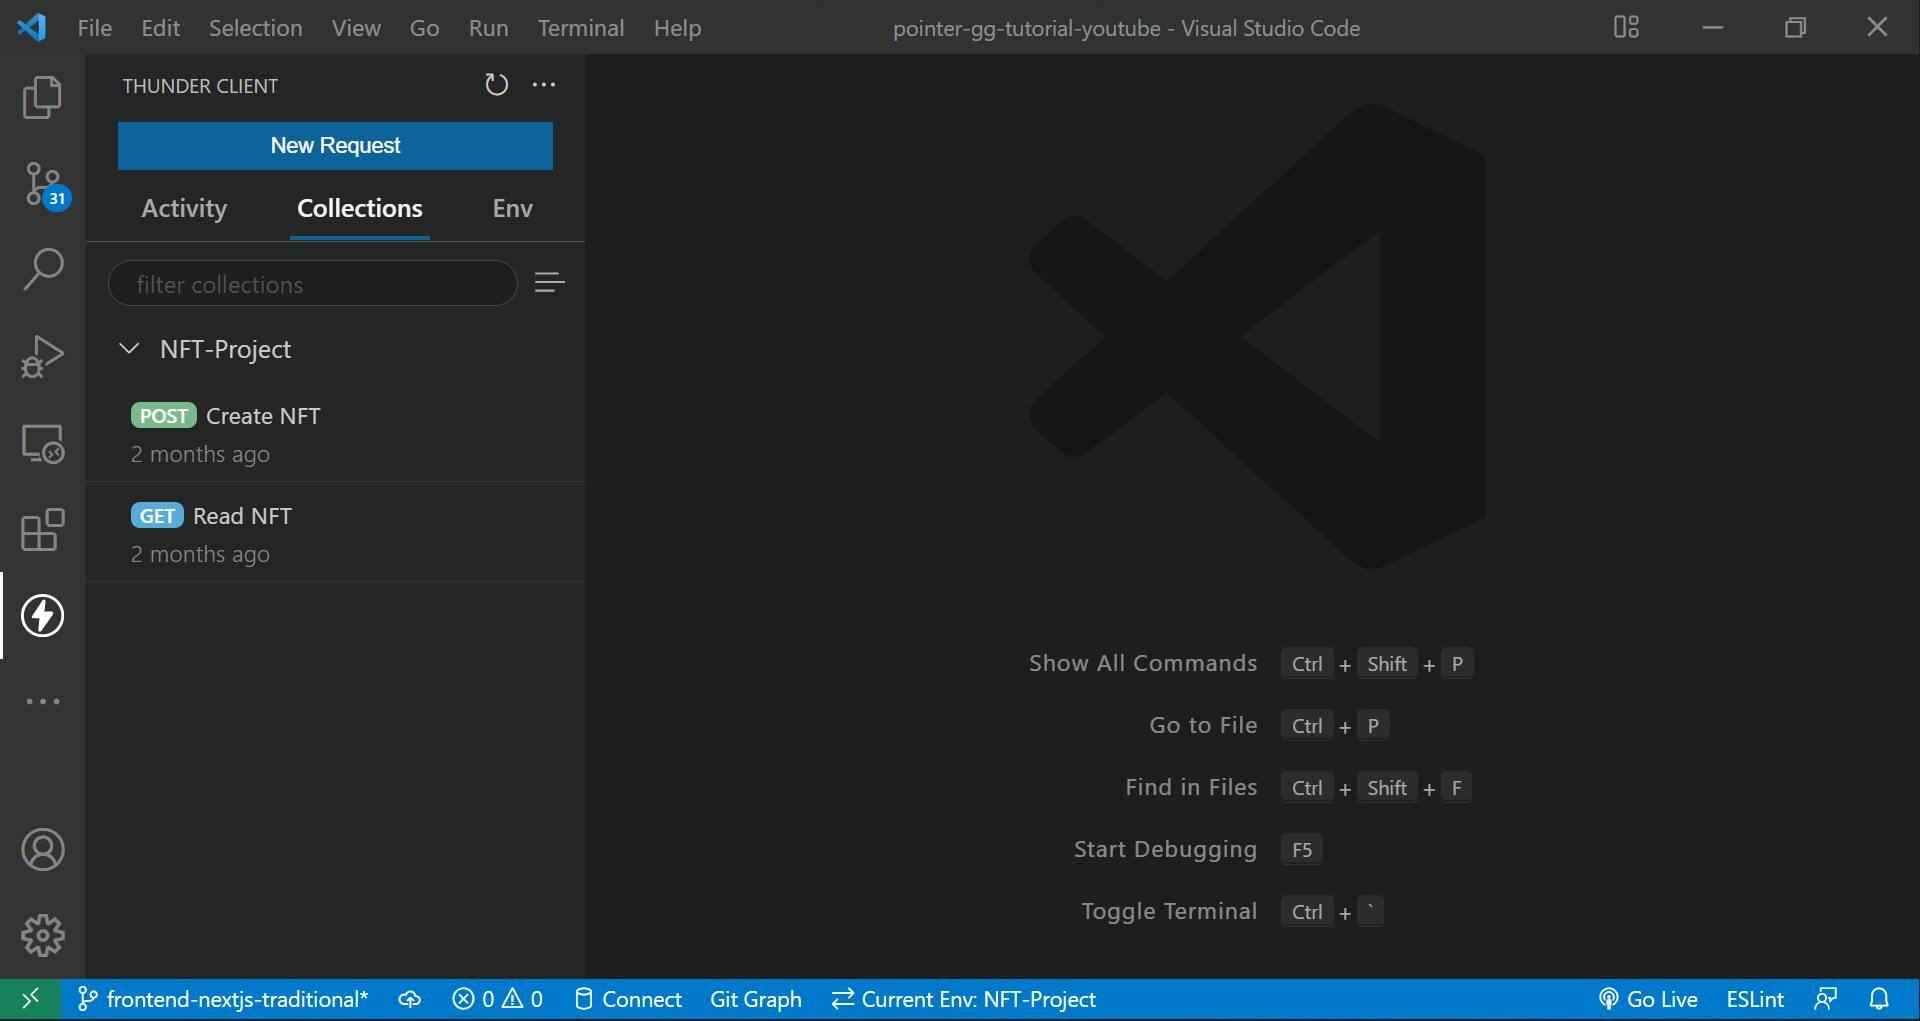
In the image, we see a collection named NFT-Project and then within that collection there are two requests: Read (GET) NFT and Create (POST) NFT.
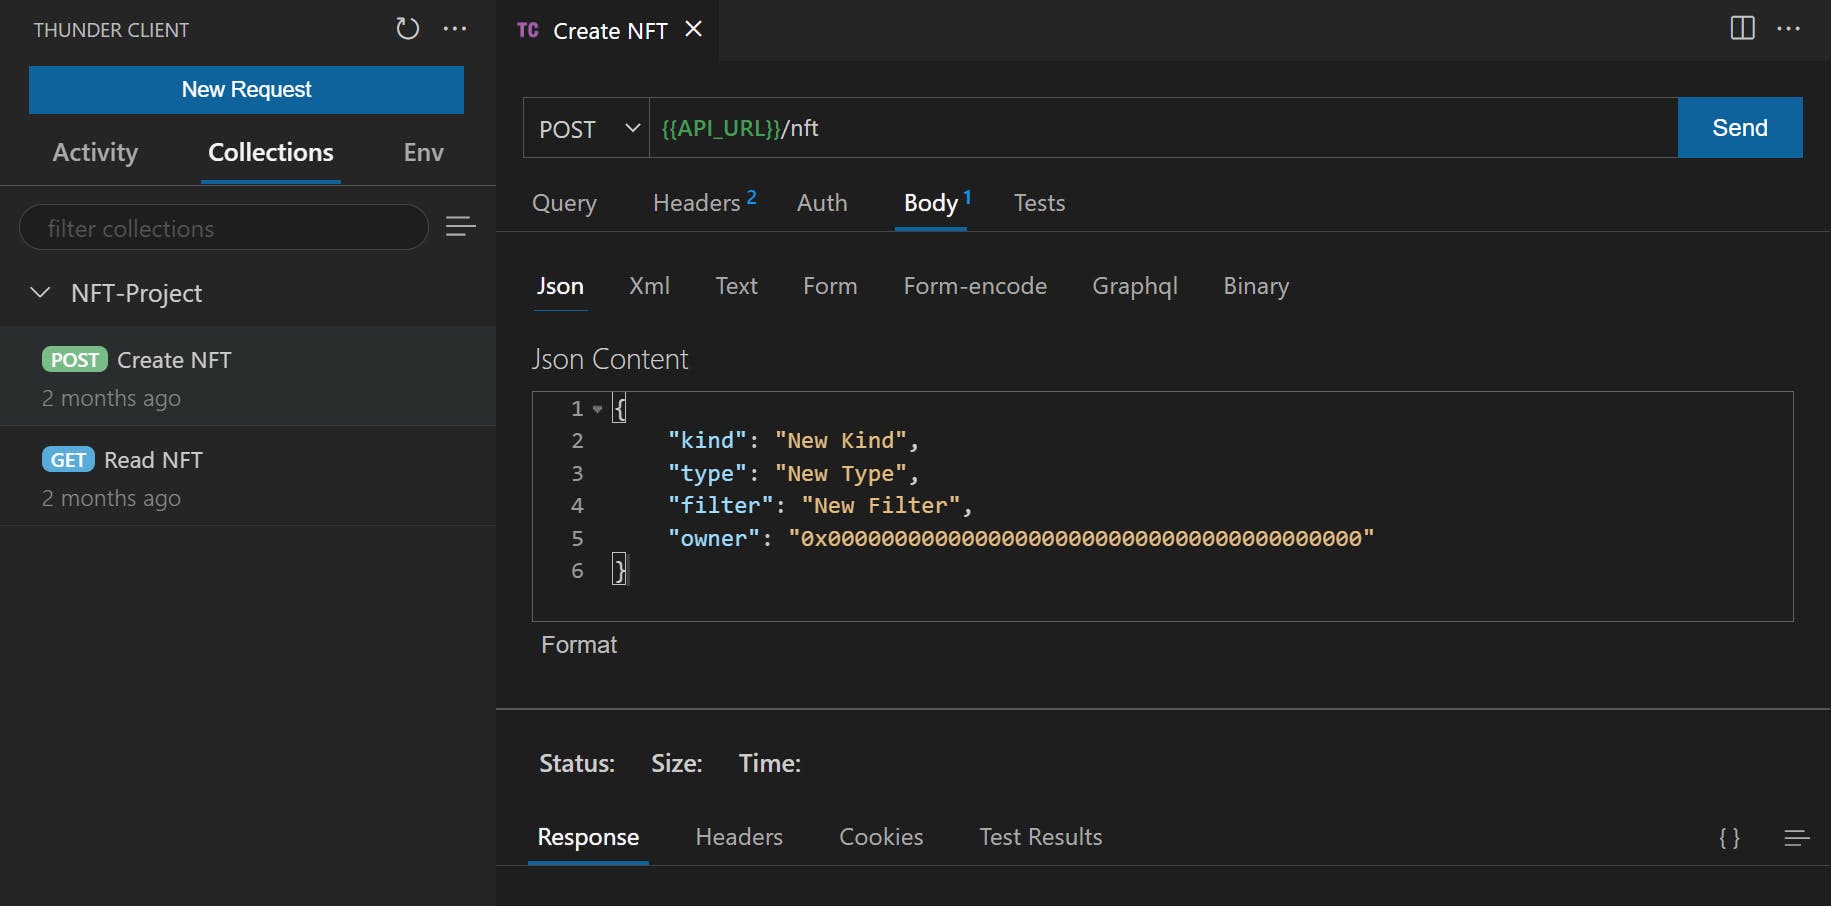
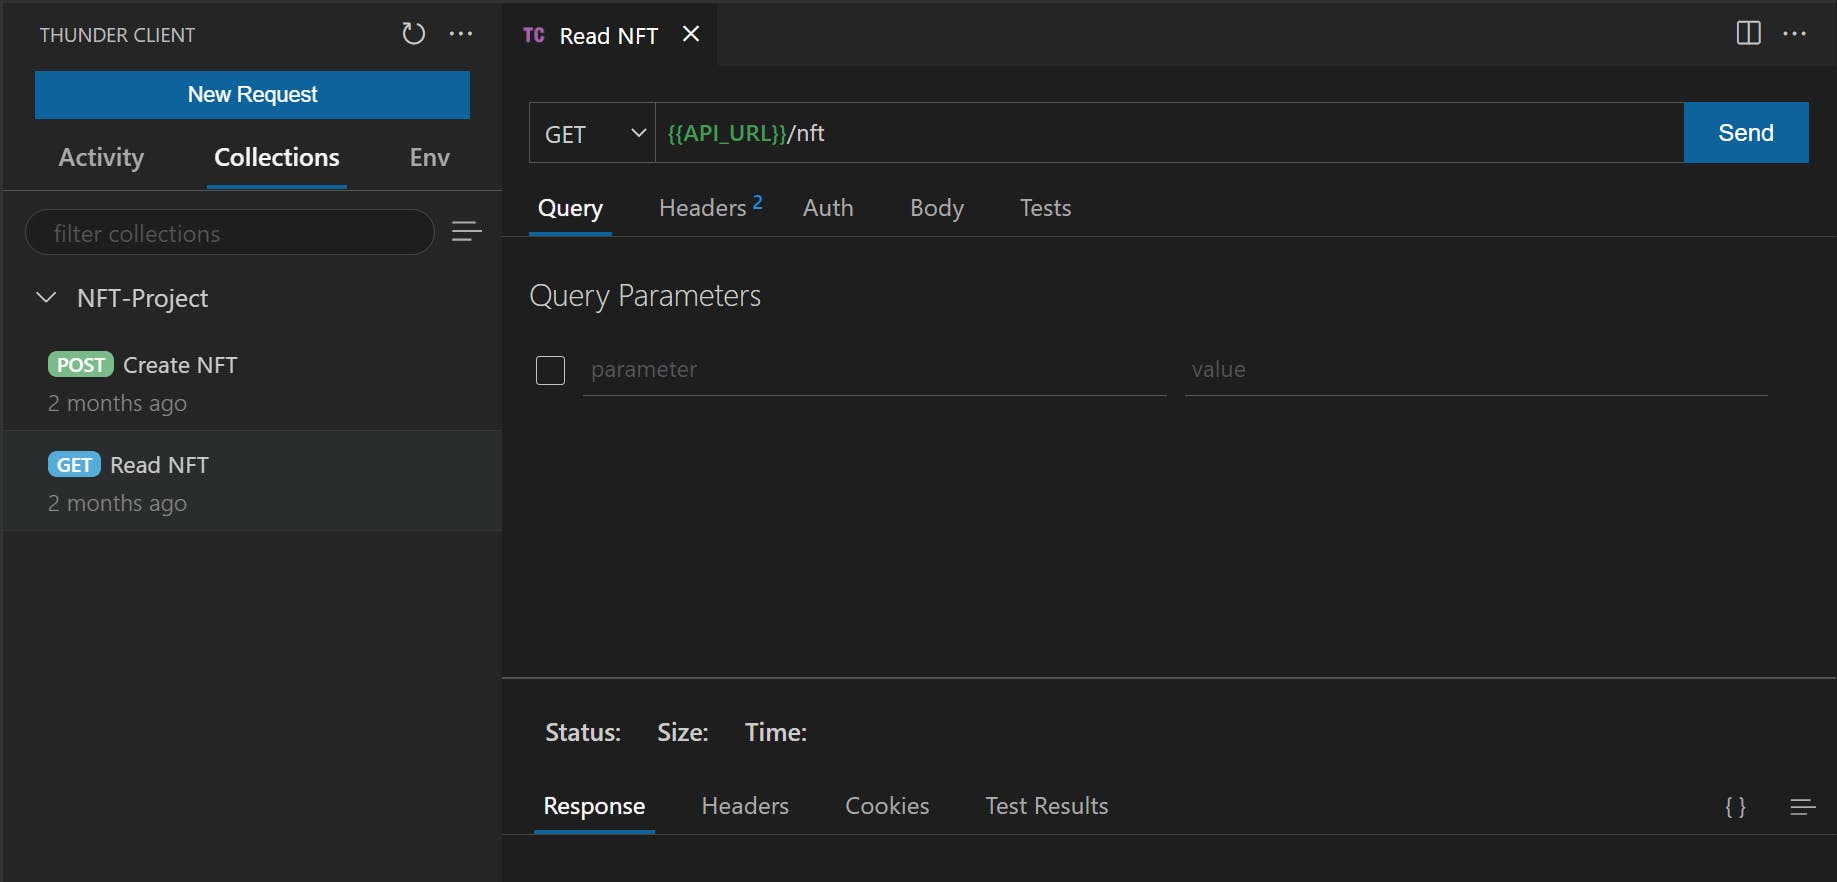
The API_URL in green is an Environment Variable. This can be set in the Environment tab of the extension.

You can also declare the environment in the .env file and then link it here. Alright, now everything is set and ready. We now open our terminal and run:
npm run dev
This command will start the nodemon server. Nodemon automatically re-runs whenever we do any changes in the code. Now, once it's running; go back to the REST Client and go to READ one and click SEND button. Do the same for CREATE one in another tab. Make sure to add the body in CREATE one as shown in the image above.

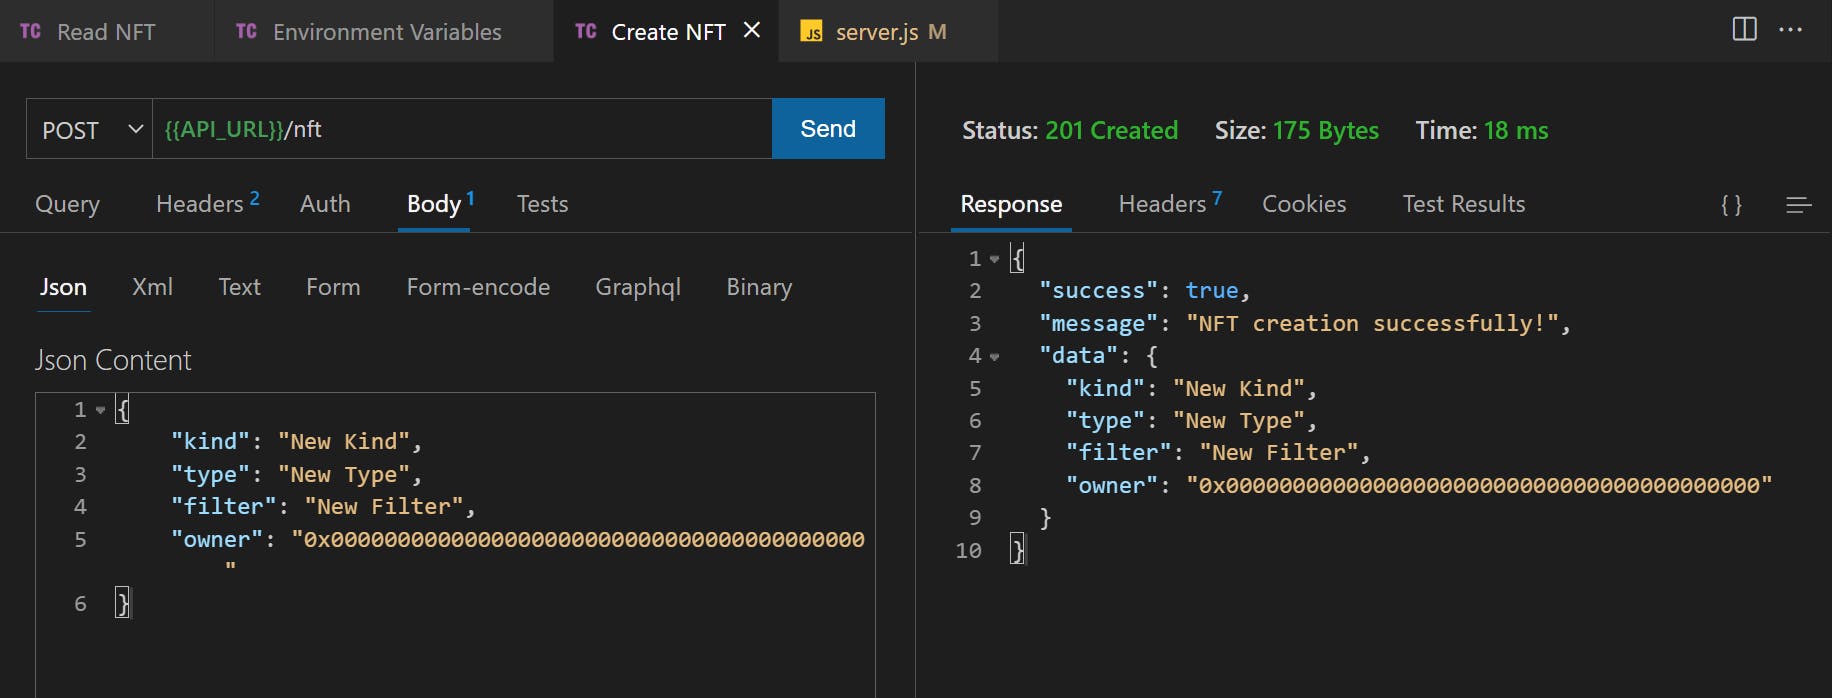
If everything was done correctly till this point, we will all see the same result as above.
Installing Mongo And Creating Mongo Linked Full Fledged Backend
Everyone here still? Cool! Let's start with installing mongoose in our project to work with MongoDB. Also, if you don't have MongoDB Atlas (FREE) Account already, please visit Mongo Cloud and create a new account. Then setup a new cluster FREE TIER in AWS and finally a Database. Watch this video to know the steps if it's not clear. I found it on youtube.
Moving on to the installation of mongoose, in terminal run:
npm install mongoose
Then, in our traditional folder, create 2 new folders: lib and utils.
With the utils folder, create 2 files: nfts.js and log.js.
Inside lib, create a new file: db.js.
In the log.js file we have:
const Log = console.log; // in production -> should be changed to something like winston

function log(message, filepath) {
  Log(`${new Date()} : ${filepath} : ${message}`);
}

module.exports = log;
Basically, we are just defining a log function which takes message and a file path and then log it out. This Log here is taken as console.log but in production app, must be replaced with something like Winston Logger. We are then exporting this log to be used outside of this file.
Then, we go to our nft.js file and write:
const log = require('./log');
const DB = require('../lib/db');

async function createNFT(kind, type, filter, owner) {
  const entryObject = {
    ownerAddress: owner,
    keyboardKind: kind,
    keyboardType: type,
    keyboardFilter: filter,
  };
  try {
    const data = await DB.create(entryObject);
    log(data, __filename);
    return data;
  } catch (err) {
    log(err, __filename);
    return err;
  }
}

async function readNFT() {
  try {
    const data = await DB.read();
    log(JSON.stringify(data), __filename);
    return data;
  } catch (err) {
    log(err, __filename);
    return err;
  }
}

module.exports = { createNFT, readNFT };
The code is pretty straightforward in itself. We are creating two functions of async type as we use await feature within both to retrieve or store data in our database. Finally, we are exporting our functions from this file. The thing to note here is the DB object. Notice that in this file, we are not writing database interaction code directly. This is the key technique here which will help us switch databases later efficiently.
For now, we assume that this DB object has 2 methods: read() and create(obj). What we are doing here is pure abstraction. We don't care what logic read() and create() has within and this part of the code shouldn't care about the database business logic either. This part of the code deals with data manipulation side of business logic in our app, not with database end of things.
Cool, before going to the db.js file, let's change some code in server.js file.
We first import/require our 2 functions from nft.js file:
const { readNFT, createNFT } = require('./utils/nft');
Then, we change our API methods code. For read(), we have:
app.get('/nft', async (req, res) => {
  try {
    const nfts = await readNFT();
    if (!Array.isArray(nfts)) {
      throw Error(nfts);
    }
    res.status(200).json({
      success: true,
      data: nfts,
    });
  } catch (error) {
    res.status(404).json({
      success: false,
      message: error.message,
    });
  }
});
Notice that we have async in the callback function as we are using await inside the function. In this, we wait for readNFT() to finish executing, which is basically reading data from database. We then check if it's an array or not. If not an array, we throw an error. The way this part is designed is that it either gives an array filled with objects in nfts variable or it gives an error message object. This is by design.
Another method of designing is "Design with Intent" where we write our code with intent - meaning we know what we are going to supply to a variable and we know it will always come exactly that way. This reduces useless error checks and improves maintainability. But we won't be doing it here as that requires enough practice to not mess up in real life. Moving on, if we find the nfts perfectly, we send it back with STATUS 200 to the client.
And for create(), we have:
app.post('/nft', async (req, res) => {
  const { kind, type, filter, owner } = req.body;
  try {
    const createdNFT = await createNFT(kind, type, filter, owner);
    if (Object.keys(createdNFT).length > 0 && createdNFT.data) {
      return res.status(201).json({
        success: true,
        message: 'NFT creation successful',
        data: createdNFT.data,
      });
    }
  } catch (error) {
    res.status(404).json({
      success: false,
      message: error.message,
    });
  }
});
The same philosophy is at play here. We destructure the request body, and then pass these as arguments to the function parameters in createNFT(). By design, it returns an Object and contains data key within itself. We check if these two are present and then send the success response back. If there is an error, we send error response back. Notice the success flag in both read and create. This is the differentiating variable which will help us check or play with UI States in the frontend later.
Finally, let's come to the db.js file. The first thing we do is require a mongoose and connect to our MongoDB instance:
require('dotenv').config();
const mongoose = require('mongoose');

mongoose.connect(
  process.env.MONGO_URI,
  () => {
    console.log('MongoDB Connected Successfully');
  },
  (err) => {
    console.error(err.message);
  }
);
Here, process.env.MONGO_URI contains the MONGO_URI string which we can get from the MongoDB Atlas. The video above will show you that string. You can paste it inside .env file and then use it here. Remember to restart the server after editing .env file. Sometimes, it doesn't load up new variables. Once this is setup, we will see "MongoDB Connected Successfully" printed on the console.
Then, we create our create() and read() functions in this. But before that, we need to create a schema and then a model instance from that schema. See, mongoose is an ORM which means it helps us create documents or collections in the MongoDB on the go. So, let's create a schema and a model:
const nftSchema = new mongoose.Schema(
  {
    ownerAddress: { type: String, required: true },
    keyboardKind: { type: String, required: true },
    keyboardType: { type: String, required: true },
    keyboardFilter: { type: String, required: true },
  },
  {
    timestamps: true,
  }
);

const NFT = mongoose.model('NFT', nftSchema);
mongoose.Schema() takes 2 parameters in our case, both objects. The first object is the schema object. Notice that it is similar to our data model design in the last part. We have marked all fields as required, meaning they must be present and their type is that of String - they can store any string formatted data. The second object mentions timestamps which automatically adds createdAt and updatedAt fields in our DB.
mongoose.model('name', schema) takes a Singular name and the declared schema associated with that name in our db. Look at the image below first:
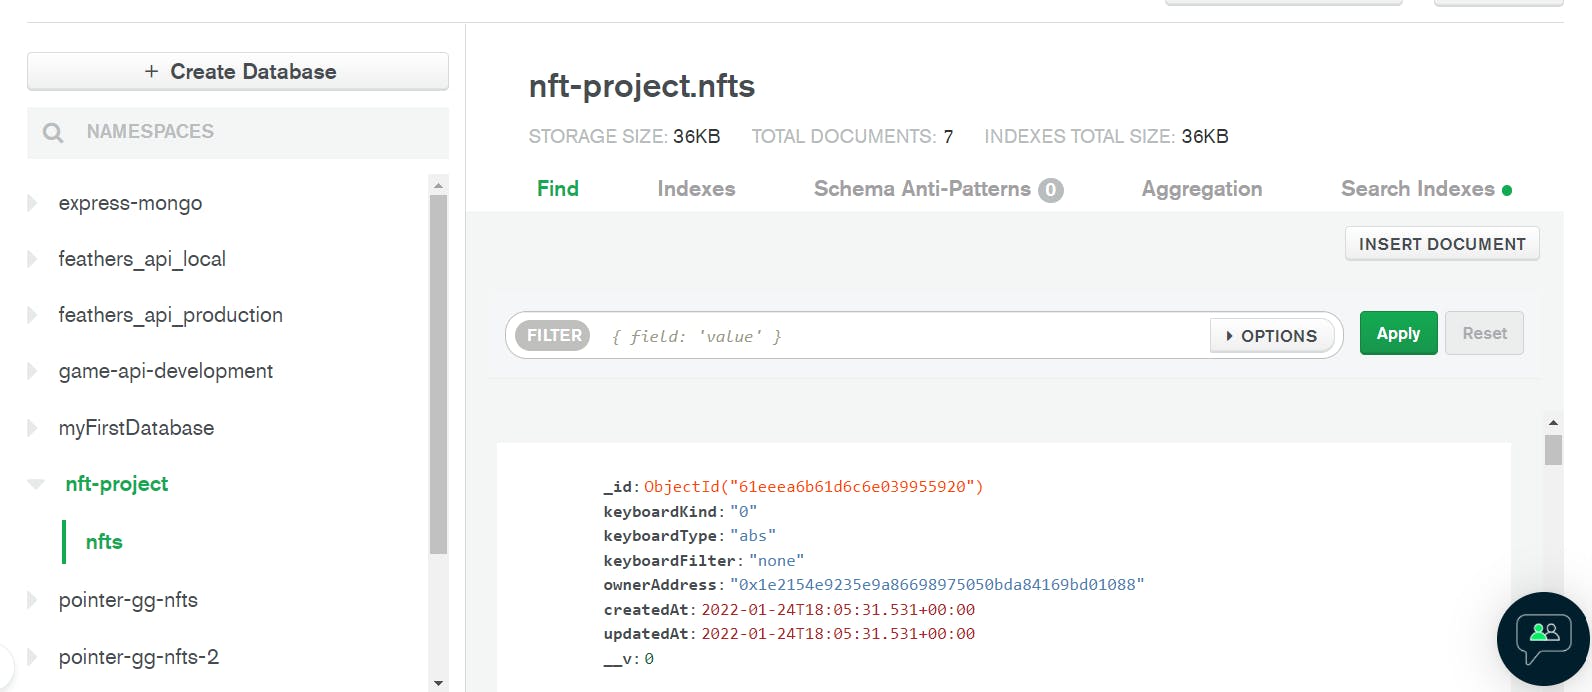
Alright, the NFT-project is something we supplied in the URI string:
MONGO_URI='.../mongodb.net/**nft-project**?retryWrites=true&w=majority'
nfts within it is the plural of the 'name' we gave in singular within the model above. And the document data structure is defined by the schema we provided.
Finally comes 2 methods:
async function read() {
  try {
    const data = await NFT.find({});
    console.log('NFTs:::', data);
    return data;
  } catch (err) {
    console.log(err);
    return 'Something went wrong in fetching the NFTs';
  }
}

async function create(nft) {
  try {
    const data = await NFT.create(nft);
    return { data };
  } catch (err) {
    console.log(err.message);
    return 'NFT creation failed';
  }
}

module.exports.create = create;
module.exports.read = read;
For read, we use NFT model instance and use find() method to get all the data within the nfts collection. Then, we also have create(obj) method which is used to create new document within the nfts collection. Notice how, by design, we return an object containing data: {data}; inside the create and how we return an array of object in the read function. It is this design design that we use in error handling in the server.js file. Finally, we export it to be used in the nft.js file.
Now, time to test it out using our ThunderClient:
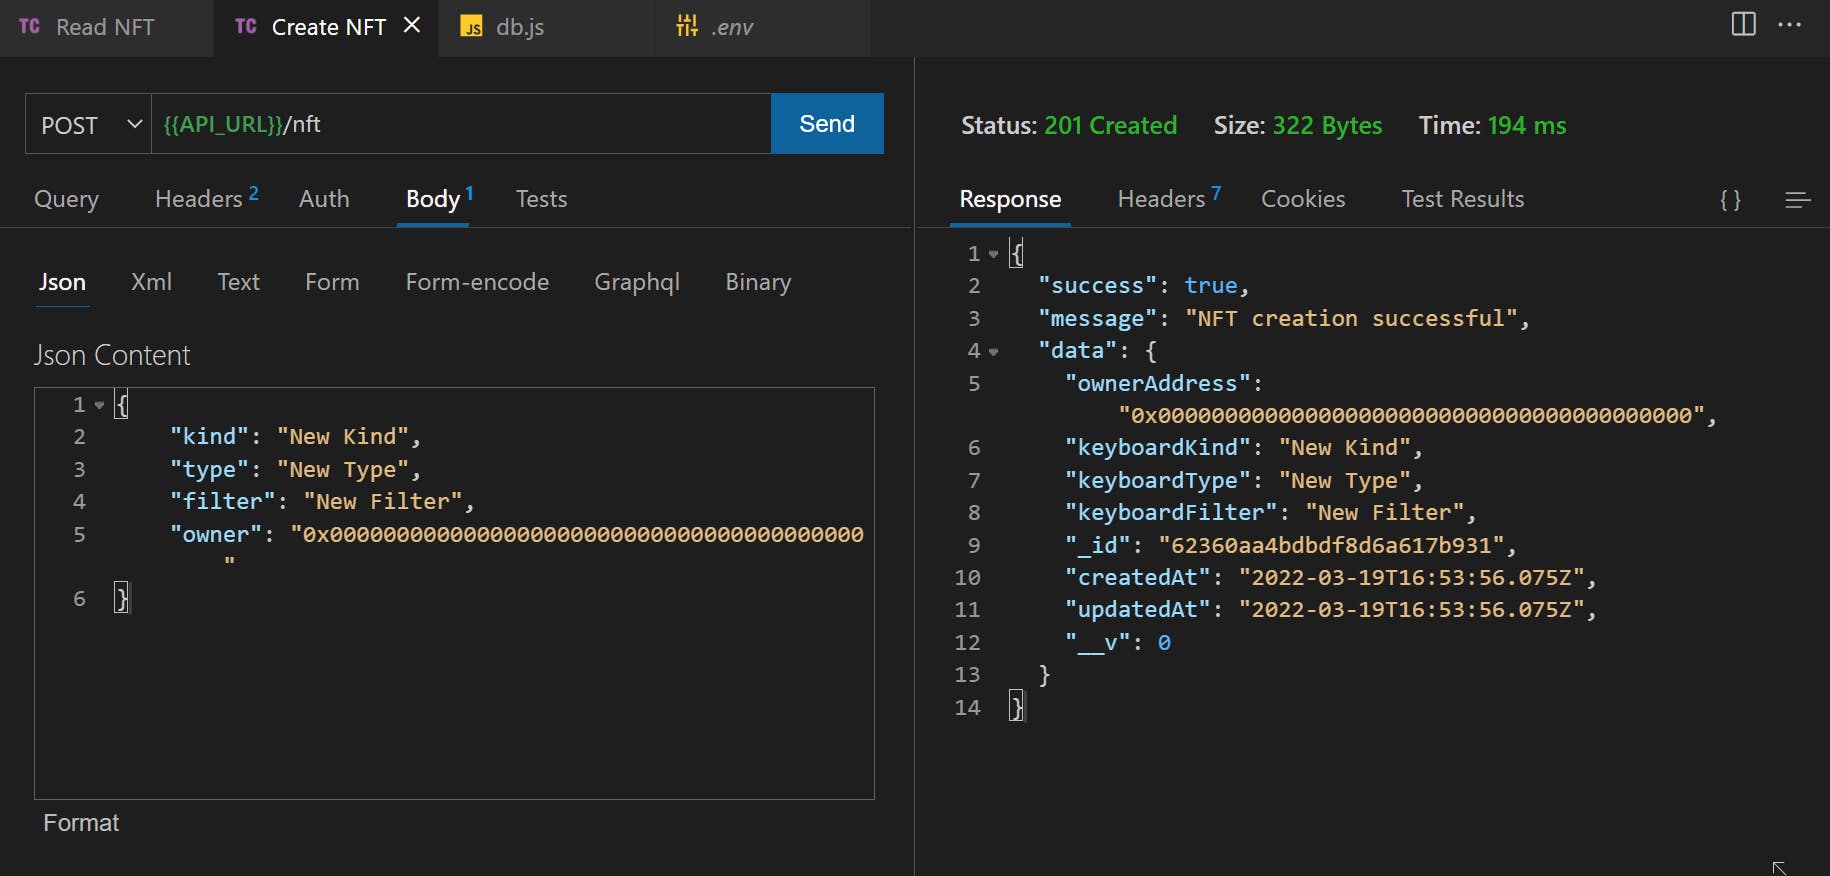
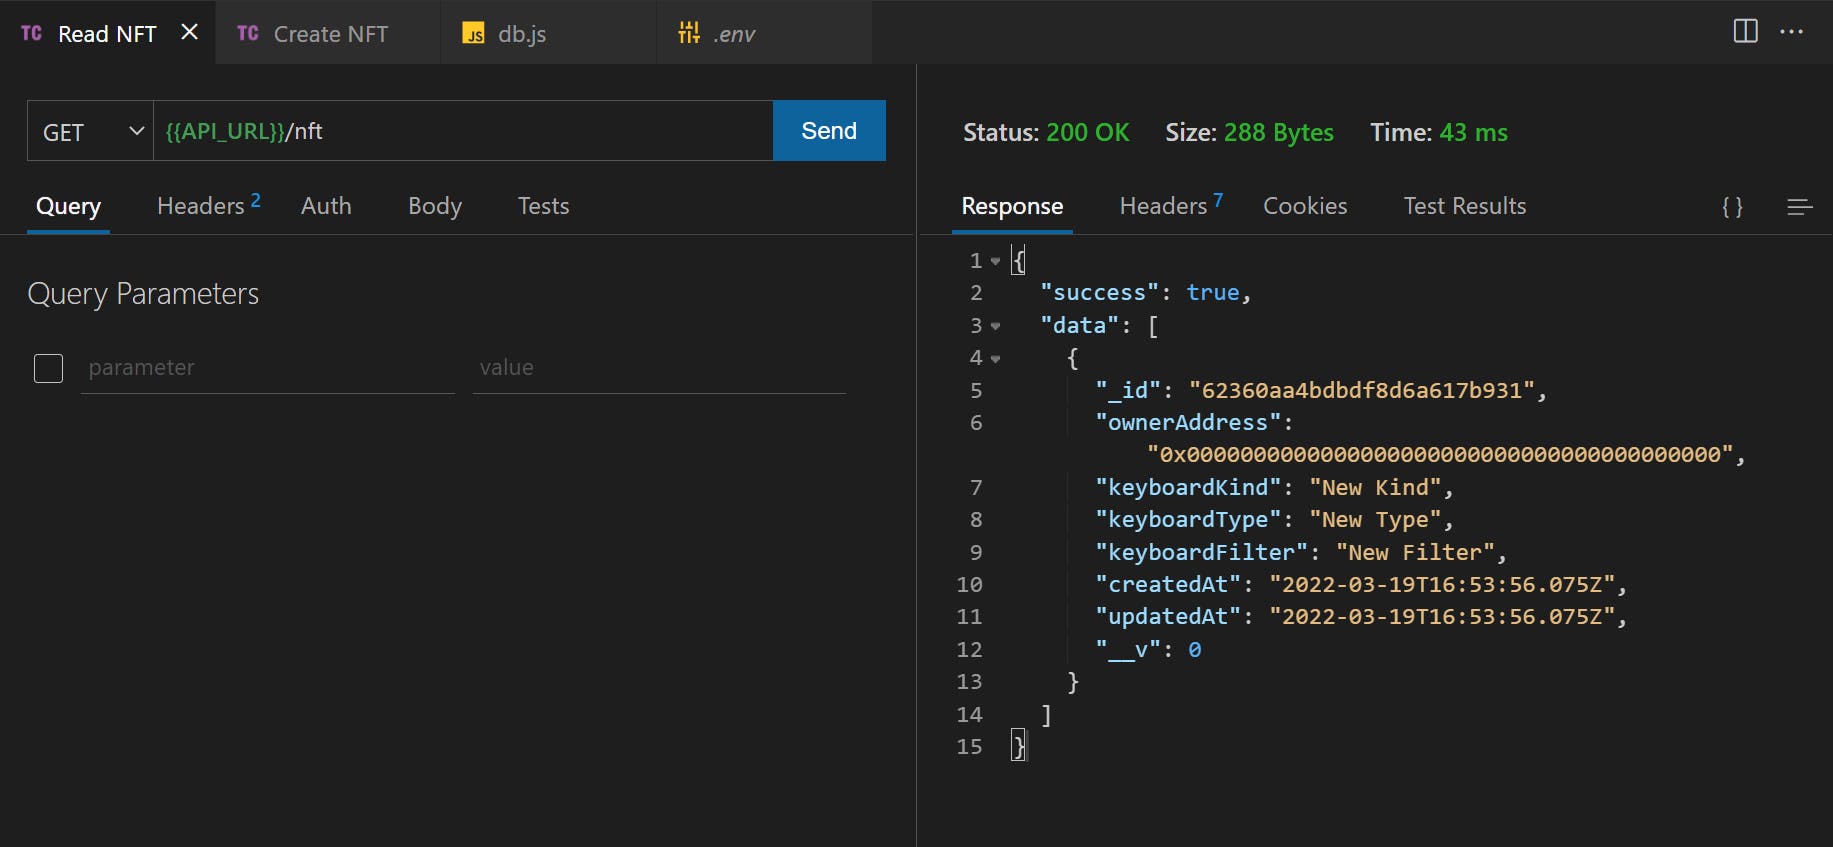
Cool! It works!
Installing MySQL And Sequelize And Creating MySQL Linked Full Fledged Backend
Alright! Let's switch the database, shall we? First, let's install mysql2 and sequelize packages in our app:
npm install sequelize mysql2
Once this is done, let's create 2 files in our lib folder: db-mongo.js and db-mysql.js. We then copy all the code in our db.js inside db-mongo.js and replace the db.js with the below code:
const mysql = require('./db-mysql');
module.exports = mysql;

// const mongo = require('./db-mongo');
// module.exports = mongo;

// const firebase = require('./db-firebase');
// module.exports = firebase;

// const supabase = require('./db-supabase');
// module.exports = supabase;
This file is where we will make changes of 2 lines to switch our databases! Let's go to our db-mysql.js and write some code:
require('dotenv').config();
const { Sequelize, DataTypes } = require('sequelize');

const sequelize = new Sequelize(
  process.env.MYSQL_DATABASE,
  process.env.MYSQL_USERNAME,
  process.env.MYSQL_PASSWORD,
  {
    host: process.env.MYSQL_HOST,
    dialect: 'mysql',
  }
);

async function connectMySQL() {
  try {
    await sequelize.authenticate();
    console.log('MySQL connected successfully');
  } catch (err) {
    console.error('Unable to connect to the mysql database:::', error);
  }
}

connectMySQL();
Here, we import our packages, then create a new sequelize instant by passing DATABASE, USERNAME, PASSWORD, & HOST. The dialect is 'mysql' to denote that we will be working with the MySQL database. Sequelize requires mysql2 package if we want to work with MySQL dialect.
We then define an async function to connect to our database using sequelize.authenticate().
We need to have a MySQL database service setup already for this to work which can be setup using XAMPP, MAMP, WAMP, or remotely on CPanel. Then get the 4 required parameters mentioned above to connect.
Moving on, we then write:
const nftSchema = {
  id: {
    type: DataTypes.INTEGER,
    autoIncrement: true,
    allowNull: false,
    primaryKey: true,
  },
  keyboardKind: {
    type: DataTypes.STRING(5),
    allowNull: false,
  },
  keyboardType: {
    type: DataTypes.STRING(3),
    allowNull: false,
  },
  keyboardFilter: {
    type: DataTypes.STRING(10),
    allowNull: false,
  },
  ownerAddress: {
    type: DataTypes.STRING(42),
    allowNull: false,
  },
};

const options = { timestamps: true };
const NFT = sequelize.define('nfts', nftSchema, options);

async function createTables() {
  try {
    await sequelize.sync();
  } catch (error) {
    console.log(error);
  }
}

createTables();
Again, we are doing the same thing: define schema, create a model, and then create tables using that model. So, we have primary key in this and that is id field. We supply plural name 'nfts' in this by default which is table name. sequelize.define() is the function which creates a model. sequelize.sync() inside createTables() create the table on the go in our database.
Then, we create our 2 functions: create() and read() as below
async function read() {
  try {
    const data = await NFT.findAll({ raw: true });
    console.log('NFTs:::', data);
    return data;
  } catch (err) {
    console.log(err);
    return 'Something went wrong in fetching the NFTs';
  }
}

async function create(nft) {
  try {
    const data = await NFT.create(nft);
    return { data };
  } catch (err) {
    console.log(err.message);
    return 'NFT creation failed';
  }
}

module.exports.create = create;
module.exports.read = read;
There is a slight difference in the read function. We use findAll({raw: true}) method to read all the data within the table. The create(obj) function remains the same. These findAll() and create() are sequelize ORM methods.
This in essence now replaced our MongoDB with MySQL. Simple as that. This is only possible because we separated the database logic file with the data manipulation logic file in our app. This means, that in case, we ever have to change our database in future; we can do so by adding a new file with new database logic and finally change the 2 lines in the db.js file.
Installing Firebase Client And Creating Firebase Linked Full Fledged Backend
Let's do the same with Firebase. First, create a new file in lib folder: db-firebase.js.
Then, comment the mysql lines in db.js and uncomment the firebase lines.
// const mysql = require('./db-mysql');
// module.exports = mysql;

// const mongo = require('./db-mongo');
// module.exports = mongo;

const firebase = require('./db-firebase');
module.exports = firebase;

// const supabase = require('./db-supabase');
// module.exports = supabase;
Now, we install firebase client:
npm install firebase
We then have to go to the Firebase and click on GET STARTED. We must have an account. Once it is clicked, we are taken to a create project page. We create a project by clicking on ADD PROJECT:
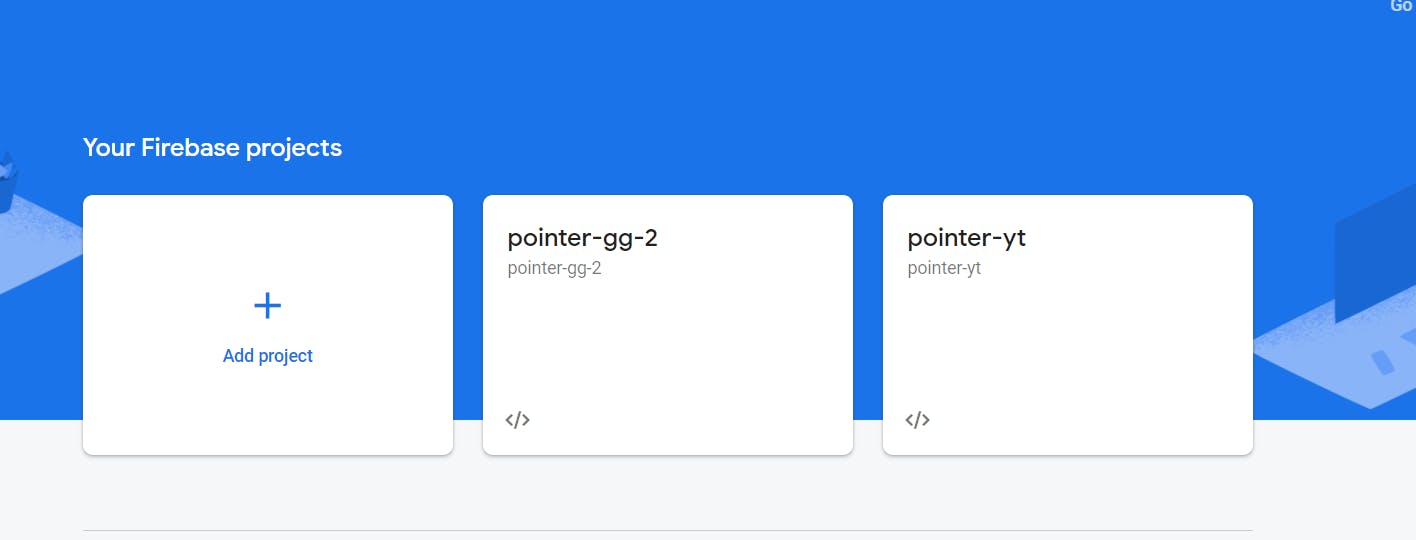
I already have few projects but let's click on add-project. Now supply the name of the project:
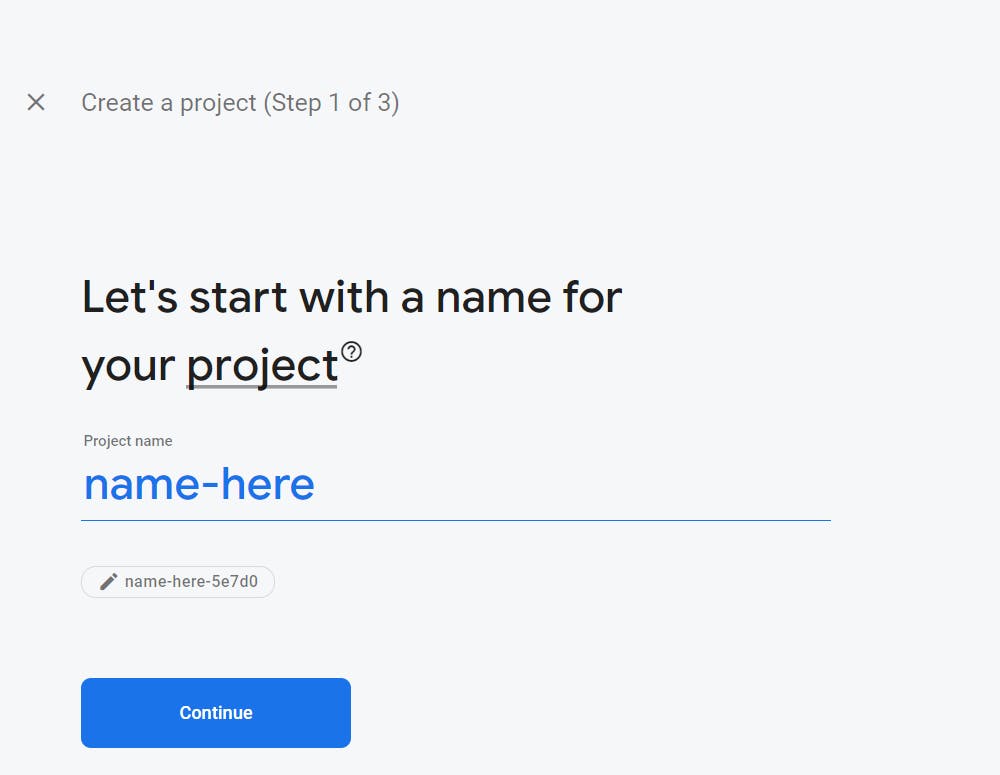
Keep clicking Continue and select the default project in Step 3:
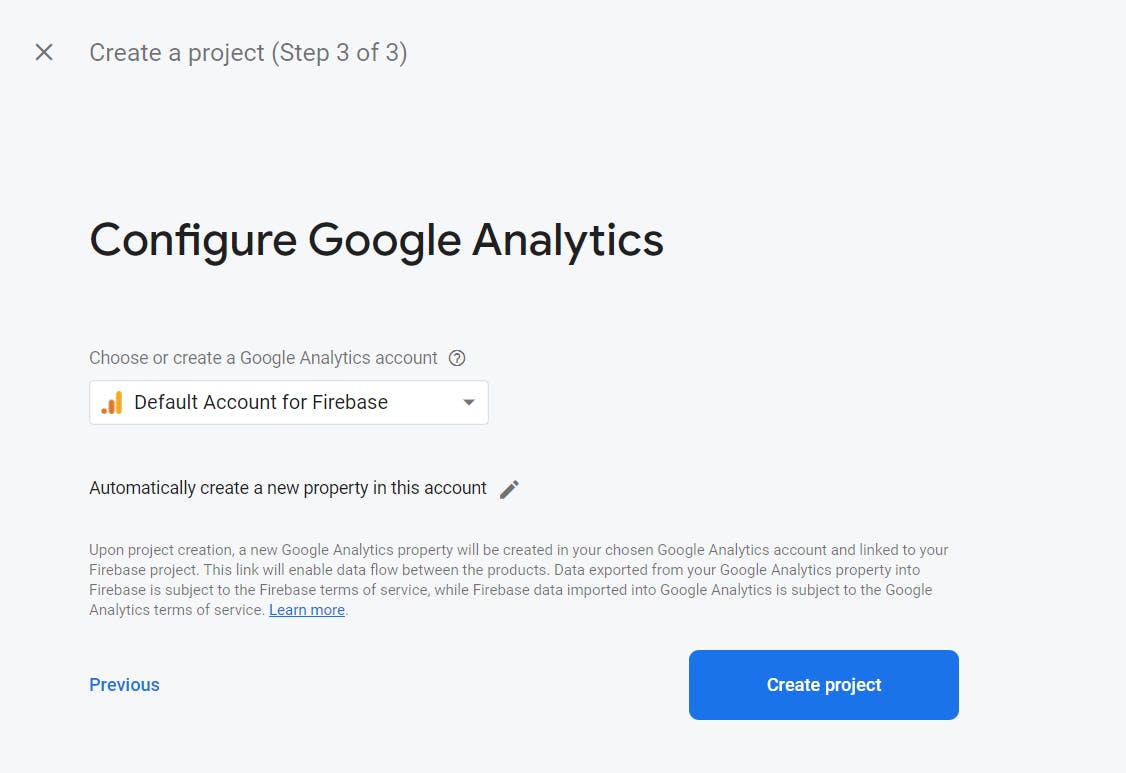
Finally, we click on the 3 icon in the center which displays "web" on hover:
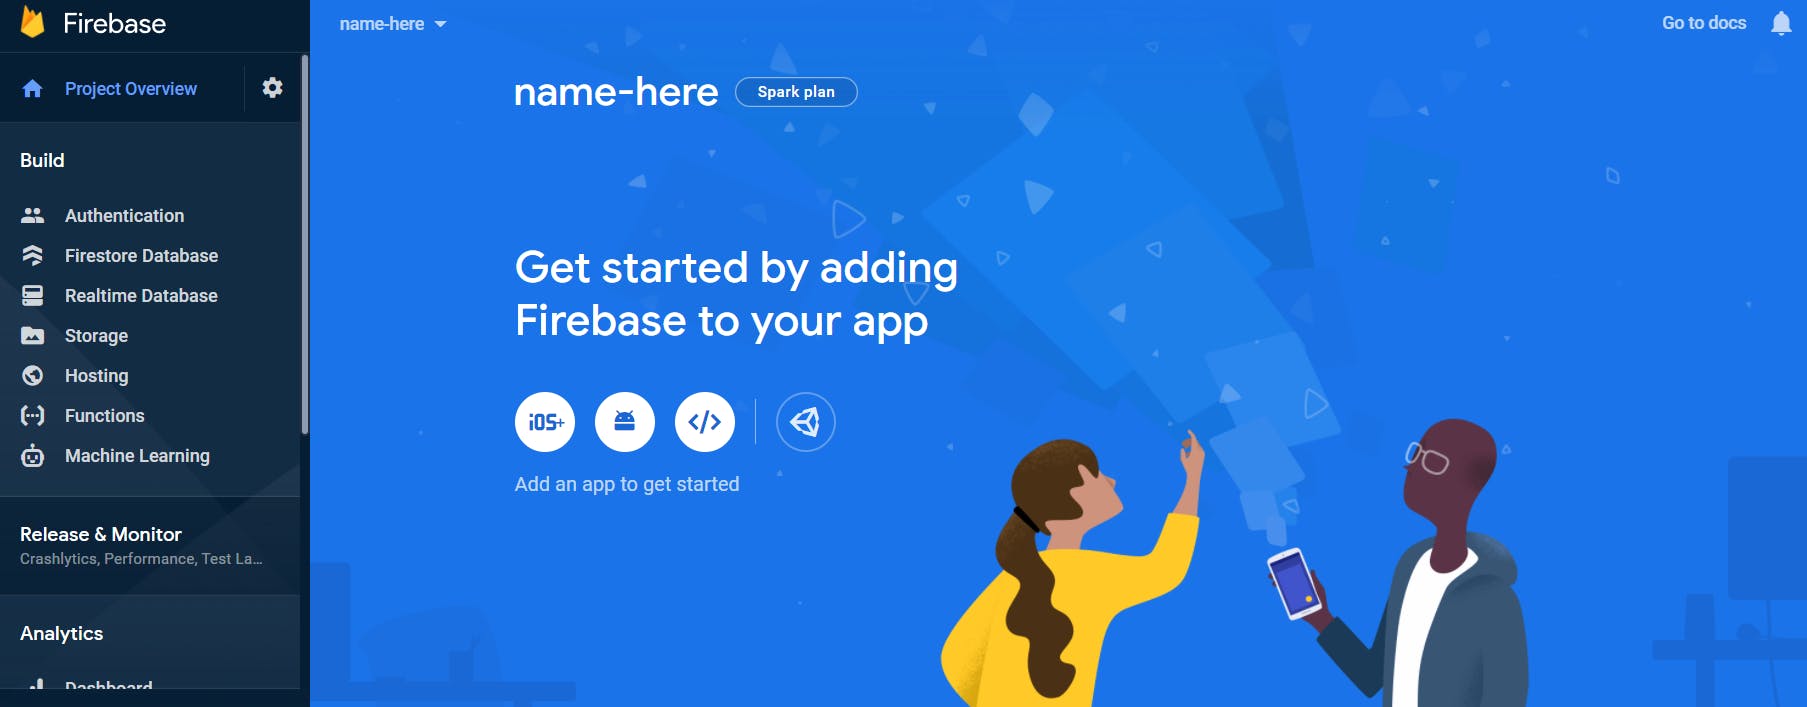
We then give a name to our app and do not check the tick mark:
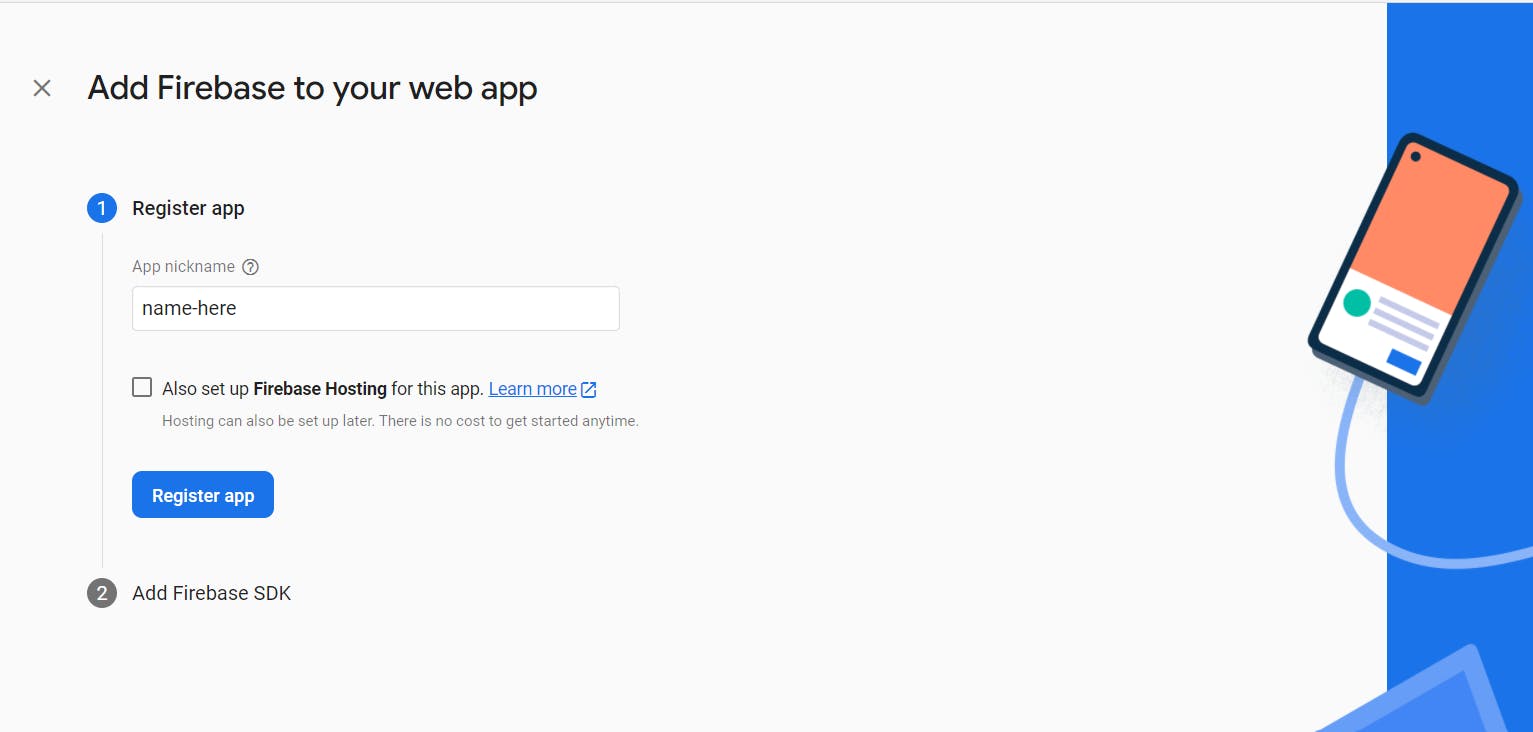
Finally, we get the required API keys we need:
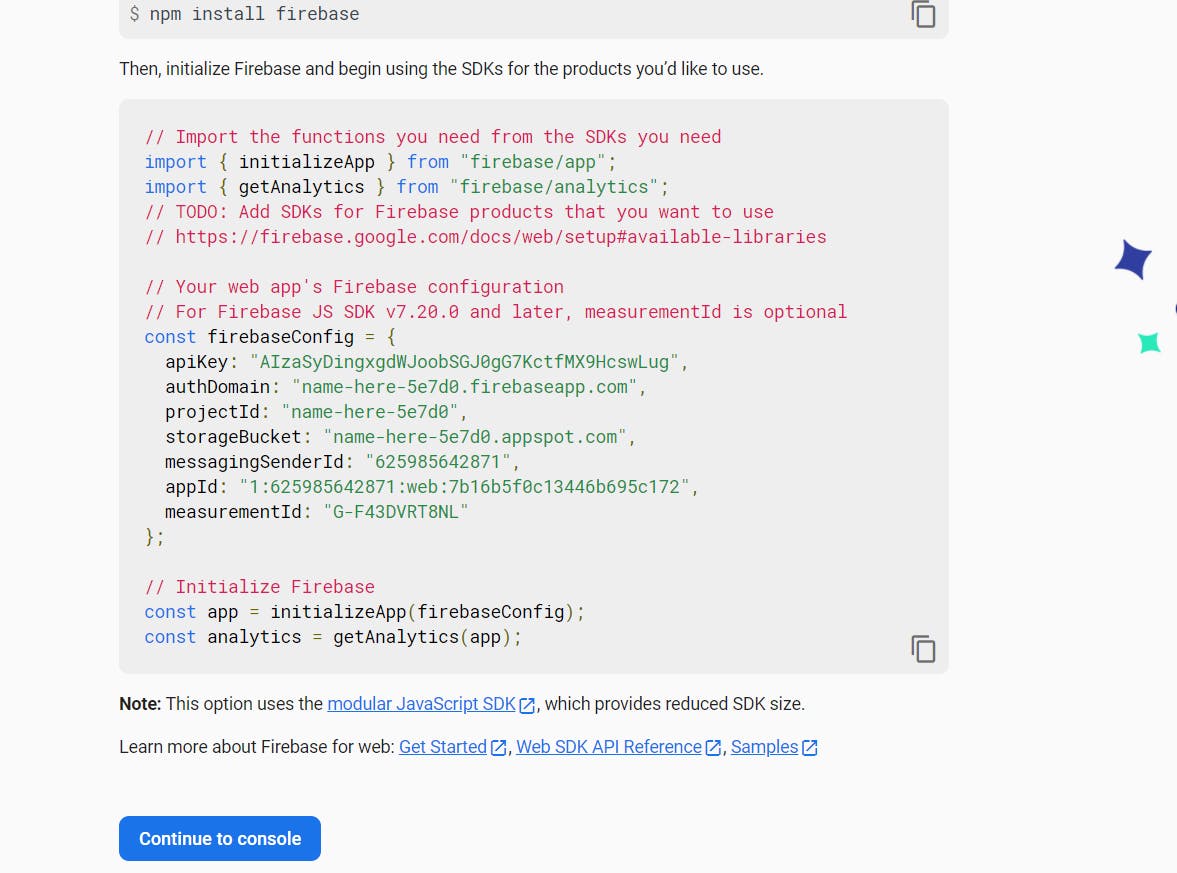
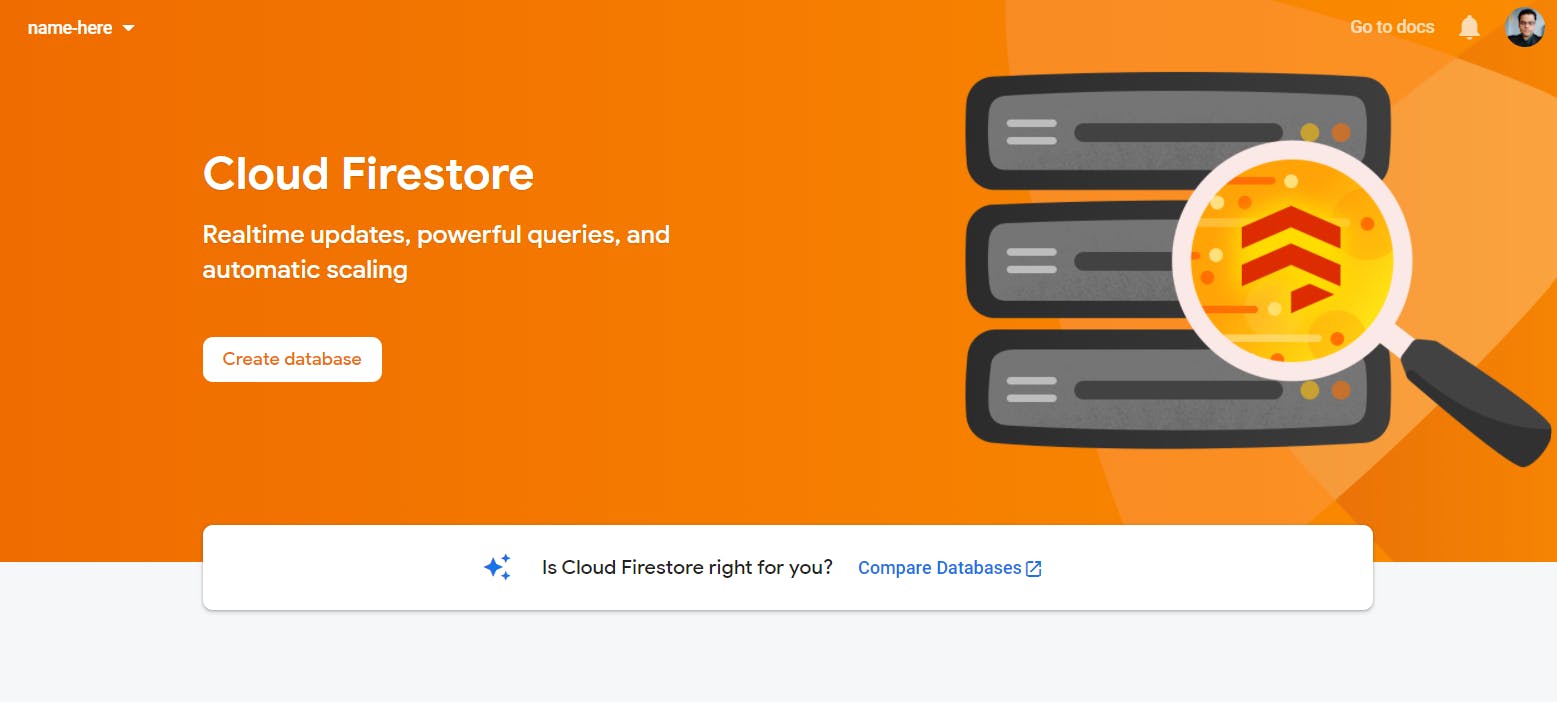
Copy the instructions to a file for now and let's go to console. In the console, we click on Firestore Database and Create a database, select production mode, and select the zone and click on enable.
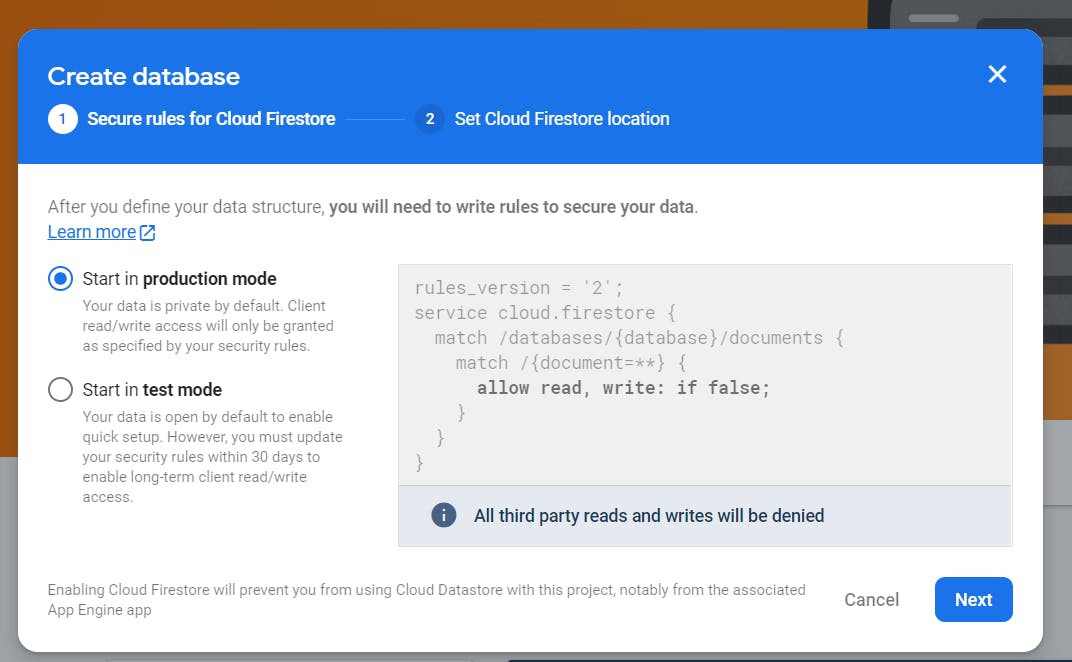
We then select the rules and change it for our app. Don't use this setting in production apps, it means anyone can read and write on your database.
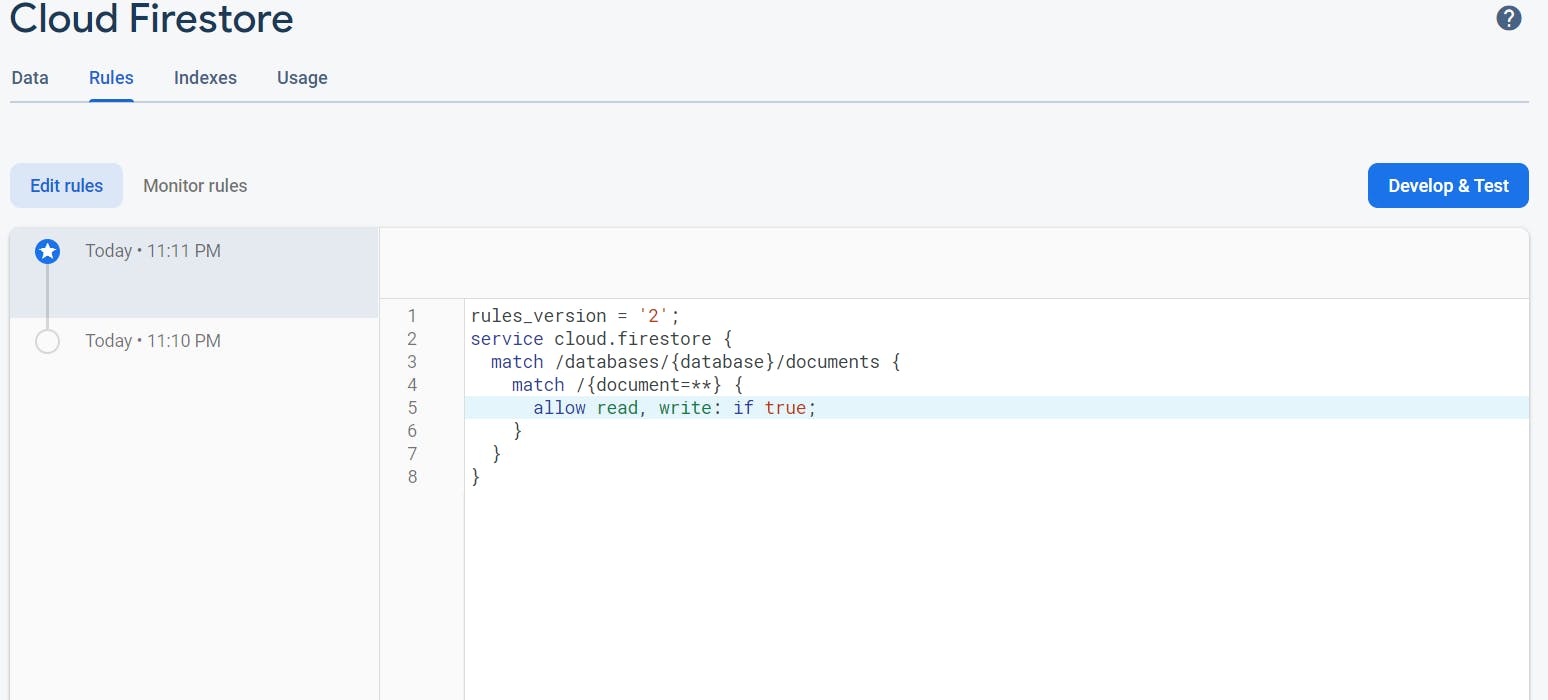
Finally publish it. We finally are ready to write our code.
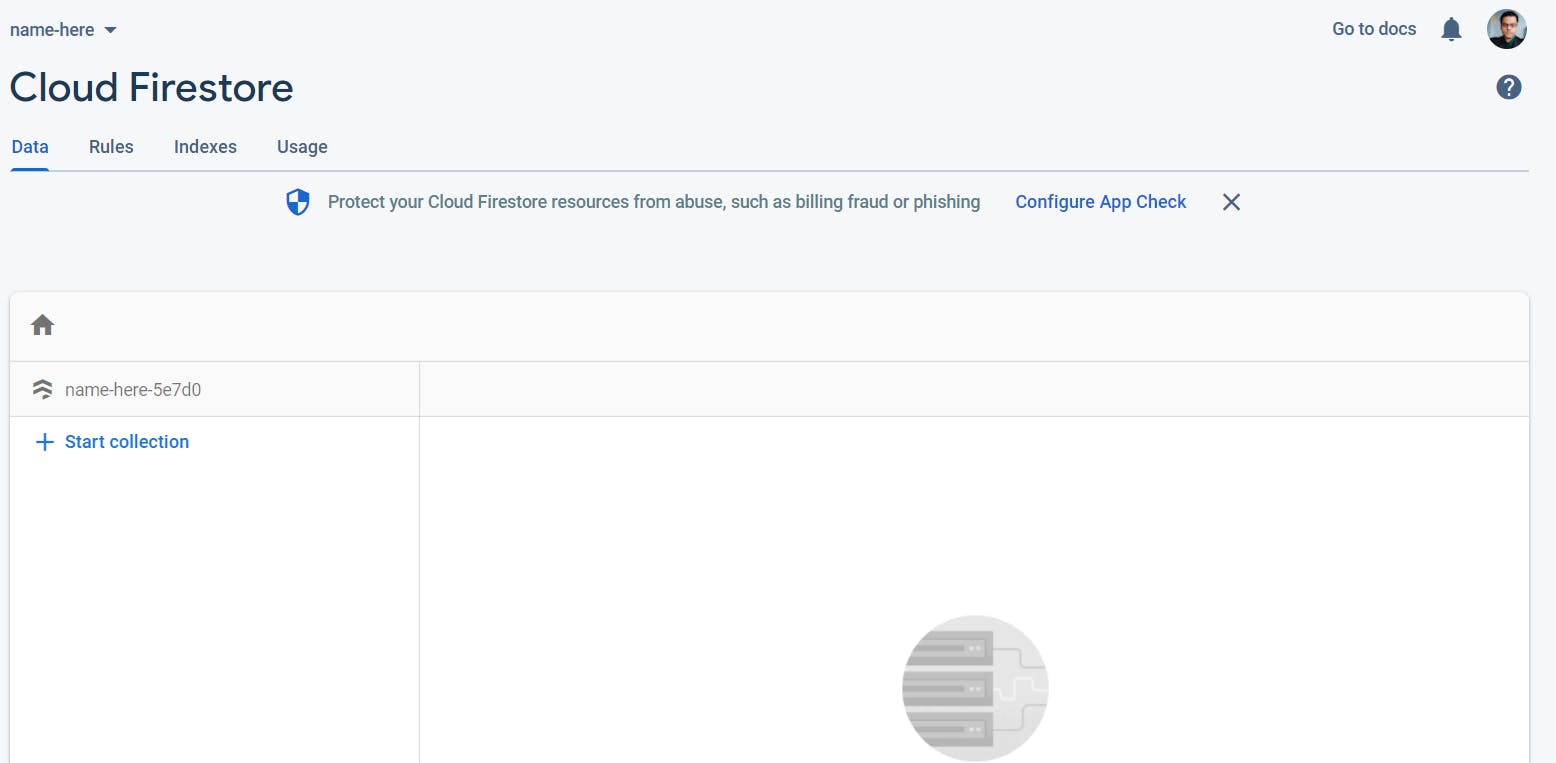
So now, we go inside db-firebase.js file, and write:
require('dotenv').config();
const { initializeApp } = require('firebase/app');

const {
  getFirestore,
  addDoc,
  collection,
  Timestamp,
  getDocs,
} = require('firebase/firestore');

const firebaseConfig = {
  apiKey: process.env.FIREBASE_API_KEY,
  authDomain: process.env.FIREBASE_AUTH_DOMAIN,
  projectId: process.env.FIREBASE_PROJECT_ID,
  storageBucket: process.env.FIREBASE_STORAGE_BUCKET,
  messagingSenderId: process.env.FIREBASE_MESSAGE_SENDER_ID,
  appId: process.env.FIREBASE_APP_ID,
};

initializeApp(firebaseConfig);
const firestoredb = getFirestore();

async function read() {
  try {
    const querySnapshot = await getDocs(collection(firestoredb, 'nfts'));
    const data = [];
    querySnapshot.forEach((doc) => {
      if (doc.exists()) {
        data.push(doc.data());
      }
    });
    return data;
  } catch (err) {
    console.log(err);
    return 'Something went wrong in fetching the NFTs';
  }
}

async function create(nft) {
  try {
    const docRef = await addDoc(collection(firestoredb, 'nfts'), {
      ...nft,
      createdAt: Timestamp.now(),
    });
    return { data: docRef.id };
  } catch (err) {
    console.log(err.message);
    return 'NFT creation failed';
  }
}

module.exports.create = create;
module.exports.read = read;
All the code here is using docs. Let me explain key parts here. We need firebaseConfig to setup our app. This is what we saved in other file few steps back. It's just that code. Then, we initializeApp(firebaseConfig) to initialize our app. We also getFirestore() to instantiate a firestore instance inside firestoredb.
We use addDoc(collection(firestoredb, 'nfts') to create a new collection by the name 'nfts' inside the collection pointed by firestoredb instance. We use getDocs(collection(firestoredb, 'nfts')) to retrieve the stored data and store it inside a snapshot. We then use:
querySnapshot.forEach((doc) => {
     if (doc.exists()) {
       data.push(doc.data());
     }
});
to loop through the data to store it inside our array object. We finally return this array object. The code is mostly self explanatory at this point.
Installing Supabase And Creating Supabase Linked Full Fledged Backend
We are finally in our last database. First, we setup the app here like we did in the Firebase. So, we first go to https://app.supabase.io/. There, we create a new project. Then supabase will provide 2 key secrets: anon-key and url. Copy these and store it in .env file.
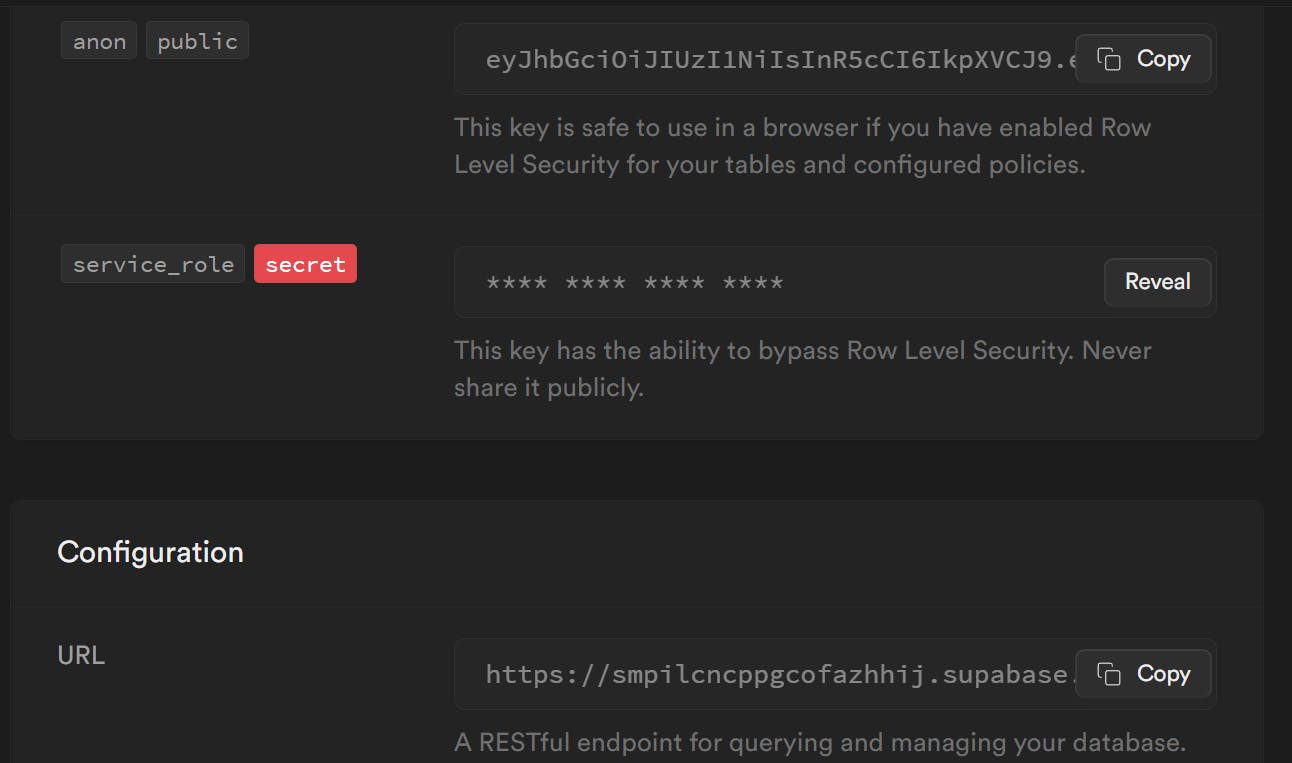
Then, install supabase client in our app:
npm install @supabase/supabase-js
Once this is installed, we uncomment the supabase line in db.js file:
// const mysql = require('./db-mysql');
// module.exports = mysql;

// const mongo = require('./db-mongo');
// module.exports = mongo;

// const firebase = require('./db-firebase');
// module.exports = firebase;

const supabase = require('./db-supabase');
module.exports = supabase;
Finally, we write our code in db-supabase.js:
require('dotenv').config();
const { createClient } = require('@supabase/supabase-js');

const options = {
  autoRefreshToken: true,
  persistSession: true,
  detectSessionInUrl: true,
};

const supabase = createClient(
  process.env.SUPABASE_URL,
  process.env.SUPABASE_ANON,
  options
);
We use createClient(url, anon-key) to get instance of supabase client. Remember, we are just using client library not SDK. We then write our 2 functions: create() and read().
async function create(nft) {
  try {
    const { data, error } = await supabase.from('nfts').insert(nft);
    if (!error) {
      return { data: data[0] };
    }
    throw error;
  } catch (err) {
    console.error(err.message);
    return 'NFT creation failed';
  }
}

async function read() {
  try {
    const { data, error } = await supabase.from('nfts').select();
    if (!error) {
      console.log('NFTs:::', data);
      return data;
    }
    throw error;
  } catch (err) {
    console.log(err);
    return 'Something went wrong in fetching the NFTs';
  }
}

module.exports.create = create;
module.exports.read = read;
We have supabase.from('nfts').insert(nft) which we use to insert or create nft document. We have supabase.from('nfts').select() to read the documents. Both of these return {data, error} by design so we destructure them and use them to handle error and return our data.
Now, this won't work out of the box as this is client side library and not SDK. So, we have to create the nfts table in the Supabase Dashboard itself. So, we go to Supabase dashboard -> SQL Editor Tab -> SQL Query:
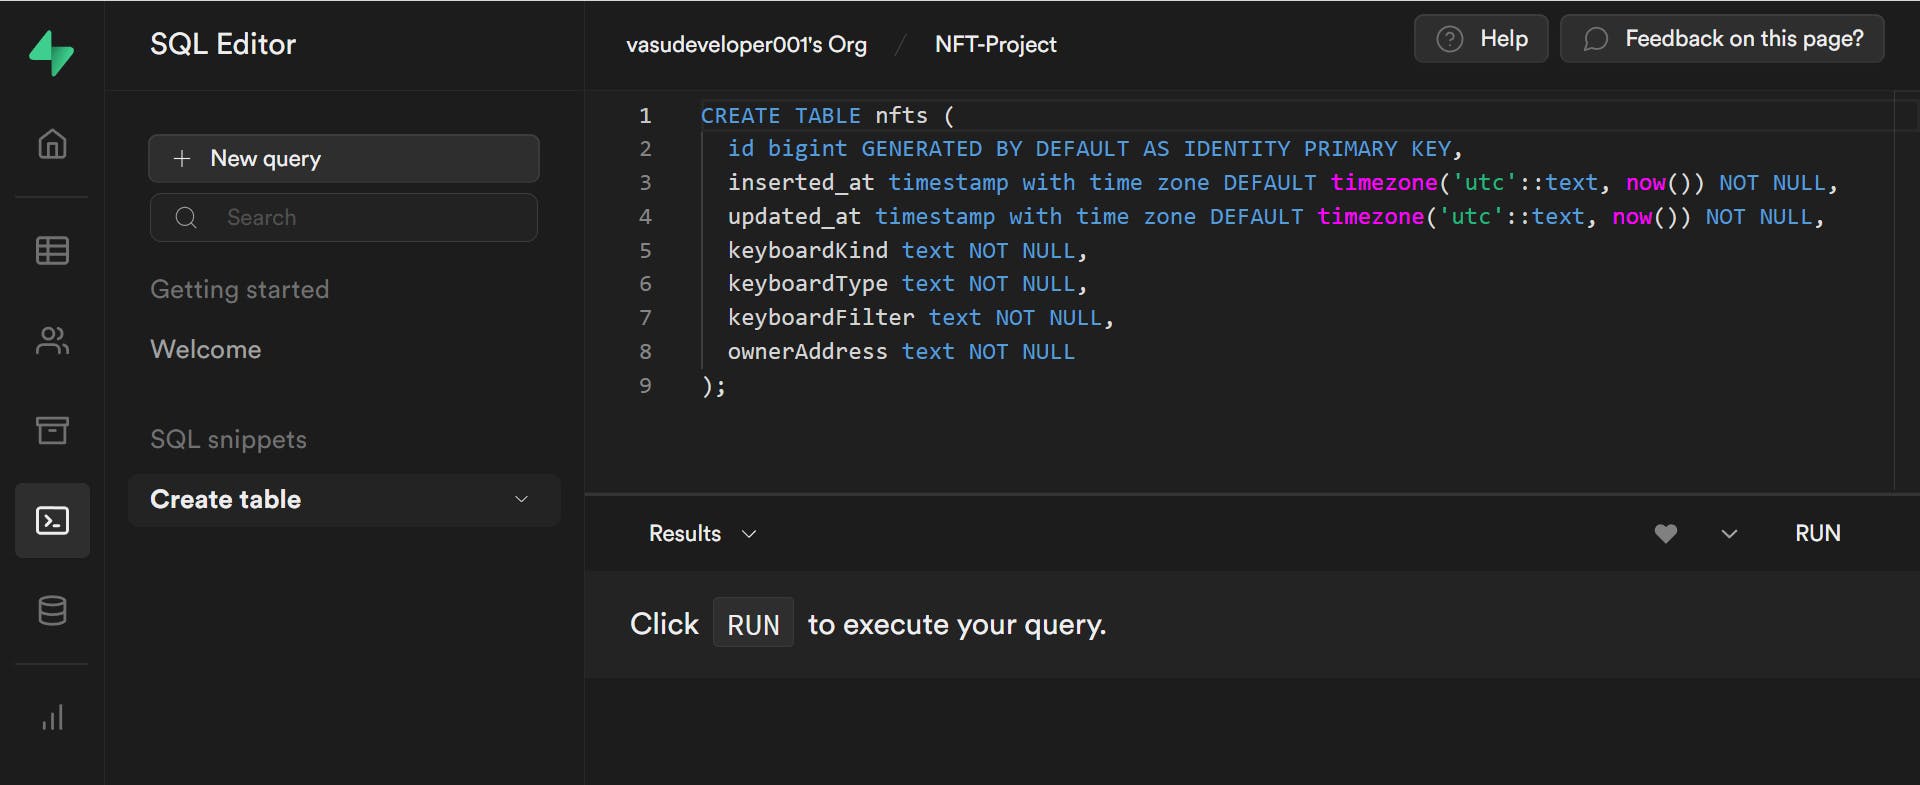
For quick syntax:
CREATE TABLE 'nfts' (
    id bigint GENERATED BY DEFAULT AS IDENTITY PRIMARY KEY,
    inserted_at timestamp with time zone DEFAULT timezone('utc' :: text, now()) NOT NULL,
    updated_at timestamp with time zone DEFAULT timezone('utc' :: text, now()) NOT NULL,
    keyboardKind text NOT NULL,
    keyboardType text NOT NULL,
    keyboardFilter text NOT NULL,
    ownerAddress text NOT NULL
);
Once you run this, there will be another issue and that is the capital letters in the middle of keyboardKind, keyboardType, keyboardFilter, and ownerAddress will become small automatically on run of sql query. So, we need to manually correct it one by one using Table Editor -> Edit Table
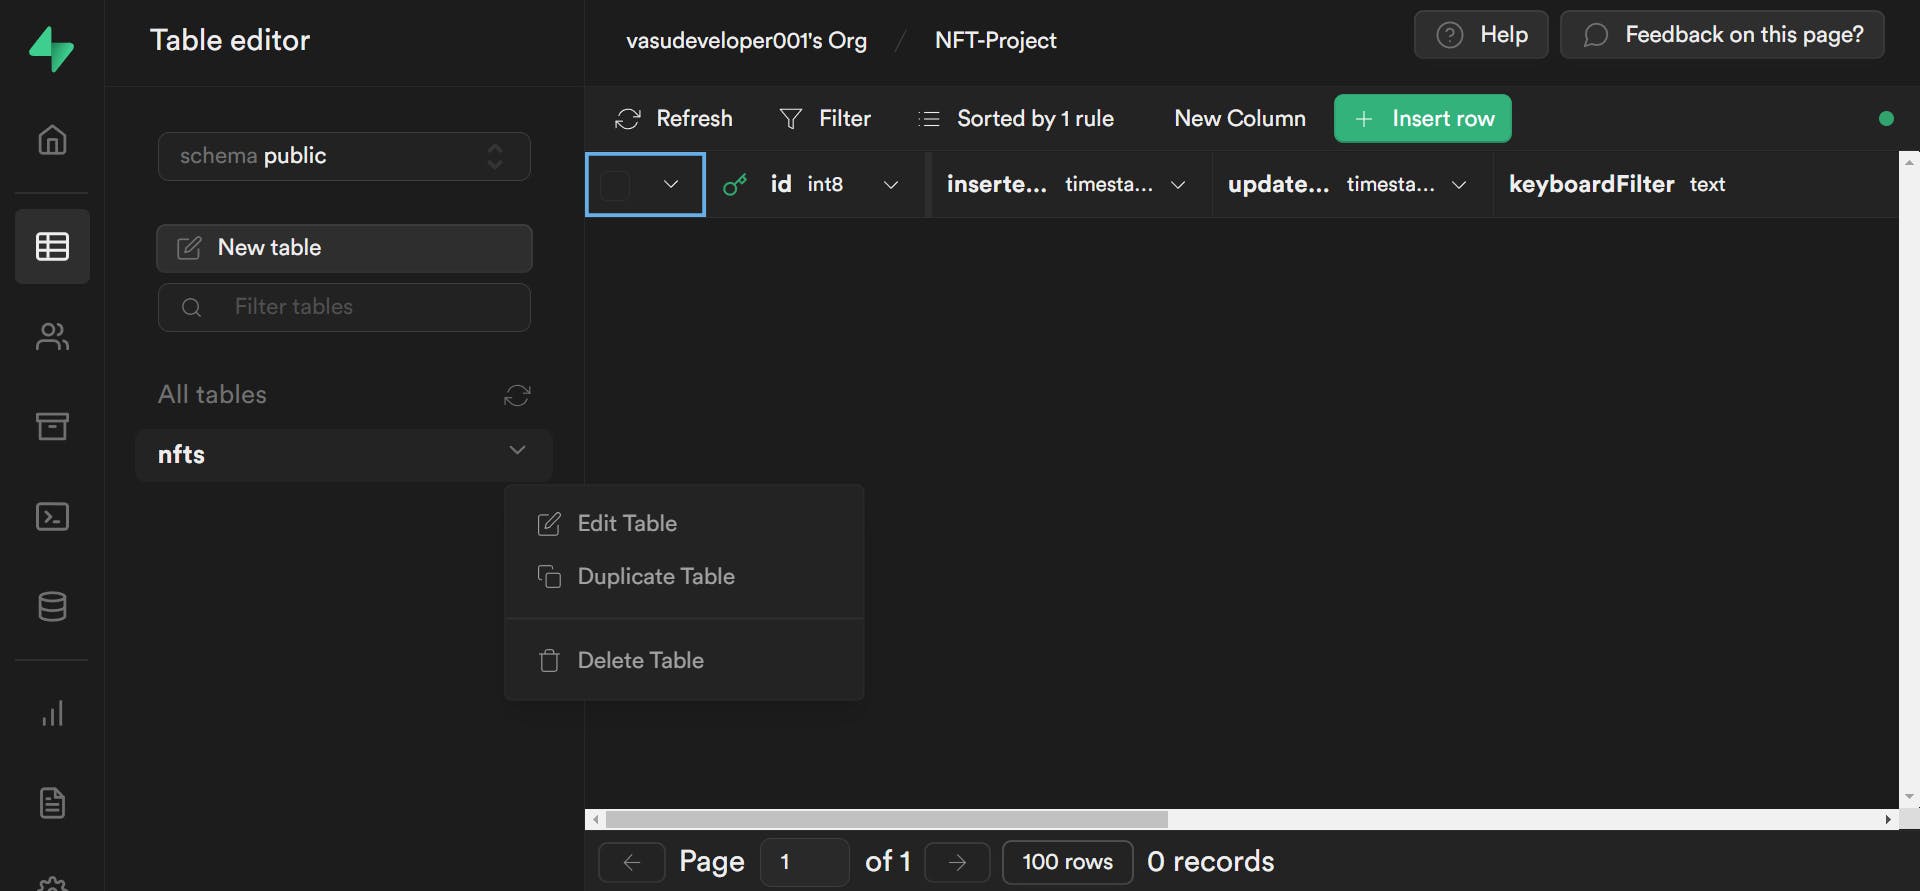
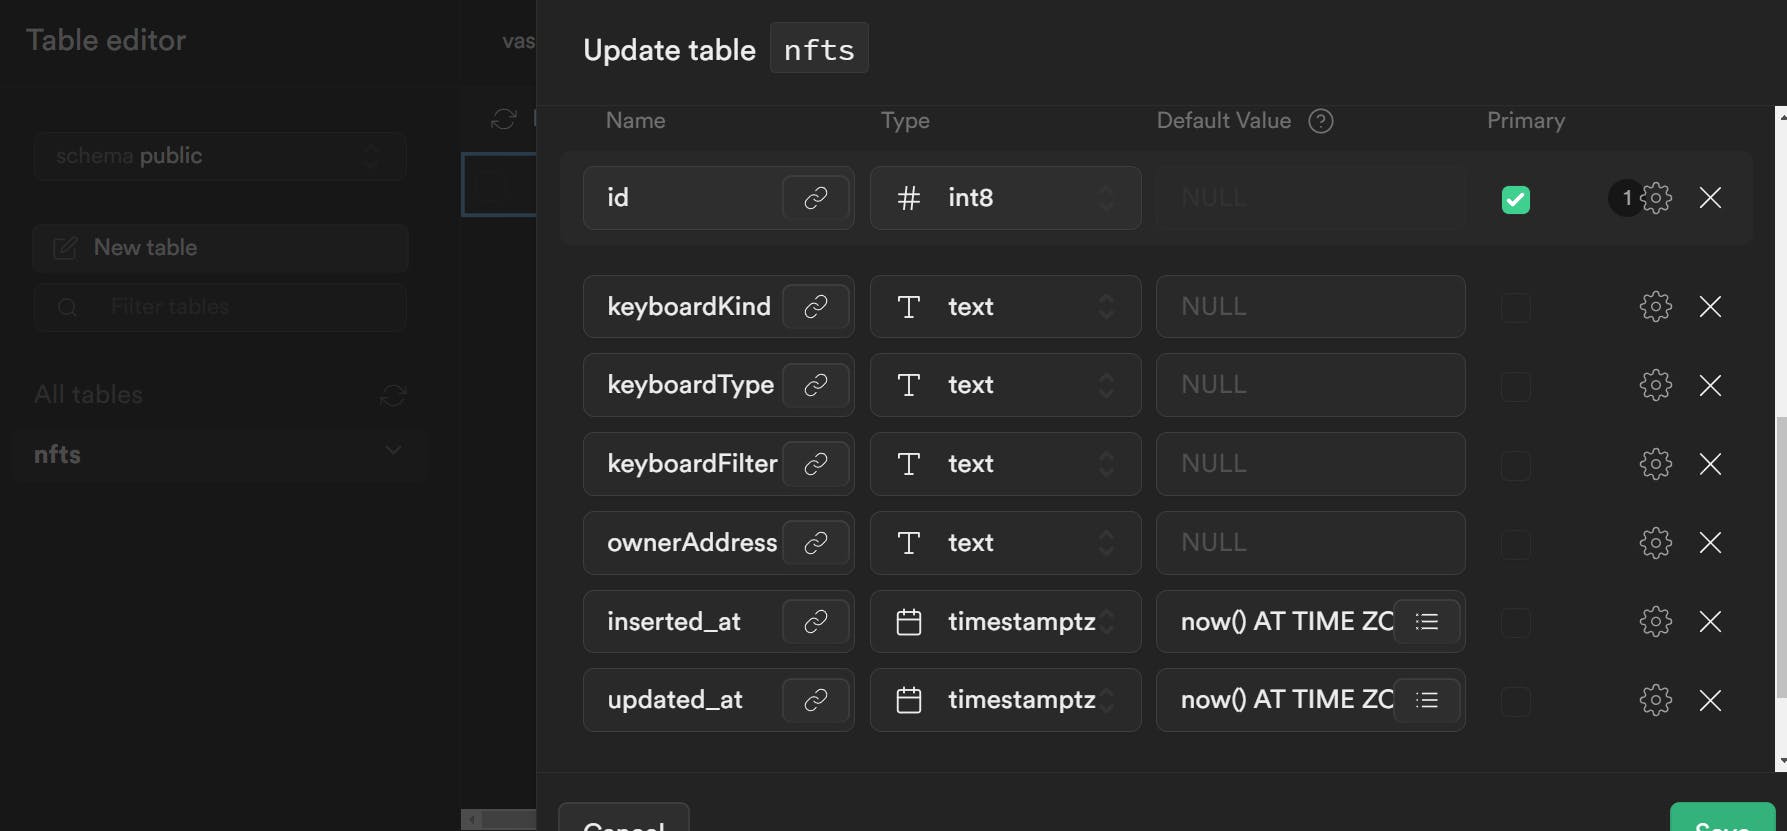
Once this is edited and saved, we can run our server file again and we can check that it works using ThunderClient.
Final Words
That's all there is to the Web 2.0 backend in this project. It could have been simple (in case we focus on only 1 technology rather than all 4), but I wanted to make this switching database technique incorporated here in the series. I hope you liked it. See you in the next article!

