NFT Project Series Part 6: Building Our Frontend Through Next.js
Learn how to create a frontend for Web 2.0 app using Next.js
In the last part, we looked into how to build the frontend for our Web 2.0 backend in React. In this one, we will build the same in Next.js. The prerequisite here is to know about Next.js basics. So, let's start!
What Will We Build?
First things first, before we begin coding, we need to know how will our app look at the end of this tutorial? Here's how:
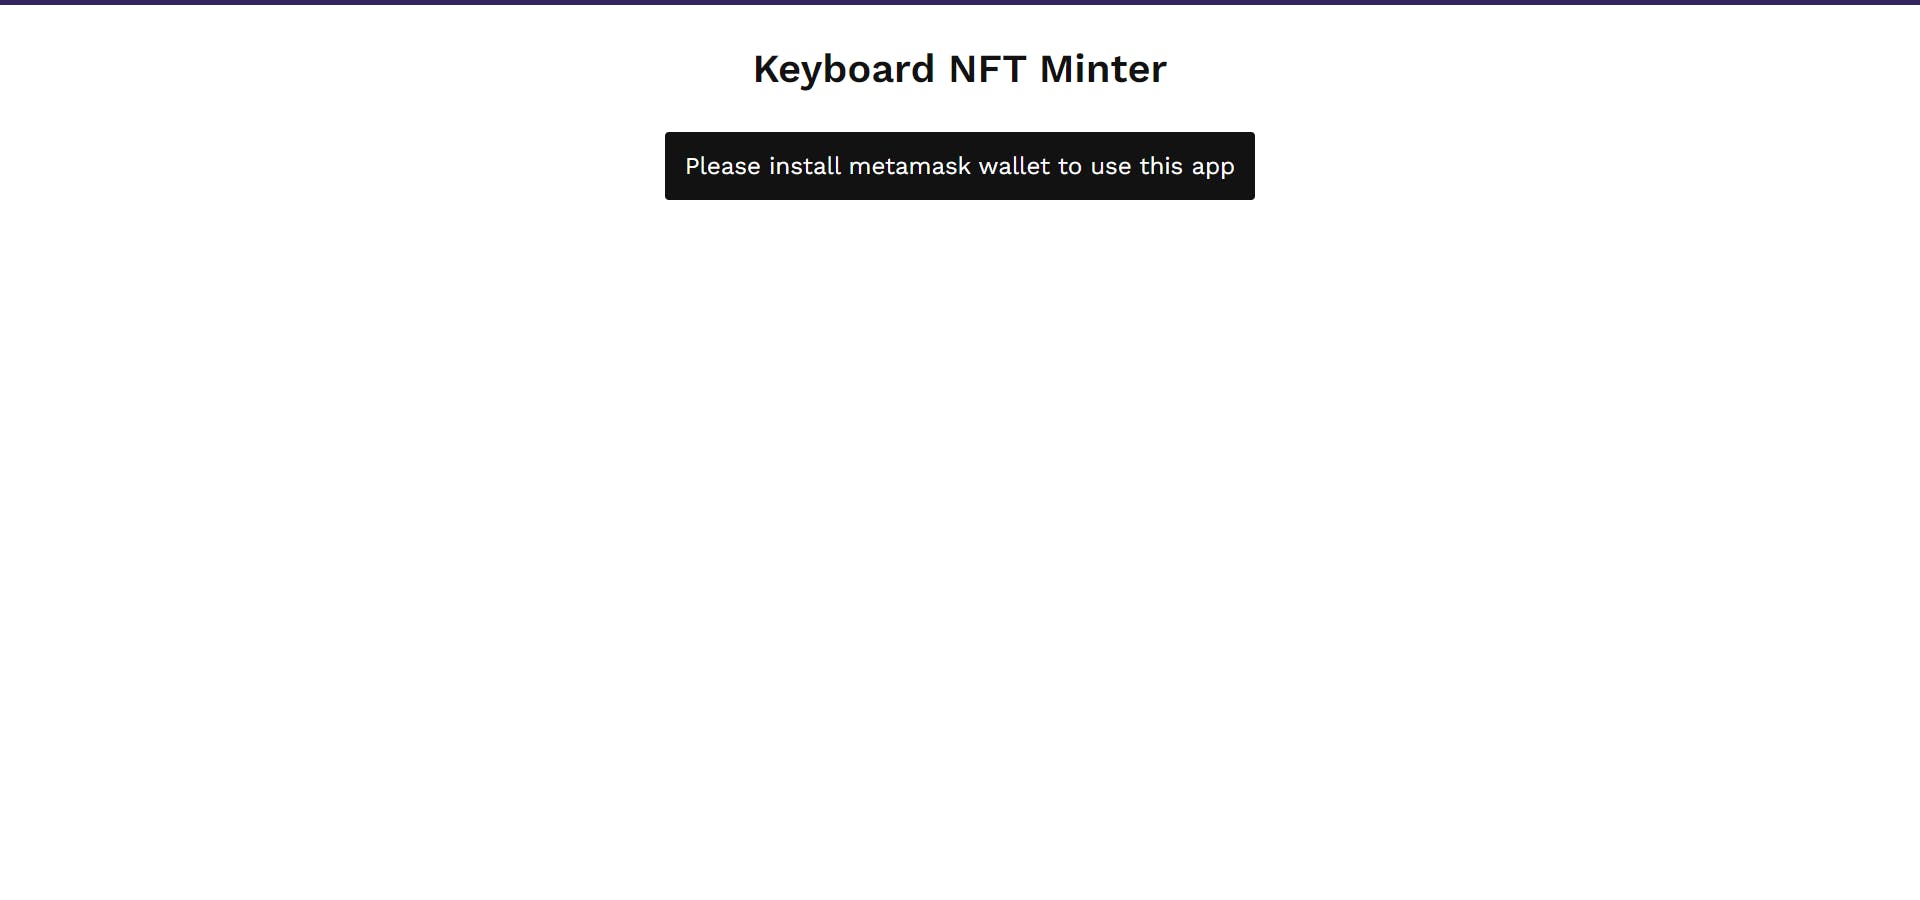
When the required wallet is not installed:
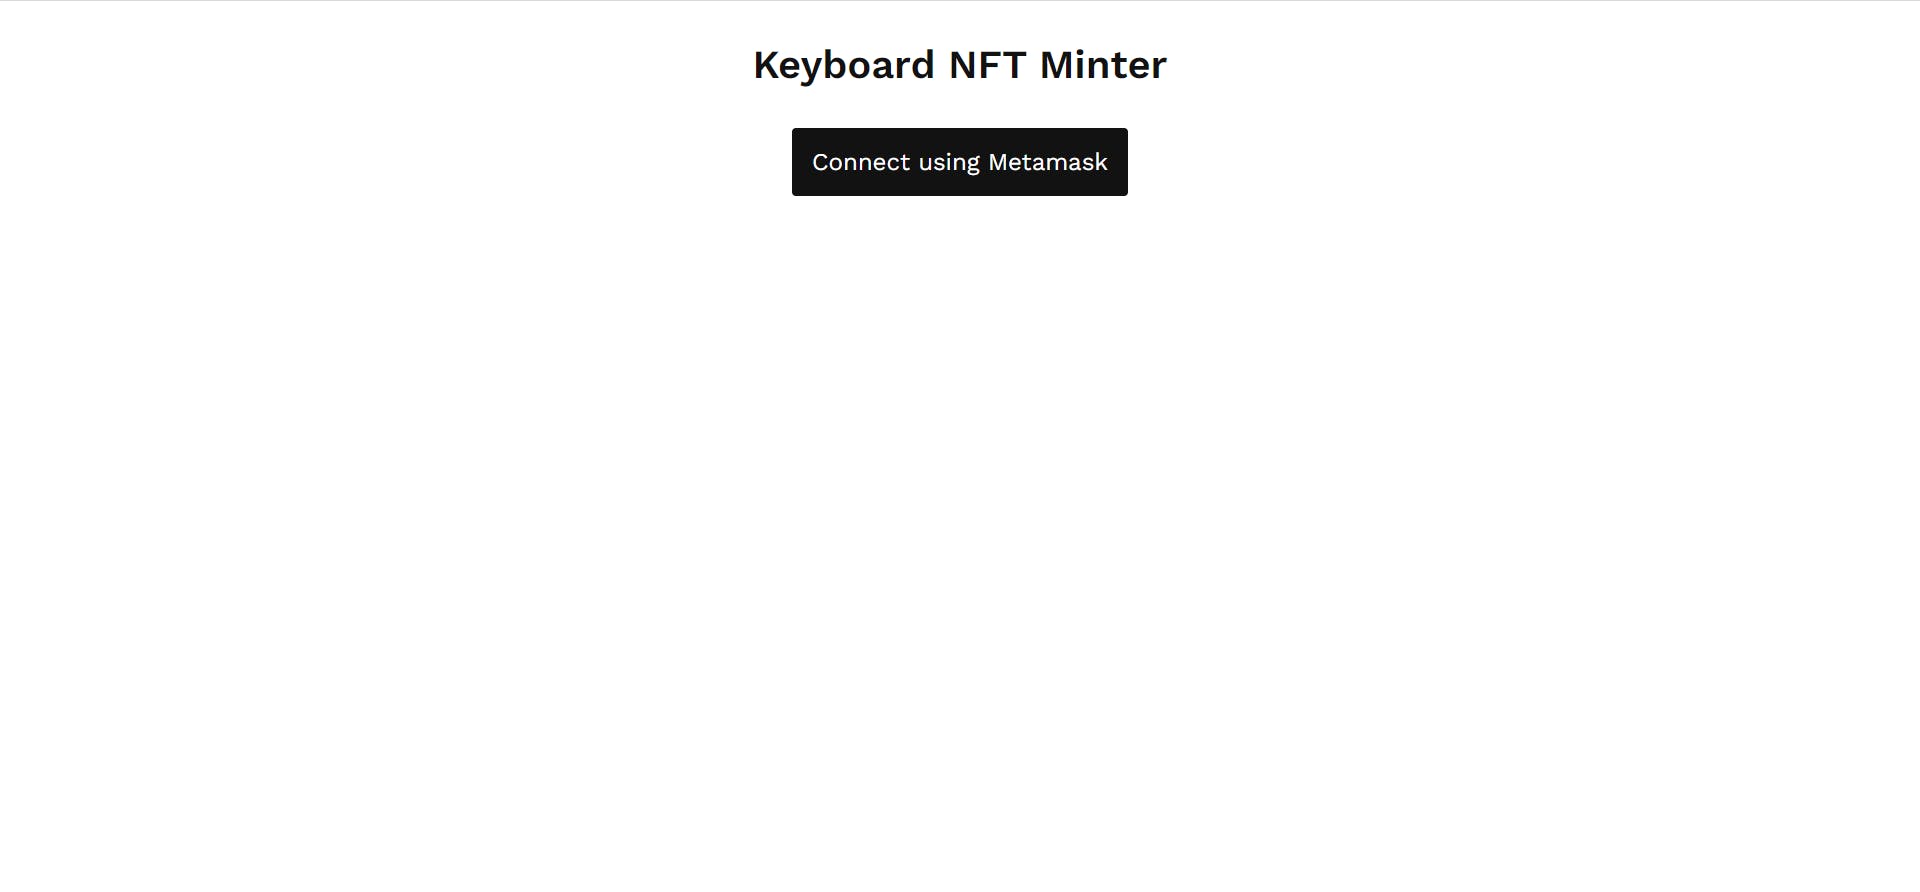
When the required wallet is installed and not connected:
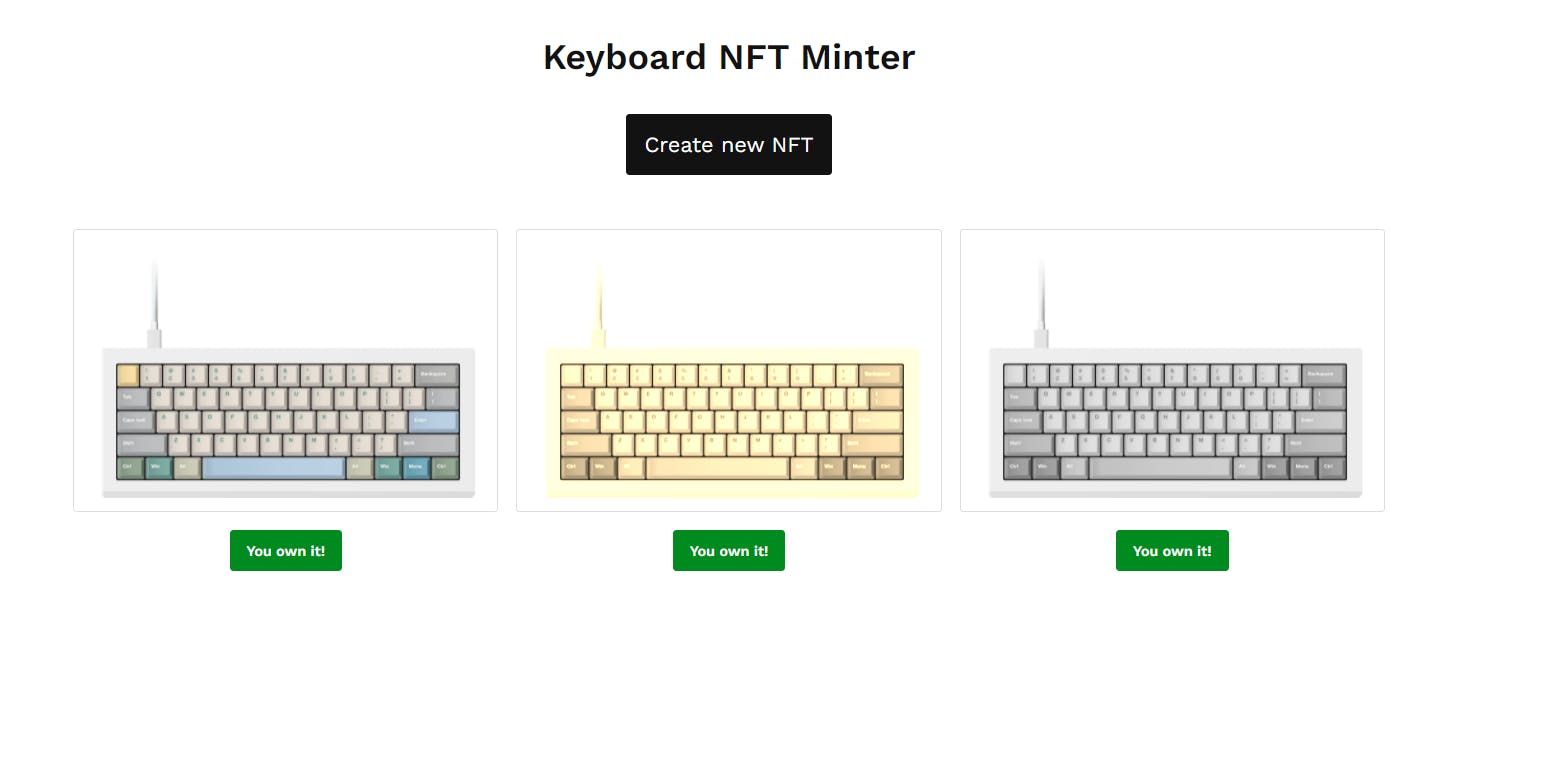
When the required wallet is installed and connected:
Keyboard Form Page:
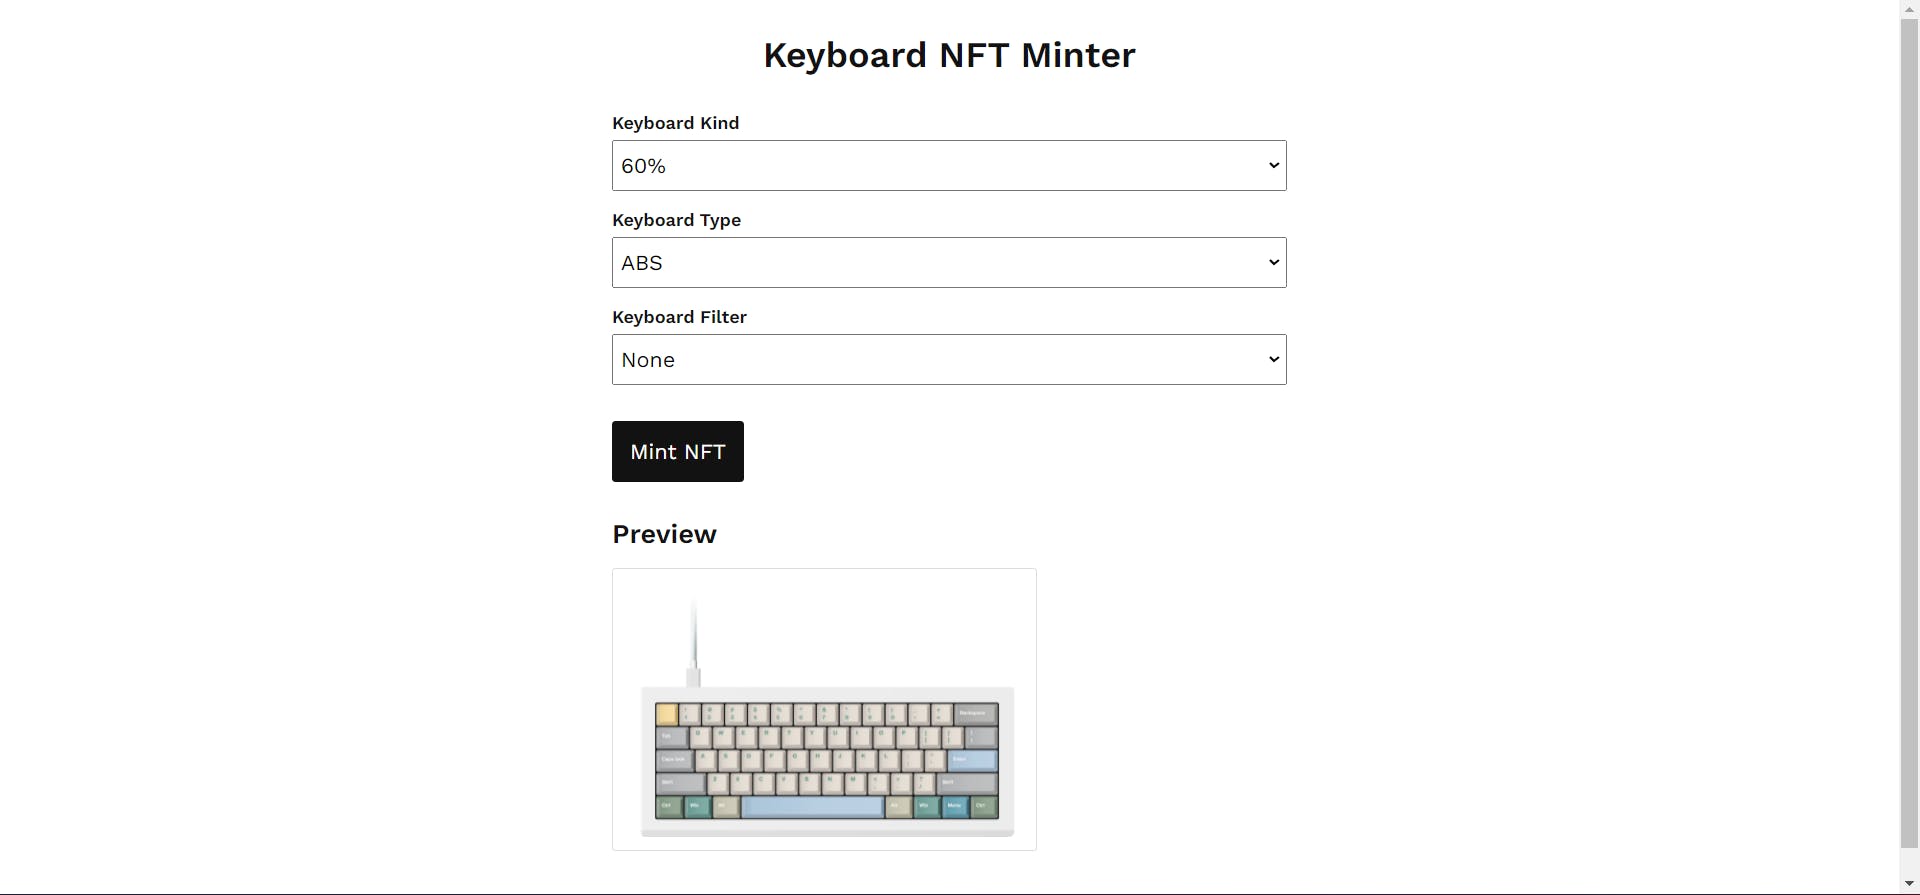
Installation And Clean Initial Setup
Now, let's install our React app:
npx create-next-app next-app
and then:
cd next-app && code
Now, at this stage, if you followed the last article, you know we have assets folder in our next app. I want you to copy that folder and paste it in the public folder in our app. Or you can directly download it from here. Then, inside our styles folder, create globals.css if it doesn't exists, and paste the following code (replace the existing one if exists):
@import url('https://fonts.googleapis.com/css2?family=Work+Sans:wght@400;600&display=swap');

*,
::after,
::before {
  margin: 0;
  padding: 0;
  box-sizing: border-box;
  font-family: 'Work Sans', sans-serif;
}

html {
  font-size: 100%;
}

body {
  color: #121212;
  background-color: #ffffff;
  padding: 2rem;
}

.home {
  display: flex;
  align-items: center;
  justify-content: center;
  flex-direction: column;
  margin: 0;
  padding: 0;
}

.btn {
  outline: none;
  border: none;
  padding: 1rem;
  font-size: 1.2rem;
  border-radius: 0.2rem;
  cursor: pointer;
}

.btn-tip {
  padding: 0.7rem;
  font-size: 0.8rem;
  font-weight: 600;
  background: #0077ff;
  color: white;
  margin-top: 1rem;
  width: 100px;
}

.btn-no-tip {
  padding: 0.7rem;
  font-size: 0.8rem;
  font-weight: 600;
  background: #008b1f;
  color: white;
  margin-top: 1rem;
  width: 100px;
}

.btn-black {
  background: #121212;
  color: white;
}

.btn-black:hover,
.btn-black:active,
.btn-black:focus {
  background: #121212de;
}

.btn-link {
  text-decoration: none;
  display: inline-block;
}

.heading {
  margin-bottom: 2rem;
}

.nfts {
  margin-top: 2rem;
  display: grid;
  grid-template-columns: auto;
}

@media (min-width: 760px) {
  .nfts {
    grid-template-columns: auto auto auto;
    gap: 1rem;
  }
}

.preview {
  margin-top: 2rem;
  display: flex;
  align-items: center;
  width: 80%;
  margin: 2rem auto;
  max-width: 600px;
}

.borders {
  border: 1px solid #ddd;
  margin-top: 1rem;
  border-radius: 0.2rem;
  padding: 0.5rem;
}

.none {
  filter: none;
}

.sepia {
  filter: sepia(100%);
}

.grayscale {
  filter: grayscale(100%);
}

.invert {
  filter: invert(100%);
}

.hue-rotate-90 {
  filter: hue-rotate(90deg);
}

.hue-rotate-180deg {
  filter: hue-rotate(180deg);
}

.form {
  width: 80%;
  margin: auto;
  max-width: 600px;
}

.form-group {
  display: flex;
  flex-direction: column;
  margin-bottom: 1rem;
  gap: 0.4rem;
}

.form-group label {
  font-weight: bold;
}

.form-group select {
  font-size: 1.2rem;
  padding: 0.6rem 0.2rem;
  cursor: pointer;
}
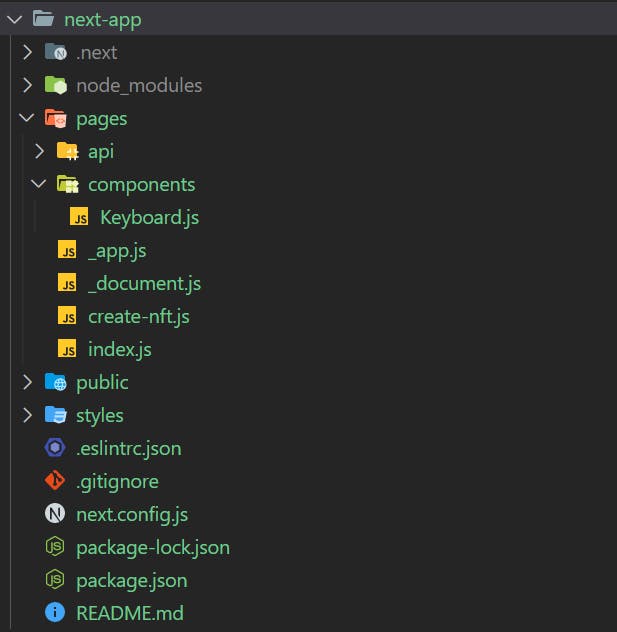
Once this is done, create a file create-nft.js inside pages folder and also create a new folder named components and then a file Keyboard.js inside that components folder. At the end of this initial clean-up and setup, we should have a folder structure similar to this:
Coding Our App
In our app, we have a home page and a form page. So, to route between these pages, we are going to use the in-built Next.js mechanism out of the box. Also, in order to send a request to our backend, we need another third-party library known as axios. So, let's install it by running:
npm install axios
This takes care of our installation. Now, we go to our index.js file and write:
import { useEffect, useState } from 'react';
import Link from 'next/link';
import axios from 'axios';
import Keyboard from './components/Keyboard';

const API_URL = 'http://localhost:5000';

export default function Home() {
  const [isEthereum, setIsEthereum] = useState(false);
  const [isConnected, setIsConnected] = useState(false);
  const [keyboardNFTs, setKeyboardNFTs] = useState([]);

  useEffect(() => {
    if (
      typeof window !== 'undefined' &&
      typeof window.ethereum !== 'undefined'
    ) {
      setIsEthereum(true);
      if (localStorage.getItem('metamask')) {
        setIsConnected(true);
      }
    }
  }, []);

  useEffect(() => {
    getKeyboardNFTs();
  }, []);

  async function getKeyboardNFTs() {
    const { data } = await axios.get(`${API_URL}/nft`);
    if (data.success) {
      setKeyboardNFTs(data.data);
    }
  }

  async function connectMetamask() {
    const accounts = await window.ethereum.request({
      method: 'eth_requestAccounts',
    });
    const account = accounts[0];
    if (typeof account === 'string') {
      localStorage.setItem('metamask', account);
      setIsConnected(true);
    }
  }

  if (!isEthereum) {
    return (
      <main className="home">
        <h1 className="heading">Keyboard NFT Minter</h1>
        <a
          href="https://metamask.io"
          className="btn btn-black btn-link"
          target="_blank"
          rel="noreferrer"
        >
          Please install metamask wallet to use this app
        </a>
      </main>
    );
  }

  if (isEthereum && !isConnected) {
    return (
      <main className="home">
        <h1 className="heading">Keyboard NFT Minter</h1>
        <button className="btn btn-black" onClick={connectMetamask}>
          Connect with Metamask
        </button>
      </main>
    );
  }

  if (isEthereum && isConnected) {
    return (
      <main className="home">
        <h1 className="heading">Keyboard NFT Minter</h1>
        <Link href="create-nft">
          <button className="btn btn-black btn-link">Create new NFT</button>
        </Link>
        <section className="nfts">
          {keyboardNFTs.map((keyboard) => {
            return (
              <Keyboard key={keyboard.id} keyboard={keyboard} preview={false} />
            );
          })}
        </section>
      </main>
    );
  }

  return null;
}
In this file, we coded our Home page logic. In Next.js, index.js file inside our pages folder denotes Home route.
Here, we took three states using react-hook useState(). Two Boolean, one array. Two Boolean states define the UI State of our App namely:
- No metamask wallet is installed or wallet is not connected:
(isEthereum = false OR isConnected = false) - Wallet is connected:
(isConnected = true AND isEthereum = true)
The keyboard state holds the keyboard list we get from the database after request through axios. We get our list using axios in getKeyboardNFTs() function and then setKeyboardNFTs(data.data) in it. This makes sure that we get our keyboards from our database. We do this inside useEffect hook as it is a code that is a part of side-effects.
We also are checking for ethereum object availability inside useEffect hook as (typeof window !== 'undefined' && typeof window.ethereum !== 'undefined') and based on that, we are setting the UI state Boolean variable isEthereum which indicates whether metamask is installed or not.
We also have connectMetamask() function which signs in our users using metamask and stores their address in localStorage and sets the Boolean isConnected to true.
Finally, we render the UI based on our two UI State Boolean values to complete our Home page. Link is used to route to different page without page refresh. We will notice an error in Keyboard Component at this stage as it doesn't exists.
So, next we go to our Keyboard.js file inside our components folder and populate it with the following code:
import { useEffect, useState } from 'react';

export default function Keyboard({ keyboard, preview }) {
  const [alt, setAlt] = useState('');
  const [imagePath, setImagePath] = useState('');
  const [style, setStyle] = useState('');
  const [connectedAccount, setConnectedAccount] = useState('');
  const [isOwner, setIsOwner] = useState(false);

  useEffect(() => {
    displayImage();
  }, [keyboard]);

  useEffect(() => {
    if (localStorage.getItem('metamask')) {
      setConnectedAccount(localStorage.getItem('metamask'));

      if (connectedAccount === keyboard.ownerAddress) {
        setIsOwner(true);
      }
    }
  }, [connectedAccount, keyboard.ownerAddress]);

  function getKindDir(kind) {
    return {
      0: 'sixty-percent',
      1: 'seventy-five-percent',
      2: 'eighty-percent',
      3: 'iso-105',
    }[kind];
  }

  function displayImage() {
    const kindDir = getKindDir(keyboard.keyboardKind);
    const filename = keyboard.keyboardType.toUpperCase();
    setImagePath(`assets/keyboards/${kindDir}/${filename}.png`);
    setAlt(
      `${kindDir} keyboard with ${filename} keys ${
        keyboard.keyboardFilter
          ? `with
${keyboard.keyboardFilter}`
          : ''
      }`
    );
    setStyle(keyboard.keyboardFilter);
  }

  return (
    <div className="nft">
      {preview && <h2>Preview</h2>}
      <div className="borders">
        <img
          height={230}
          width={360}
          className={style}
          src={imagePath}
          alt={alt}
        />
      </div>
      {!preview && !isOwner && <button className="btn btn-tip">Tip</button>}
      {!preview && isOwner && (
        <button className="btn btn-no-tip">You own it!</button>
      )}
    </div>
  );
}
Here, we have two props in our component: keyboard and preview. The preview is a Boolean prop which is used to display the Preview heading. The keyboard is an object prop containing the keyboard data. Notice that we pass this keyboard as a dependency in our useEffect hook responsible for displaying the keyboard. This is because when we change the form values while selecting to see the preview, the keyboard values changes and therefore we need it inside the dependency to detect the change and run the displayImage() function again.
getKindDir() function here takes the kind property value as in 0, 1, 2, and 3 and returns the directory name of the keyboard (under Assets folder). Filename comes from the type property.
We are also using a Boolean isOwner to know if the current address belongs to the keyboard creator's address. For this, we are using useEffect hook and the following line:
useEffect(() => {
    if (localStorage.getItem('metamask')) {
      setConnectedAccount(localStorage.getItem('metamask'));

      if (connectedAccount === keyboard.ownerAddress) {
        setIsOwner(true);
      }
    }
  }, [connectedAccount, keyboard.ownerAddress]);
Here, this is dependent on connectedAccount and ownerAddress property from keyboard.
Finally, we go back to our create-nft.js file and write the following code:
import { useEffect, useState } from 'react';
import axios from 'axios';
import Keyboard from './components/Keyboard';

const API_URL = 'http://localhost:5000';

export default function CreateNFT() {
  const [keyboard, setKeyboard] = useState({
    keyboardKind: 0,
    keyboardType: 'pbt',
    keyboardFilter: 'none',
    ownerAddress: localStorage.getItem('metamask'),
  });

  function change(event) {
    setKeyboard({ ...keyboard, [event.target.name]: event.target.value });
  }

  async function onSubmit(event) {
    event.preventDefault();
    const nft = {
      kind: keyboard.keyboardKind,
      type: keyboard.keyboardType,
      filter: keyboard.keyboardFilter,
      owner: keyboard.ownerAddress,
    };
    console.log(nft);
    const { data } = await axios.post(`${API_URL}/nft`, nft);
    if (data.success) {
      notify(data.message);
      window.location.href = '/';
    }
  }

  function notify(message) {
    alert(message);
  }

  return (
    <main className="home">
      <form className="form" onSubmit={onSubmit}>
        <div className="form-group">
          <label htmlFor="kind">Keyboard Kind</label>
          <select
            id="kind"
            name="keyboardKind"
            onChange={change}
            defaultValue={keyboard.keyboardKind}
          >
            <option value="0">60%</option>
            <option value="1">75%</option>
            <option value="2">80%</option>
            <option value="3">ISO-105</option>
          </select>
        </div>
        <div className="form-group">
          <label htmlFor="type">Keyboard Type</label>
          <select
            id="type"
            name="keyboardType"
            onChange={change}
            defaultValue={keyboard.keyboardType}
          >
            <option value="abs">ABS</option>
            <option value="pbt">PBT</option>
          </select>
        </div>
        <div className="form-group">
          <label htmlFor="filter">Keyboard Filter</label>
          <select
            id="filter"
            name="keyboardFilter"
            onChange={change}
            defaultValue={keyboard.keyboardFilter}
          >
            <option value="none">None</option>
            <option value="sepia">Sepia</option>
            <option value="grayscale">Grayscale</option>
            <option value="invert">Invert</option>
            <option value="hue-rotate-90">Hue Rotate (90°)</option>
            <option value="hue-rotate-180">Hue Rotate (180°)</option>
          </select>
        </div>
        <button type="submit" className="btn btn-black">
          Mint NFT
        </button>
      </form>

      <section className="preview">
        <Keyboard preview={true} keyboard={keyboard} />
      </section>
    </main>
  );
}
This needs a little in-depth breakdown in some important places, so:
function change(event) {
    setKeyboard({ ...keyboard, [event.target.name]: event.target.value });
  }
Here, we are declaring only one function change which takes care of changing the individual property values of keyboard object. The trick is to use name input html property as in [event.target.name] to differentiate between the keyboard object keys. This means that the name values must be the same as object keys in keyboard: name="keyboardKind", name="keyboardType", and name="keyboardFilter".
We are then submitting the values to our backend as in:
async function onSubmit(event) {
    event.preventDefault();
    const nft = {
      kind: keyboard.keyboardKind,
      type: keyboard.keyboardType,
      filter: keyboard.keyboardFilter,
      owner: keyboard.ownerAddress,
    };
    console.log(nft);
    const { data } = await axios.post(`${API_URL}/nft`, nft);
    if (data.success) {
      notify(data.message);
      window.location.href = '/';
    }
  }

  function notify(message) {
    alert(message);
  }
Notice that we used axios to do post request to our backend we build in part-3 of the series. This means the backend must be up and running while making this request. Also, rather than doing alert directly, we use notify instead. This allows us to safely replace alert in future with toastify notification coded outside of this UI component (to increase re-usability by decoupling). In case you want to know this technique in depth (on conceptual level), watch this video I did on my channel a while back: Birthday Palindrome in React and JavaScript [USE SAME CODE!]
Testing Our App
At this point, we have successfully coded our app. It's time to test it out. So, let's run the command:
npm run dev
This opens our app. Now test it out. We should be able to create a new keyboard and see the difference between the ones we created and the ones created by someone else. To test this, all we need is to run our app in two different browsers with two different metamask addresses.
Final Words
This was one big read! Congratulations! You made it till the end in this short attention span modern world. Tell me if you liked it or not. In the next article, we will build the same frontend in Remix. See you then. Bye!

