

Principles Of 3D Design For Flutter
A guide on how to implement 3D designs and animations on your Flutter application using basic widgets


Introduction
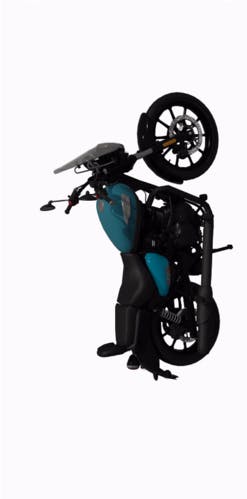
This article is an introduction to implementing 3D design on Flutter application. While we won't be going into depth about the advanced features, we shall explore how to get creative and imaginative when using common widgets and tools to create great designs. In this exploration, we shall learn how to design the 3D image given below which in turn will give you knowledge on manipulating tools by applying mathematics to create innovative designs.
Why Flutter?
When compared to other cross-platform tools, Flutter is unique because it makes no attempt to emulate the underlying native SDKs and instead creates widgets using its high-performance rendering engine-Skia. Flutter executes this by requesting the underlying OS for a window and then uses Dart to handle content by using Skia as a platform. Post this, all UI functionalities, which include scroll, touch events and animations, must be re-implemented in Flutter for the development to run smoothly. This concept is quite similar to how gaming engines do things too!
The Coding:
Now a 3D design may look complex at first glance; but on close observation, it is seen that any design can be split into two parts- Widgets and Objects.
- Elements that can be represented using what is known as "widgets". Refer to the image below:

- "Objects" like the bike in the image given below:
1. Widgets in 3D
Flutter does not expose any optimized 3D APIs. On the other hand, it provide us with a third axis, the z-axis, in addition to the x-axis and the y-axis which we can use to manipulate widgets. To three dimensionalize a widget, we will be needing three basic sub-widgets, which are explained in length below:
- A Stack widget to place different components.
- A Transform widget to rotate, scale and translate different components to create sceneries.
- A GestureDetector widget to move around in the scenery.
Stack
A stack is a Flutter widget that holds a list of widgets and arranges them on top of the other for future use. They allow developers to facilitate the overlapping of multiple widgets on a single screen while also rendering them. Let's see how to use stacks to place components for this application:
Stack(
    children: <Widget>[
    // page background
    Container(
        decoration: BoxDecoration(
            gradient: LinearGradient(
                begin: Alignment.topRight,
                end: Alignment.bottomLeft,
                colors: [Colors.white, Colors.white, Colors.blue],
            ),
        ),
    ),
    bikeBackgroundWidget(),
    bikeWidget(),
    bikeForegroundWidget(),
    bikeSpecsWidget(),
    bikeSpecsFooterWidget(),
    ],
),
The first thing that we are going to place is a page background and we can then get proceed to the next step; the page background is the only thing that does not move on the animation shown at the beginning of the article. The next step is to set the background that we desire for the bike when the bike is rotated sideways. Thirdly, we have to place the bike on the rest of the elements to set the stage for further animations. After this, we have to place the "Royal Enfield" and "Meteor 350" logos to be a part of the bike's foreground. These are further detailing in the form of bike specifications which are to appear on the left side when the bike is vertical. Lastly, we have the "All About Enfield" symbol as a part of the specifications footer. On completion, we shall have all the components that we need fro go forward.
Transform
Flutter also has a transform widget that transforms the child widget before painting it. After we have placed all the components on the screen using stacks, we will need to build a scene by rotating things around, scaling them, translating them and also possibly playing with the texture of the components. To achieve this, the transform widget provides us with two types of constructors:
- Single operation constructors
- Default constructor
Single operation constructor
A single operation constructor, as the name suggests, allows us to do only one operation at a time. For example, consider a square and factor in the code below:
Container(
    height: 200,
    width: 200,
    color: Colors.orange,
)
Rotate this square using the rotate property, give it an angle and finally set an origin if you don’t want the origin to be the center of the object, and you are done with the operation! Use the code given below to rotate the square at a forty-five degrees angle around its bottom-right vertex:
Transform.rotate(
    angle: pi / 4,
    origin: Offset(100, 100),
    child: Container(
        height: 200,
        width: 200,
        color: Colors.orange,
    ),
)
You can also scale the square by using the scale property to give it a scaling factor and set an origin. The square will now become twice its original size. Use the code give below to do this:
Transform.scale(
    scale: 2,
    origin: Offset(100, 100),
    child: Container(
        height: 200,
        width: 200,
        color: Colors.orange,
    ),
)
Lastly, to translate this square, that is move it, you can use the translate property and give it an offset Also, there is no origin parameter in this scenario as the origin is not affected. Use the code given below to use the translate property:
Transform.translate(
    offset: Offset(100, 100),
    child: Container(
        height: 200,
        width: 200,
        color: Colors.orange,
    ),
)
Default constructor
The default constructor, unlike single operation constructors, allows us to do multiple operations at once. This was made possible by making use of a four dimensional matrix, i.e. a matrix with four rows and columns. We will be making use of an identity matrix and manipulate values at certain places to perform any transform operation.
For rotation, we will make use of different matrices depending on the axis that we want to rotate.
- The matrix to perform rotation around the x-axis will be:
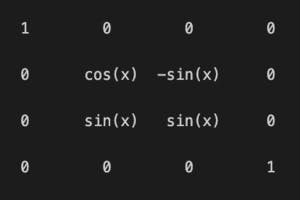
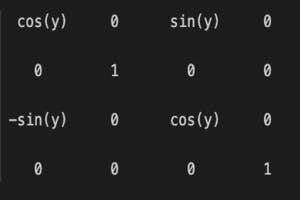
- For rotation around the y-axis, the matrix will be:
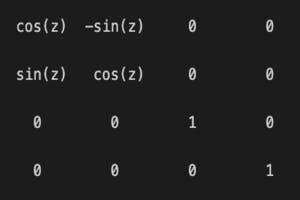
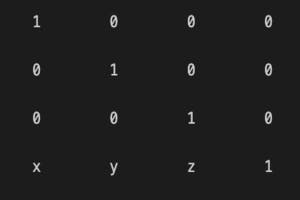
- And lastly, for rotation around the z-axis, it will be:
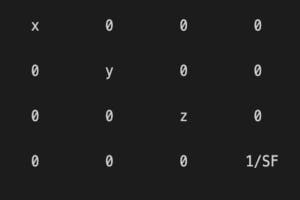
To scale around the x-axis, the y-axis, and the z-axis, we will change the x, the y, and the z values respectively. Also to scale in all the direction, we need to replace the SF in the matrix with a scaling factor.
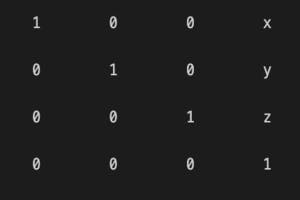
To translate, we will specify the offset in the x-axis, the y-axis and the z-axis in place of the x, the y, and the z values respectively.
Lastly, we have a special matrix to add depth to the components. Depth is the phenomenon where an object that is further from us appears smaller and the part that is nearer to us appears larger. Hence, to add depth in the x-axis, the y-axis and the z-axis we will have to replace the x, the y and the z values respectively as a higher value will give a higher gradient of length by distance. So the greater this number, the nearer you will be to the object! Refer to the image below:
Let's see an example of how the transform property is used to rotate, scale and move all the components of the application:
Transform.translate(
    offset: Offset(bikeSpecsWidth * animationController.value, 0),
    child: Transform(
        transform: Matrix4.identity()
          ..setEntry(3, 2, 0.001)
          ..rotateY((pi / 2 + 0.1) * -animationController.value),
        alignment: Alignment.centerLeft,
        child: bikeBackgroundWidget(),
    ),
)
Here, we have to consider the bike's background to fully understand the transform widget. As the bike moves from the side to the top, there are two things that will happen in the bike's background. Firstly, it will move on the x-axis and then it will proceed to rotate around the y-axis. Therefore, we will use the Transform.translate function at the beginning to move the object on the x-axis and then we will use the default constructor to rotate it around the y-axis. We will also use setEntry(3, 2, 0.001) to add depth along the z-axis.
Gesture Detector
We can encapsulate any widget with a gestureDetector and it will proceed to listen to gestures from that particular widget’s layer which in turn will provide us with many useful callbacks. We shall examine some of the major ones in this segment:
onHorizontalDragStart: A pointer which has contacted the screen and may potentially begin to move horizontally.onHorizontalDragUpdate: A pointer that is in contact with the screen and moving horizontallyonHorizontalDragEnd: A pointer that was previously in contact with the screen and moving horizontally but which also moved at a specific velocity when it stopped coming into contact with the screen.
We also functions like onVerticalDragStart, onVerticalDragUpdate and onVerticalDragEnd to detect vertical gestures. In addition to these, we have onPanStart, onPanUpdate and
onPanEnd to detect both horizontal and vertical gestures at the same time. Let's see how we use gestureDetector to interact with all the different components in our application:
GestureDetector(
    onHorizontalDragStart: onDragStartFunction,
    onHorizontalDragUpdate: onDragUpdateFunction,
    onHorizontalDragEnd: onDragEndFunction,
    child: screenWidget(),
)
- We have to mark the starting position when a pointer comes in contact with the screen using the code given below:
void onDragStartFunction(DragStartDetails dragStartDetails) {
 // to mark starting position
 onDragPositionStart = dragStartDetails.globalPosition.dx;
}
Then when the pointer moves across the screen, we shall calculate the horizontal distance using the starting position which can be derived from the following code:
void onDragUpdateFunction(DragUpdateDetails dragStartDetails) { var dragDistance = dragStartDetails.globalPosition.dx - onDragPositionStart; var dragDistanceFactor; if (dragDistance > 0) { dragDistanceFactor = dragDistance / screenWidth; if (isBikeSpecsVisible && dragDistanceFactor <= 1.0) return; animationController.value = dragDistanceFactor; } else { dragDistanceFactor = 1 + (dragDistance / screenWidth); if (!isBikeSpecsVisible && dragDistanceFactor >= 0.0) return; animationController.value = dragDistanceFactor; } }- At last, when the pointer is no longer in contact with the screen, we can make use of either the distance or the velocity to complete the transition if the pointer was left in between. Use the code given below:
void onDragEndFunction(DragEndDetails dragStartDetails) {
 // for swipe
 if (dragStartDetails.velocity.pixelsPerSecond.dx.abs() > 500) {
     if (dragStartDetails.velocity.pixelsPerSecond.dx > 0) {
         animationController.forward(from: animationController.value);
         isBikeSpecsVisible = true;
     } else {
         animationController.reverse(from: animationController.value);
         isBikeSpecsVisible = false;
     }
     return;
 }
 // for drag
 if (animationController.value > 0.5) {
     animationController.forward(from: animationController.value);
     isBikeSpecsVisible = true;
 } else {
     animationController.reverse(from: animationController.value);
     isBikeSpecsVisible = false;
 }
}
2. Objects in 3D
Coming to the 3D bike that was shown in the animation, it will be very difficult to render it using Flutter widgets because of which it is imperative to look for alternatives. Using packages is an optional but we did not do that here in this scenario. The reasons being:
- There are a very few packages available in the market
- By using packages, your speed of development is limited to the speed of development of the package because of which there is only as much you could do.
- Doing this process manually will give you more control over the animation.
But on the other hand, there are also some advantages if you do choose to develop this with the help of packages. One of them would be that you will get most of the things you need out of the box, i.e. the complex stuff as well as the boilerplate code.
Since we are not using any package, how will we go about? To proceed, we can make use of a sequence of images to provide the most control from all the options available as we will have access to each of the frames.
The next question is, how do you get this sequence of images? What I did in this scenario was, I downloaded a gltf file of a free 3D bike model from the internet. Then I imported that from Blender. I also taught myself the basics of Blender and rendered an animation in which the camera travels from the side to the top of the bike.
Now to render a sequence of images in Flutter, we have to write a class called ImageSequence:
ImageSequence(
    imageRelativePath: "assets/bikeImageSequence/",
    imageNameIncrement: 1,
    imageNameLength: 4,
    imageFileFormat: ".png",
    totalImages: 120,
    currentImage: (animationController.value * 120).ceil(),
)
The parameters that this class accepts are:
imageRelativePath: Here, we will specify the path of the folder containing the sequence of images relative to the directory atpubspec.yamllevel.imageNameIncrement: Using this, we will specify the image's file name increment, i.e. if files are in the order of0001.png,0002.png, and so on.imageNameLength: This is to specify the length of each file name, i.e. if file names are0001.png,0002.png, and so on.imageFileFormat1: This is to specify the file format of each image, like.png,.jpg, etc.totalImages: Used to specify the total number of images in the sequence.currentImage: To specify the current image to render which we can also control using thegestureDetector.
To proceed, we will make use of these parameters to render the images inside the 'ImageSequence' class using the code given below:
Widget build(BuildContext context) {
    if (widget.currentImage != null) {
        if (currentFrame == null || widget.currentImage != previousFrame) {
            previousFrame = widget.currentImage;
            if (previousFrame < widget.totalImages)
                currentFrame = Image.asset(
                getDirectory(),
                gaplessPlayback: true,
            );
        }
    }
    return currentFrame;
}
Conclusion
Cool right?! I enjoyed executing this animation and I hope you did too! Also, a point to note is that this looks 3D enough! So, why is it often said that Flutter does not expose an optimized 3D API? In this particular scenario we have a fixed camera while we are only manipulating the scenery but it is not as simple in most cases. The difference here would be that playing with the camera is easy, but manipulating the complete scenery like scaling, rotating and translating each object in the scenery is a very tedious task.
You can find the source code of the above application here and a detailed video of the same!
Thanks for reading! Do leave some likes and comments.