

Writing automation test cases using Ga-wdio for mobile application.


Ga-wdio what it is
Ga-wdio is an automation CLI tool that creates the tests project for the Web, the API & the Mobile (iOS & Android) App / Browser. Runs various things like GeckoDriver , ChromeDriver & Appium internally for various stacks, browsers & modes.
Why should you use Ga-wdio
Ga-wdio provides many features like creating a boilerplate, checking the appium's necessary & optional dependancies on the system
You can check all the features provided by ga-wdio here .
Setup for Ga-wdio & appium for mobile app testing
To setup Ga-wdio & appium just run the simple command.
npm install -g ga-wdio appium

ga-wdio create
It will create a project using the boilerplate provided by Ga-wdio
That's It !
Ga-wdio is ready to use now.
Setting up android & iOS automation testing
To setup android and IOS environment you need to do follow some steps from the following link from the official documentation.
github.com/GeekyAnts/ga-wdio/wiki/Mobile-En..
Following are some issues you might face while writing tests for a mobile application and solutions for them.
To perform automation test we need to find specific elements on which we can perform test actions. For this tutorial we will be using xpath to find elements. Also we have to pass testId and accessibilitylabel to react-native components to locate.
Adding testID & getting xpath in React Native app
Let's first add testId and accessibilityLabel to our React native project.
To add testId we just need to pass accessibilityLabel and testID params as props to the component.
<Component accessibilityLabel={ 'FOO' } testID={ 'FOO' } />
Also in much cleaner way we can create a function in utils and pass an Id
 export function testProps (id) {
    return {testID: id, accessibilityLabel: id};
  }

<Component ...testProps('FOO') />
Finding and interacting with elements using Xpath
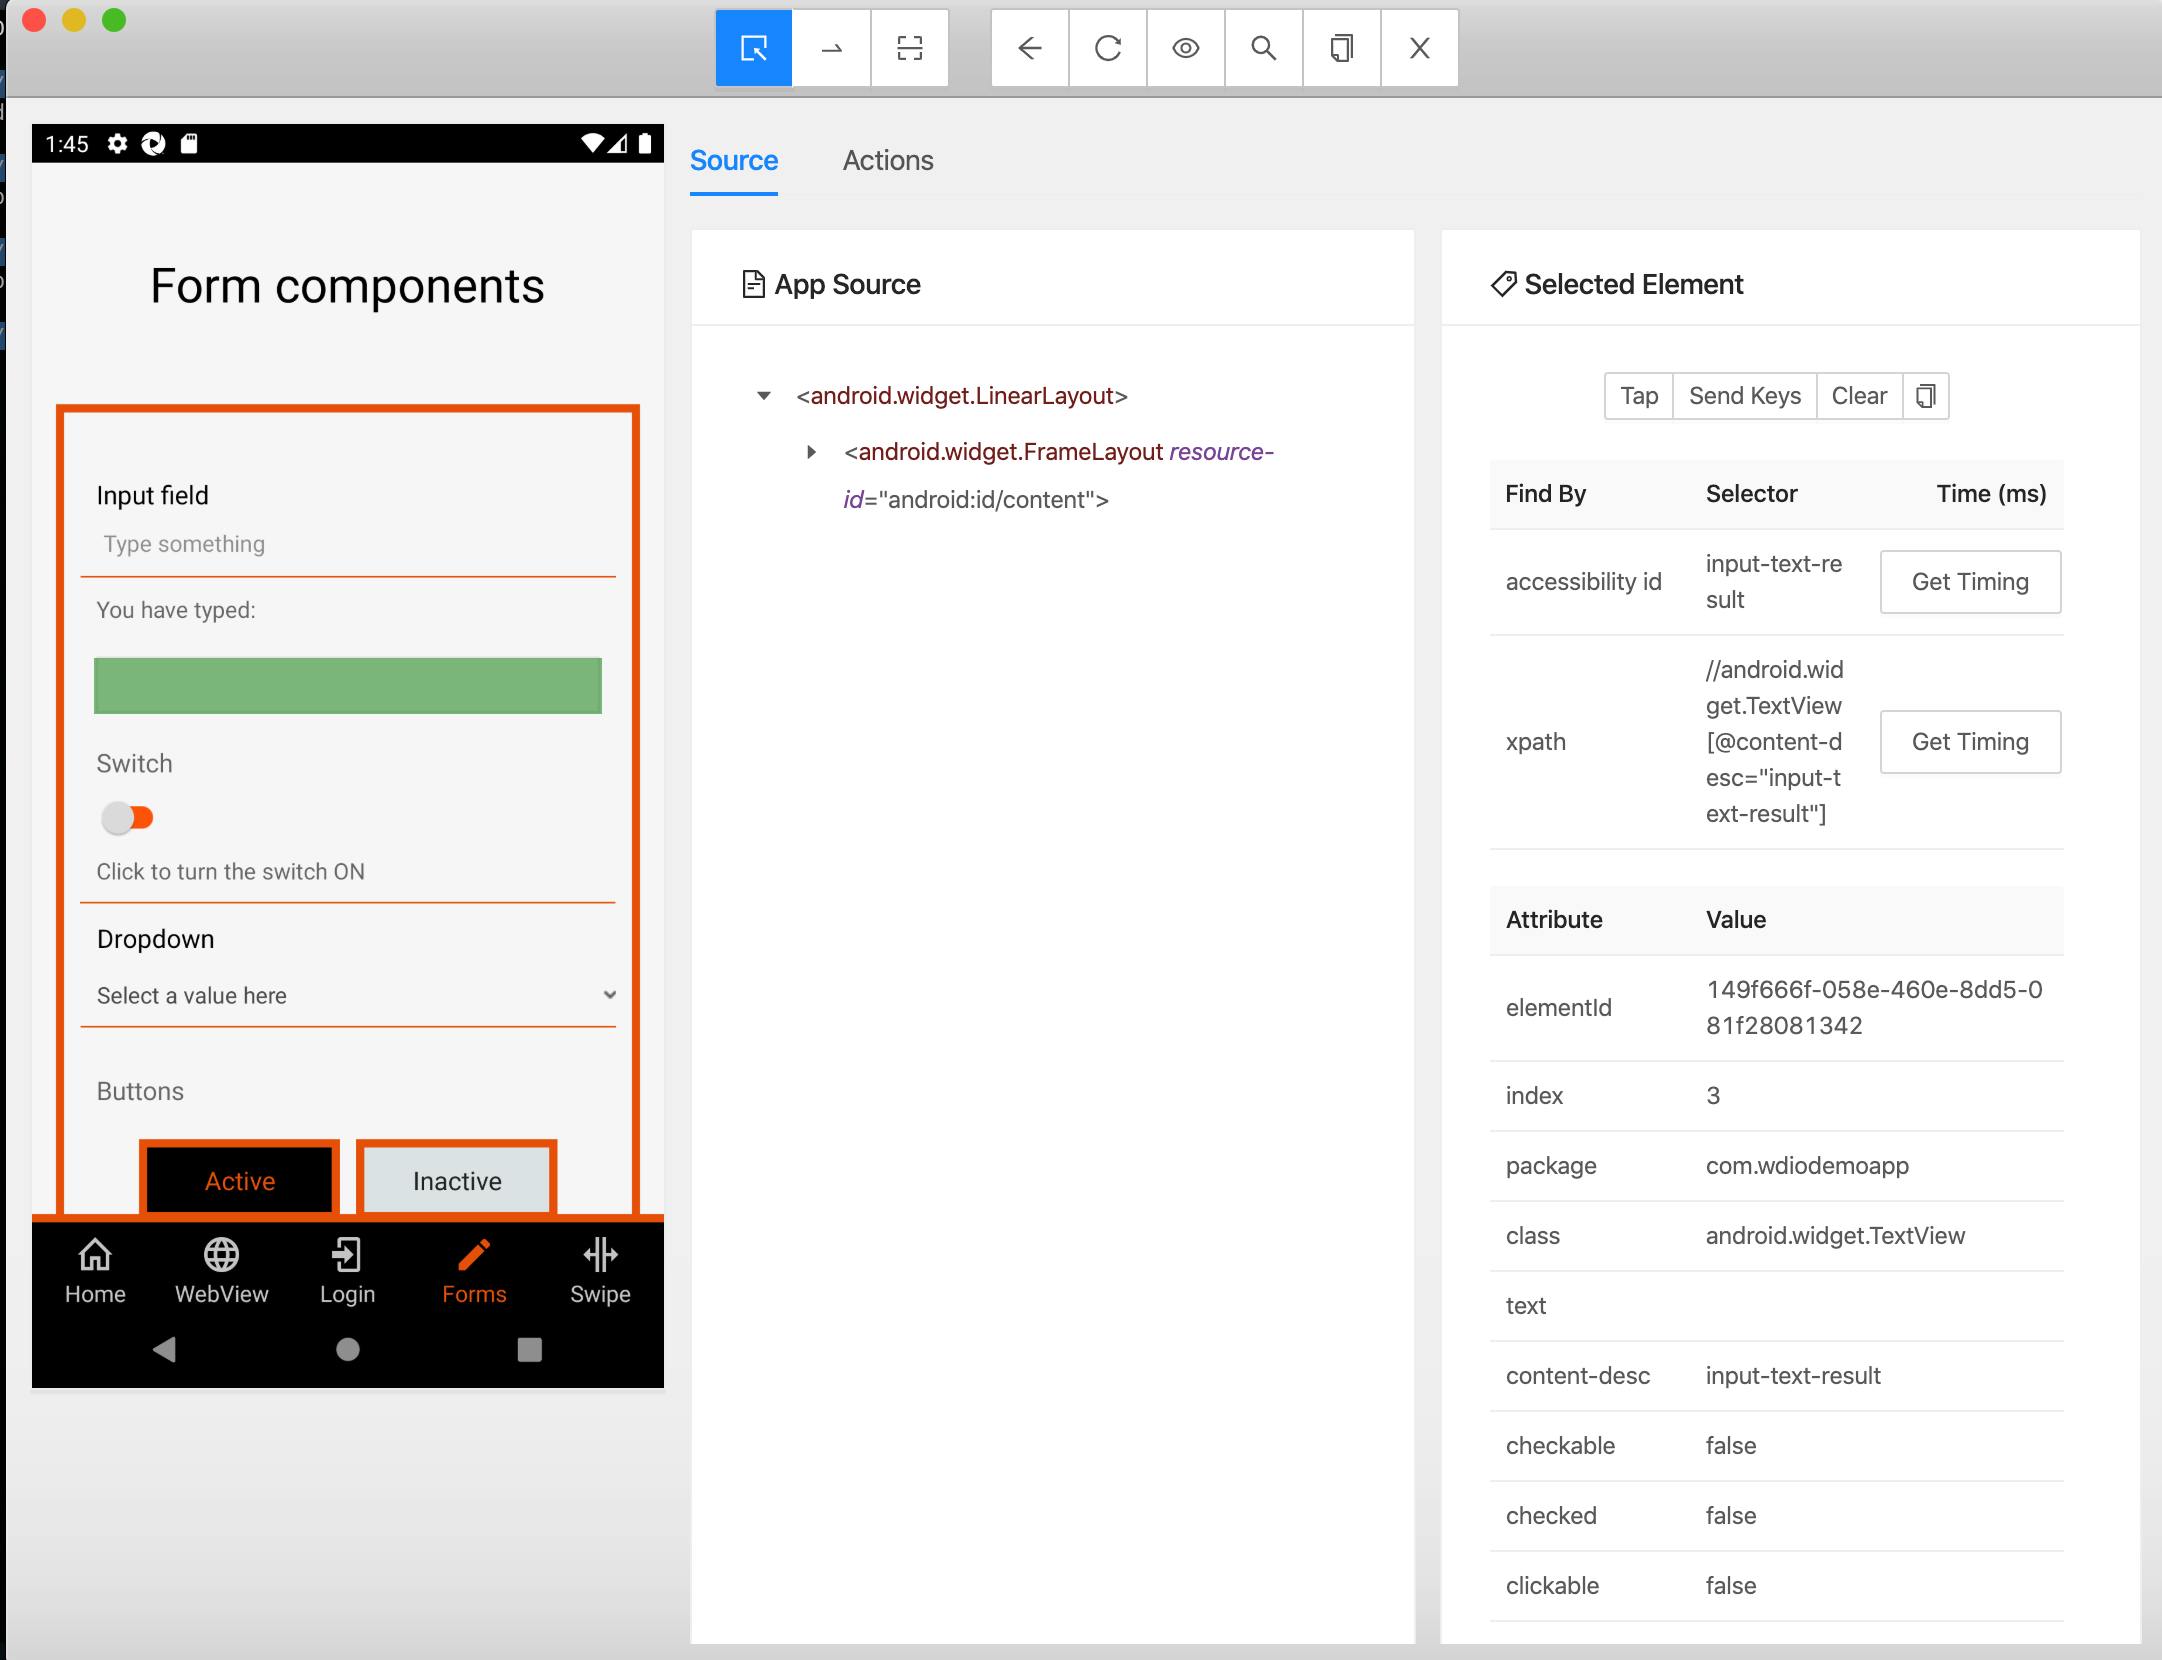
We have used Xpath to select and interact with element using ga-wdio. For finding Xptah or accessibility ID I have used Appium Desktop
With Appium Desktop you can find any element and its locators by either clicking the element on the screenshot image, or locating it in the source tree.
Checkout this link for more information about finding the element.
Using gesture & web view on ga-wdio
Working with gestures
In most of the application use touch gesture for interactivity, navigation and scrolling content.
Appium provides touchPerform function to handle the gestures.
/*    This is a swipe up
       const from = { x: 100, y: 250 }
        const to = { x: 100, y:50 }
*/

swipe (from, to) {
        driver.touchPerform([{
            action: 'press',
            options: from,
        }, {
            action: 'wait',
            options: { ms: 1000 },
        }, {
            action: 'moveTo',
            options: to,
        }, {
            action: 'release',
        }]);
        driver.pause(1000);
    }
In many application content on mobile screen is longer than the height of mobile specially for forms.
If the element we need to test is below the visible area on mobile device, testing tools will not be able to find that element. In such situation we have to scroll until we find the element and do the testing.
checkIfDisplayedWithScrollDown (element, maxScrolls, amount = 0) {
        if ((!element.isExisting() || !element.isDisplayed()) && amount <= maxScrolls) {
            this.swipe(from, to);
            this.checkIfDisplayedWithScrollDown(element, maxScrolls, amount + 1);
        } else if (amount > maxScrolls) {
            throw new Error(`The element '${element}' could not be found or is not visible.`);
        }
    }
Working with webview
When we are working with Hybrid app, that is Native + webview.
By default we will have NATIVE_APP as the current context. If a webview is loaded then we will have two context as ["NATIVE_APP","WEBVIEW_28158.2"]
We can get list of available context by using driver.getContexts(); method.
We can not start looking for a particular element in webview if webview is not rendered or not fully loaded. We can use following methods to confirm these conditions
export const CONTEXT_REF = {
    NATIVE: 'native',
    WEBVIEW: 'webview',
};
const DOCUMENT_READY_STATE = {
    COMPLETE: 'complete',
    INTERACTIVE: 'interactive',
    LOADING: 'loading',
};

// Wait for the webview context to be loaded

    waitForWebViewContextLoaded () {
        driver.waitUntil(
            () => {
                const currentContexts = this.getCurrentContexts();

                return currentContexts.length > 1 &&
                    currentContexts.find(context => context.toLowerCase().includes(CONTEXT_REF.WEBVIEW));
            }, {
                timeout: 10000,
                timeoutMsg: 'Webview context not loaded',
                interval: 100,
            },
        );
    }

 // Wait for the document to be full loaded

    waitForDocumentFullyLoaded () {
        driver.waitUntil(
            () => driver.execute(() => document.readyState) === DOCUMENT_READY_STATE.COMPLETE,
            {
                timeout: 15000,
                timeoutMsg: 'Website not loaded',
                interval: 100,
            },
        );
    }
Working with hooks
Ga-wdio allows you to implement hooks supported by webdriver.io. We can use these in config (android.conf.js/ios.conf.js )files.
I was asked to create a custom log report and send it over mail after completion on tests.
For implementing the same I have used after, afterTest and onComplete hooks in configs.
  onComplete: async (result) => {
    await sendReport(process.env.GA_SESSION_ID);
  }
Checkout all the hooks here.
Writing test cases scenario
Usually we are writing test cases on JS using chai or mocha. Sample code snippet for login test .
import TabPage from "../common/TabPage";
import Login from "../common/Login";

describe("Test login elements", () => {
    it("It should go to login page", () => {
        TabPage.login.click();

        Login.email.click();

        Login.email.setValue("test@webdriver.io");
        Login.password.setValue("Test1234!");
        if (driver.isKeyboardShown()) {
            driver.hideKeyboard();
        }

        Login.loginButton.click();
        Login.loginAlert.click();
    });
})
const xpath = require("../xpath");
const tabXpath = xpath("tabPath.json");

class TabPage {
    get home() {
        return $(tabXpath.HOME);
    }
    get webView() {
        return $(tabXpath.WEB_VIEW);
    }
    get login() {
        return $(tabXpath.LOGIN);
    }
    get forms() {
        return $(tabXpath.FORMS);
    }
    get swipe() {
        return $(tabXpath.SWIPE);
    }
}

export default new TabPage;
Useful links
- Ga-wdio documentation-> geekyants.github.io/ga-wdio
- Appium -> appium.io.
webdriver -> webdriver.io.
Thank you for reading. Cheers !