What Is PyCaret?
PyCaret is an open-source machine learning library inspired by the CARET package in R written in Python. Its goal is to employ minimal code and lesser hypotheses to gain insights during a cycle of machine learning exploration and development. With the help of this library, we can quickly and effectively carry out end-to-end machine learning experiments.
Why Use PyCaret?
Using this library requires minimal programming to run any machine learning experiment. We can carry out sophisticated machine learning experiments in a flexible manner thanks to PyCaret's features.
Operations utilizing this library are automated and stored in the PyCaret Pipeline, which is completely coordinated for and aimed at. This library also allows us to quickly transition from data analysis to model building and deployment. It also aids in automating a variety of tasks, such as changing categorical data or adding missing values, engineering the existing features, or enhancing hyperparameters in the existing data of models.
We will experiment with a classification use case with PyCaret on the Default of credit card client dataset from Kaggle in order to predict whether a Customer will default or not. This prediction will be determined by a number of features that we'll examine in this tutorial.
Prerequisites:
- Jupyter Notebook or Visual Studio with Jupyter extension
- Python 3.6+ version
- PyCaret latest version and release notes can be found here.
Getting Started
As a first step toward our process, we’ll install the required libraries to perform our operations, and our dependencies include
PyCaret:
This will be our main trump card that enables us to leverage the ML pipelines for end-to-end execution.
Pandas:
Pandas is an open-source software library built on top of the Python programming language for analyzing, cleansing, exploring, and manipulating data.
Let’s now include these dependencies using the pip commands.
pip install pycaret pandas
In the next step, we will import the dependencies to perform various operations.
import pandas as pd
from pycaret.classification import *
Loading The Data Set
The Credit card data set that we will use can be downloaded from here. Download the data set into the folder you’re working on.
Once the download is finished, we can load the data set using Pandas.
df = pd.read_csv(UCI_Credit_Card.csv)
Here, we’re assigning the loaded data set to a variable called df (data frame), which is the generally used naming convention used by developers. You have every liberty to use your own variable name as per your convenience.
In order to ensure that the dataset has loaded and to view it, we’ll use
df.head()
The top five rows of the data frame are shown by default when using Python's head method. It only accepts one parameter, which is the number of rows. This parameter allows us to specify the number of rows to display.
df.tail()
Here, df.tail()throws the details of the last five rows
Getting Data Set - Method 2
We can also grab the curated data sets from the PyCaret Data repository, which consists of fifty-six popular data sets for various use cases such as classification, regression, clustering, NLP, etc. Mind you, for your own data set you cannot employ this method. You can view the list and specifications of those datasets with just two lines of code.
from pycaret.datasets import get_data
all_datasets = pycaret.datasets.get_data('index')
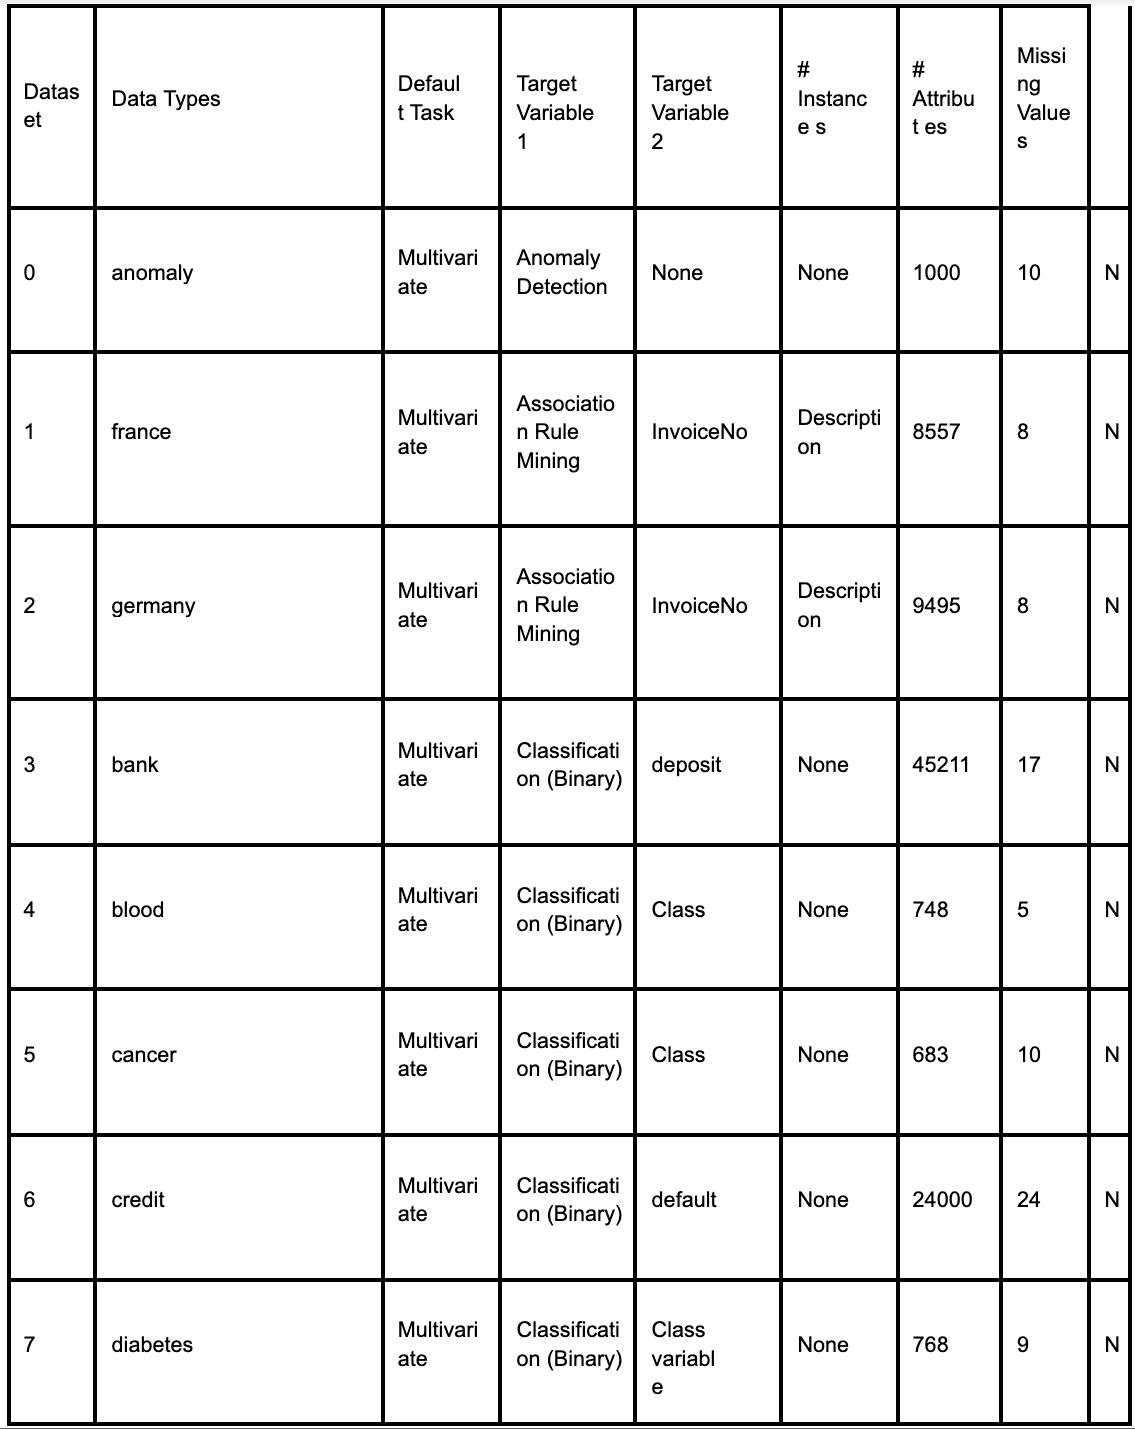
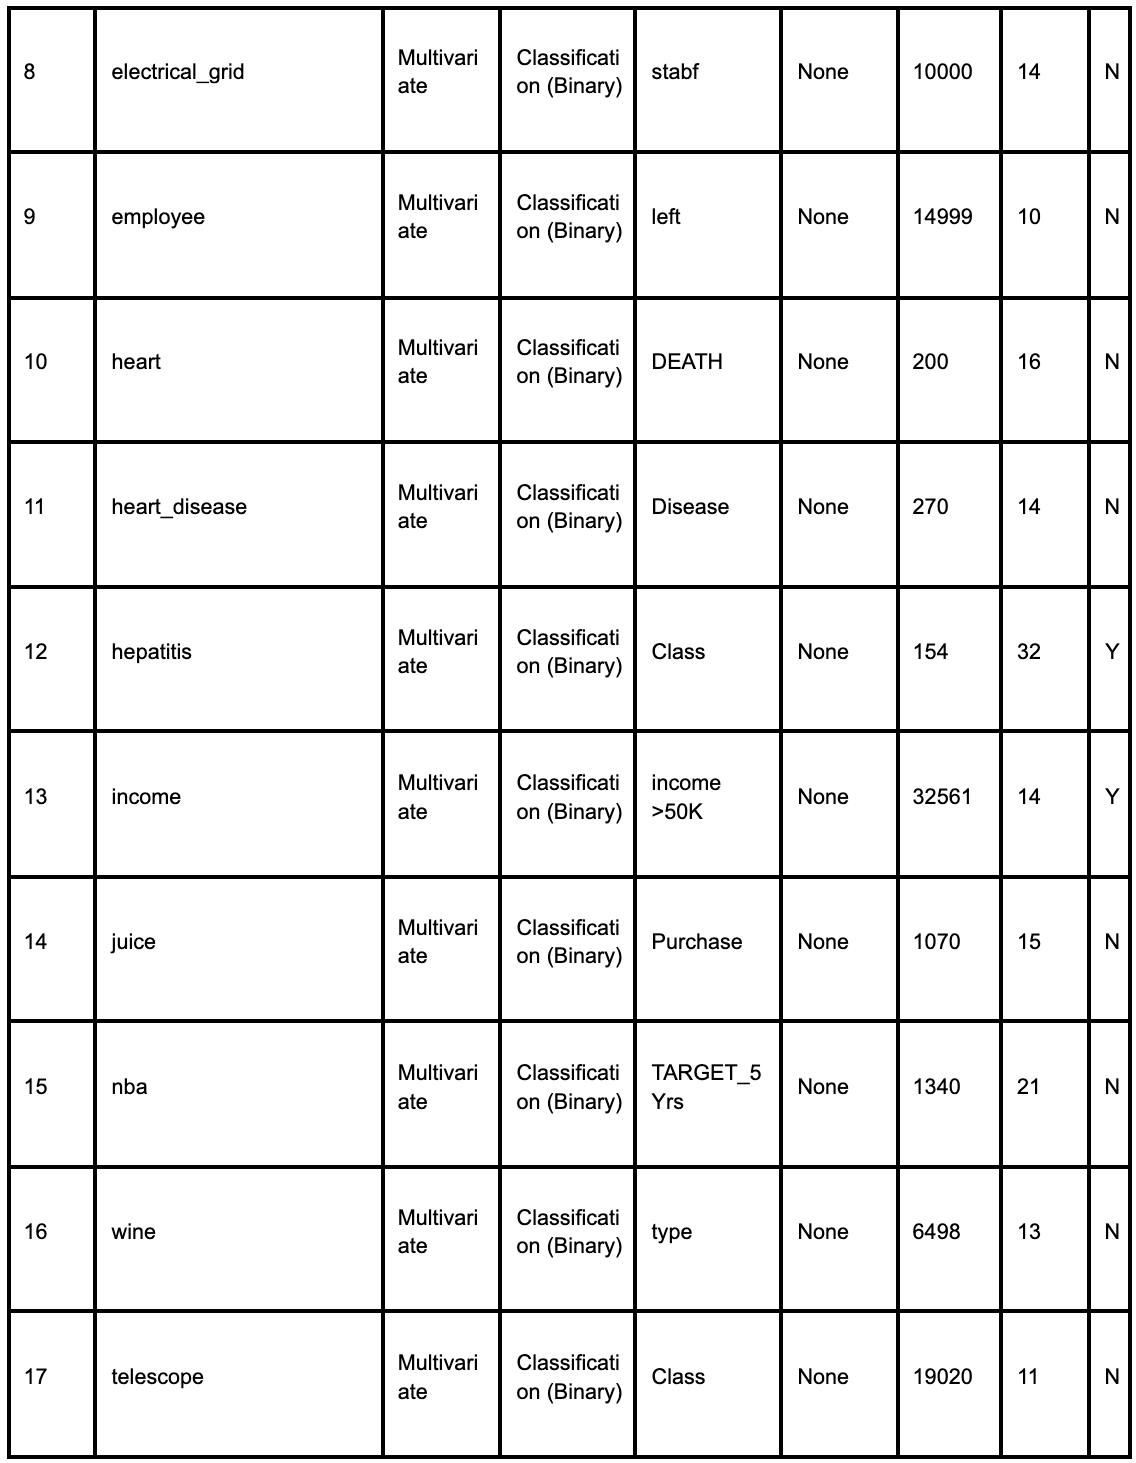
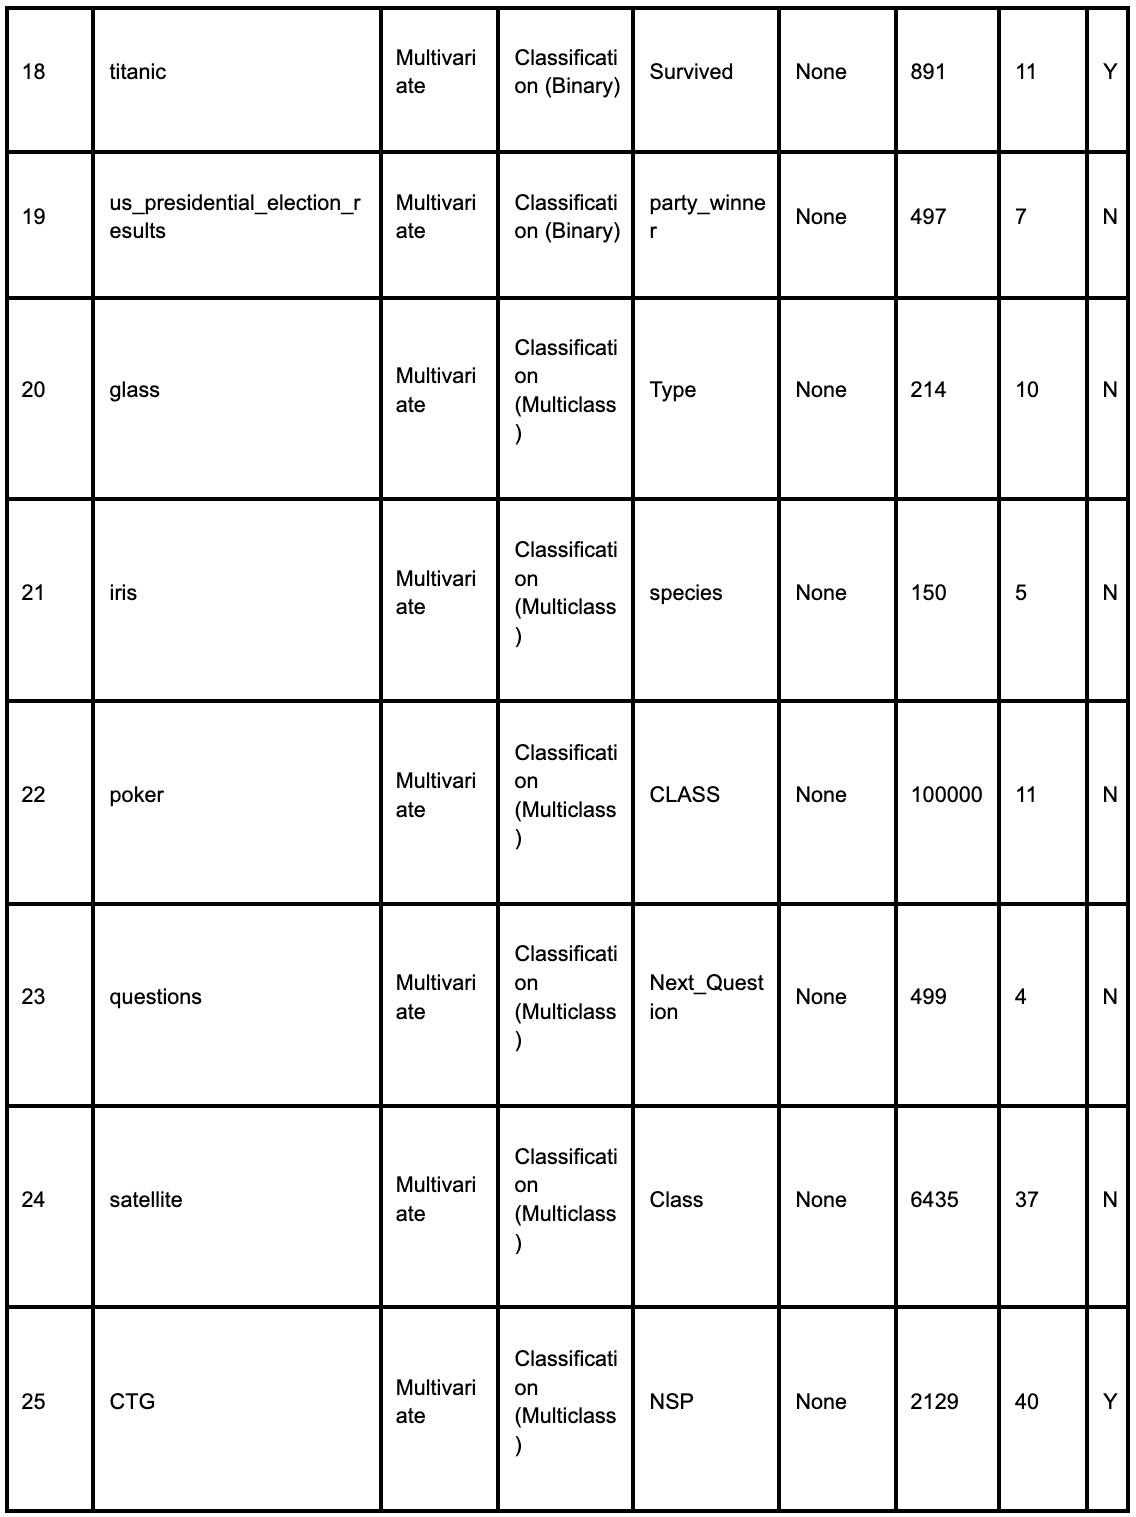
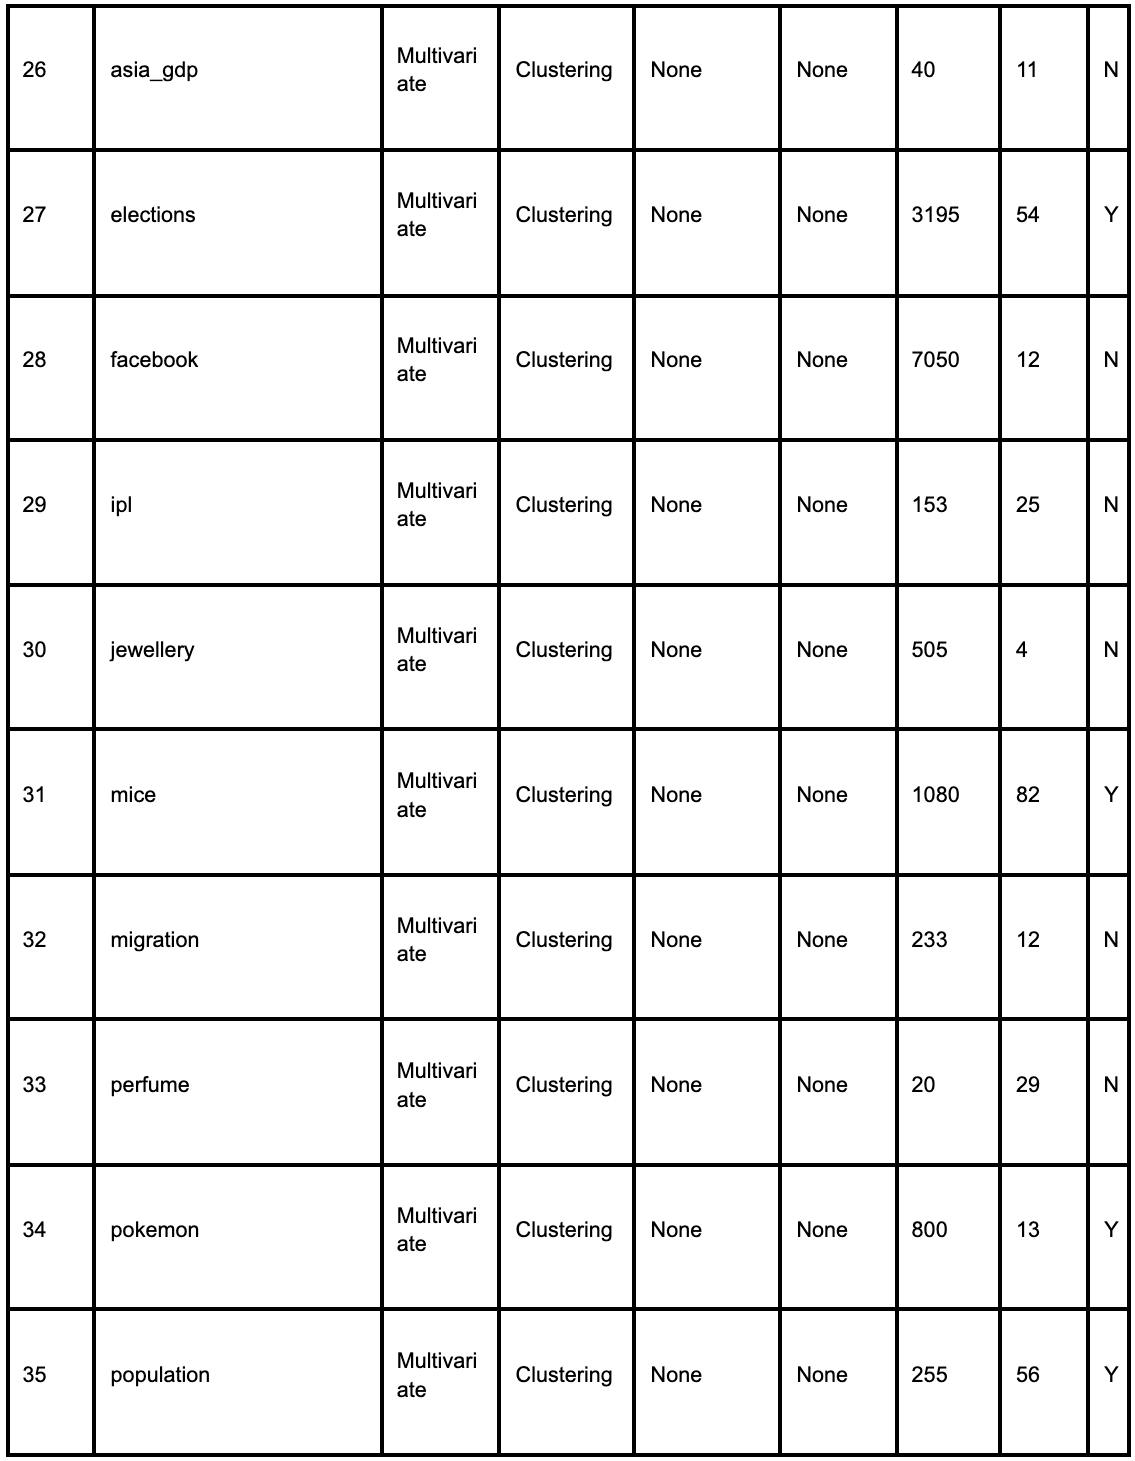
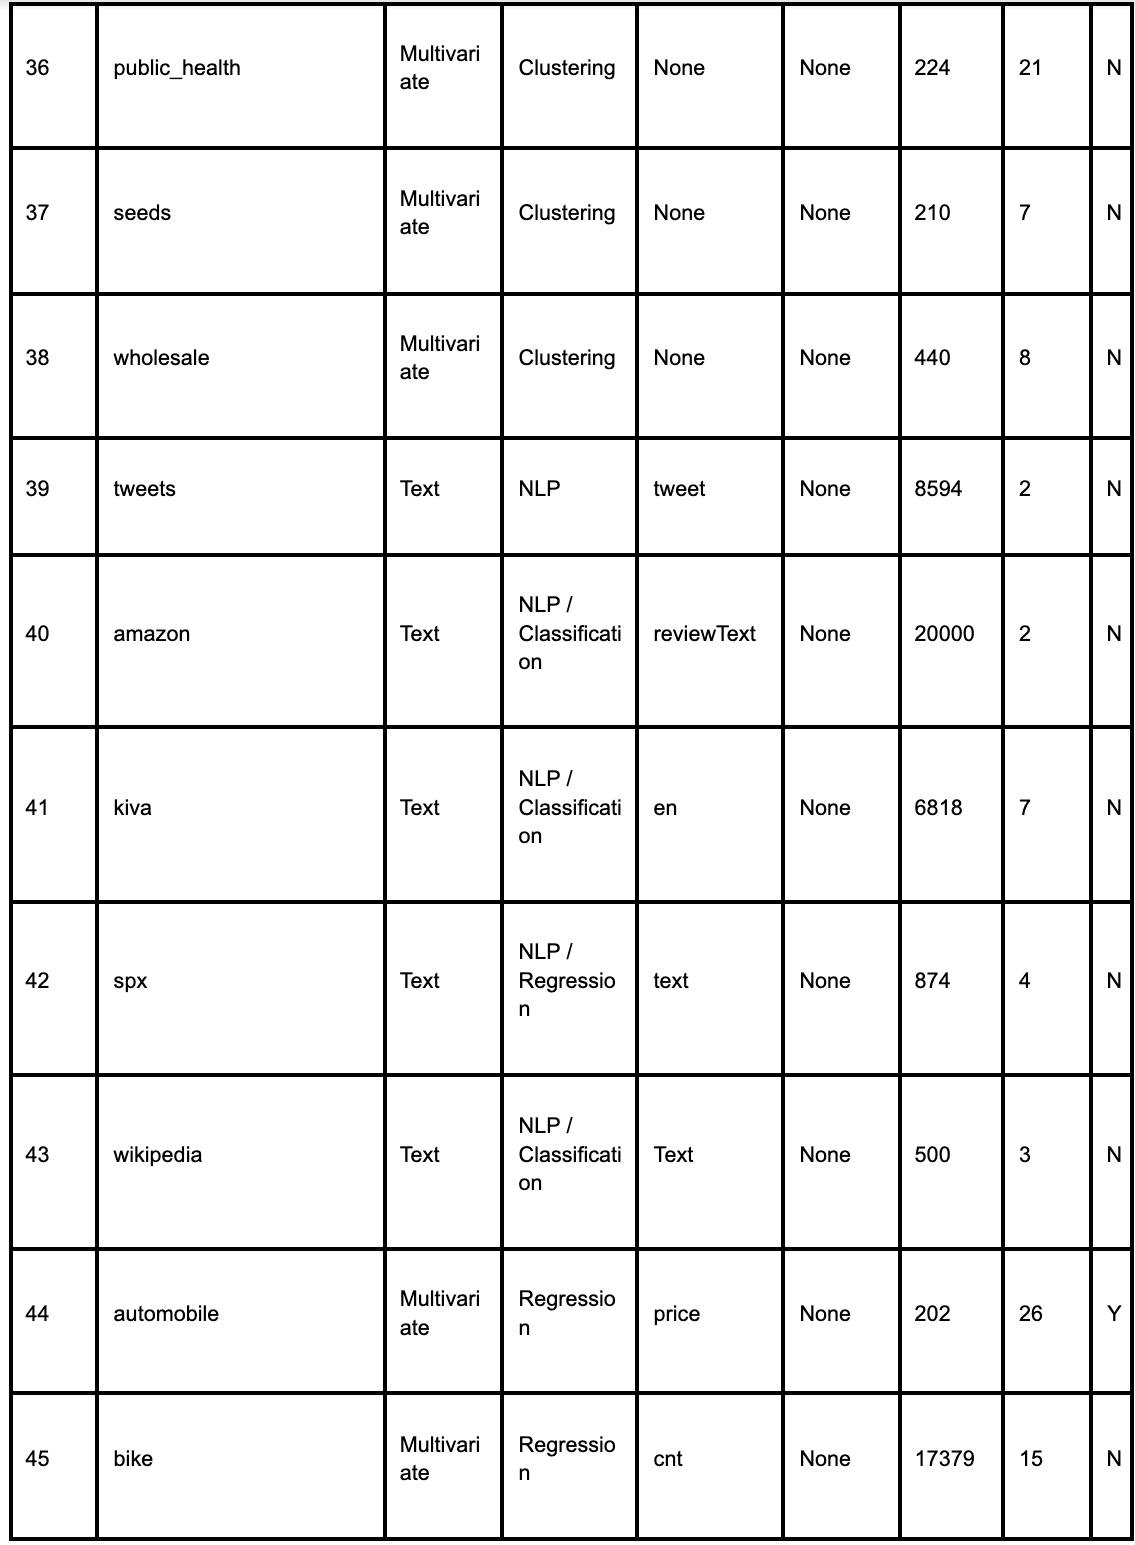
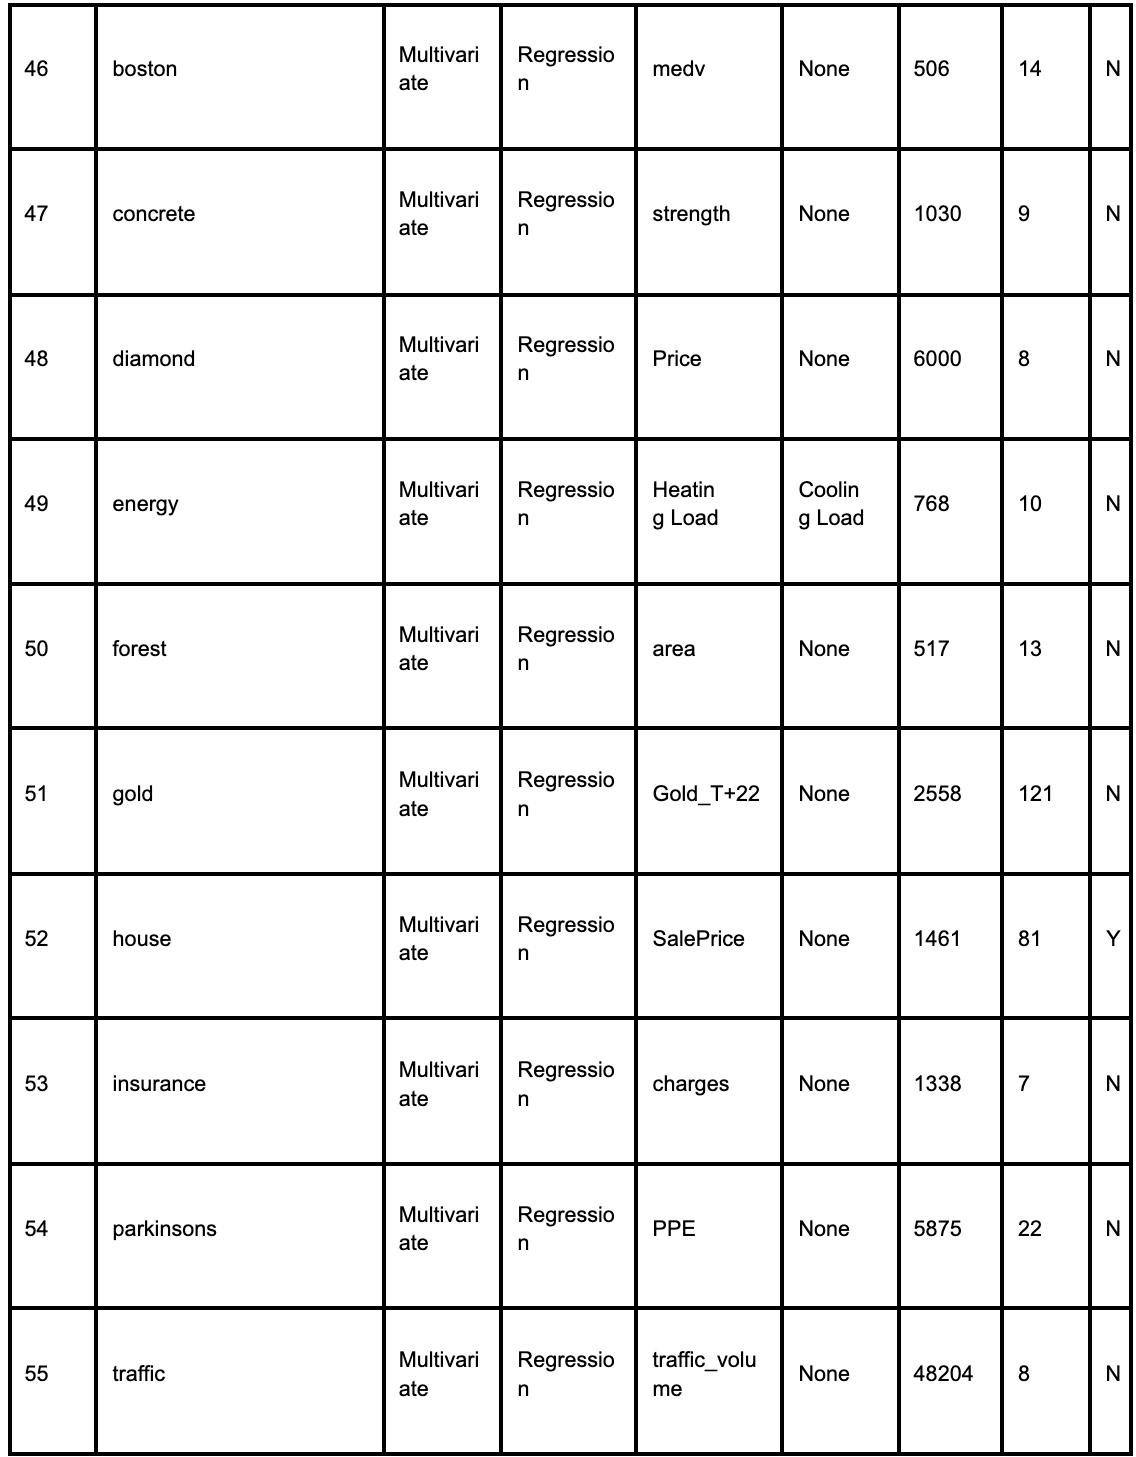
The 6th one shows our Credit card dataset, which can be loaded by,
dataset_name = 'credit'
data = pycaret.datasets.get_data(dataset_name)
Model Training And Evaluation
We will use the setup() function to train and evaluate our model.
PyCaret automates multiple time-consuming preprocessing tasks by standardizing and readily assembling basic data preparation procedures into time-saving repeatable workflows. Users have the option to automate cleaning, divide data into train and test sets, some aspects of feature engineering, and training. For example, by handling missing values with one of the available imputation methods. While many of the items produced during this process aren't clearly displayed to the user (such as train and test sets or label vectors), more seasoned practitioners can still access them if necessary or wanted.
clf = setup(data = credit_dataset, target='default', session_id=123)
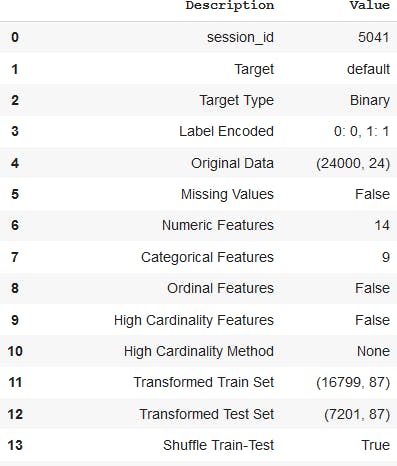
The above code renders the information regarding the preprocessing pipeline which was enabled when setup() is put into effect.
We also used the session id = 123 option in our experiment. Our goal is to achieve reproducibility. It is not required to be used, and however, if it is not, a random number will be produced instead.
Now the stage is set for the final show, which is our model training.
best_model = compare_models()
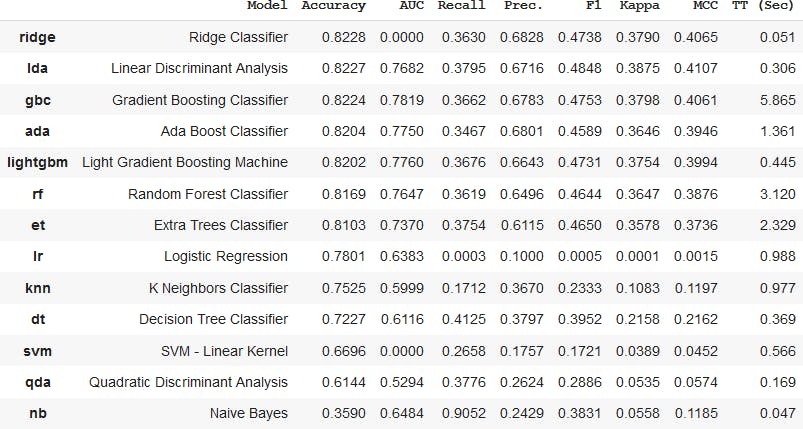
The above code will train our model and it is the compare_models() function that does the magic for us.
The Accuracy, AUC, Recall, Precision, F1, and Kappa classification metrics are utilized to evaluate every model in the model library by this function. The outcomes provide a list of the
top-performing models at a specific moment.
The Ridge Classifier is our best-performing model in this instance. Various learning algorithms are included in the list. However, the learning algorithm that performs the best is the only one in which we are interested. We let the others go.
Model Testing
predict_model(best_model)

The test accuracy yielded after testing the model is 0.8159, which is comparable to what we have got in training results. Yet this decline may be due to some overfitting issues that need to be inspected. This issue can be tamed by applying techniques such as dropout and early stopping, thereby narrowing the gap between train and test results.
Prediction On Dataset
Next, we’ll carry out a prediction on the credit data set that we run:
prediction = predict_model(best_model, data = credit_dataset) prediction.tail()

You can now see that a new column has been appended at the end of the data set, which indicates our prediction. Value 1 stands for True - Customer will default, and Value 0 stands for False - Customers will not default. We can use the head and tail functions according to our wish and for complete prediction, just remove the head/tail function.
Saving Model
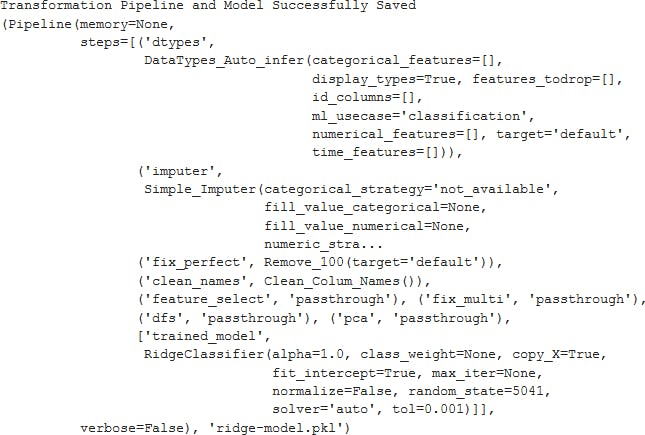
The concluding step in this end-to-end ML pipeline is to save the model to our local system. For that run:
save_model(best_model, model_name='ridge-model')
Load Model
Enter the code below to load our stored model:
model = load_model('ridge-model')
Voila!!! So in less than twenty lines of code, we were able to execute the entire ML classification pipeline.
Conclusion
PyCaret is definitely going to be a most loved package in the Data ecosystem; new features and integrations are being released on a day-to-day basis. It saves a lot of time, and its ease of execution is helping to democratize the ML Data Science Life Cycle to a great extent. Mastering PyCaret, along with scikit-learn, pandas, TensorFlow, PyTorch, etc., will definitely add value to the arsenal of every ML Developer.

