CodeGen: How it Simplifies your life

Learn how GraphQL Codegen enhances your TypeScript development, ensuring seamless integration with GraphQL APIs.
Imagine having a collection of famous dishes as a chef. Everyone asks for the recipe, requiring details like ingredients, quantities, cooking time, and preparation time. To avoid repeating yourself, you can write a recipe book or post it on a blog. You can update it in one place if there is any change in the recipe.
Codegen solves this problem if you use typescript for front-end development. It ensures that frontend and backend types, schemas, and other elements stay synchronized.
The End Goal
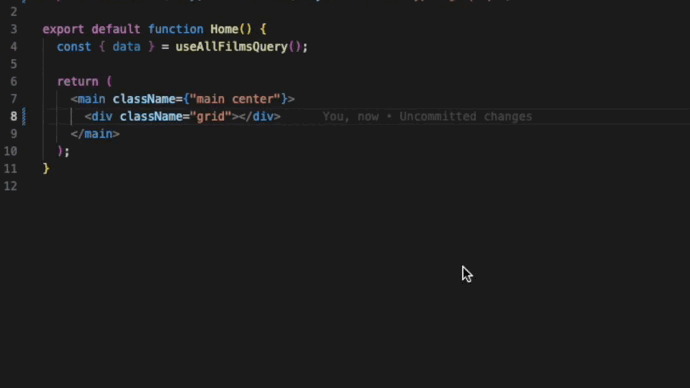
By the end of this article, we're striving for a better and smoother development experience like this:
Before we begin experimenting with our code, let's first understand
The Power of GraphQL Codegen: Why It Matters for Your Project
Are you using TypeScript for your front-end development? If so, you're likely aiming for strict typing across the board – from UI components to services and business logic. With the help of frameworks like @types/..packages, this becomes a smooth process.
But here's the challenge: What about the data you retrieve from external services?
You might know the structure and types of the external data, making manual type definitions seem simple. However, here's the twist: if the backend team alters variable types, adds new ones, or removes existing ones, maintaining consistency across your codebase becomes nearly impossible.
Now, let's talk about GraphQL. You might already be aware that GraphQL APIs are strongly typed and built around a GraphQL schema. Through GraphQL operations like queries, mutations, fragments, and subscriptions, you can efficiently fetch data on the client side.
But before we dive into the world of generated types, let's take a quick look at how it works behind the scenes. Understanding this process will give you a solid foundation for harnessing GraphQL codegen's potential effectively.
How Does GraphQL Code Generator Work?
To generate code and types, GraphQL Code Generator depends on 2 main core concepts GraphQL Introspection and GraphQL AST.
GraphQL Introspection:
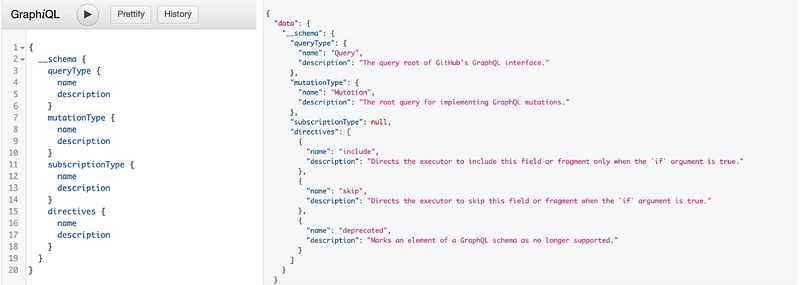
Introspection is the ability to query which resources are available in the current API schema. Given the API, via introspection, we can see the queries, types, fields, and directives it supports.
__Schema
The type \_\_Schema is the one that defines the Schema the API provides. It returns which types the Schema has, the queryType, the mutationType, and the subscriptionType.
Let's take an example using Gitthub API:
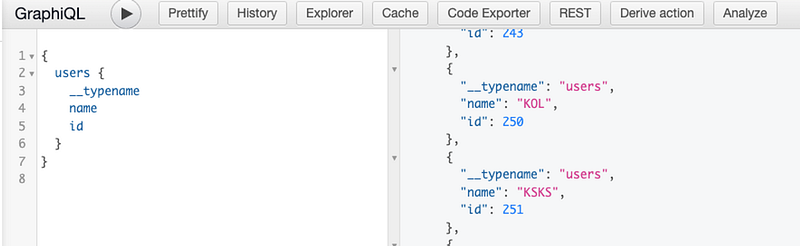
__type
It represents the type we define in our system. A simple User type is illustrated below-

__typename
__typename is a special field in GraphQL that provides the name of the object type associated with a specific GraphQL object. This reserved field, along with id, holds importance because well-known clients like Apollo and Relay leverage them for client-side caching purposes.
GraphQL AST :
Abstract Syntax tree is a structure that is used in compilers to parse the code we write and convert it into a tree structure that we can traverse programmatically.
When a user initiates a request, GraphQL performs a crucial task – it merges the user's query document with the schema definition that we've set for our resolver. This combination is presented in the form of an Abstract Syntax Tree (AST). This AST plays a pivotal role in determining the requested fields, included arguments, and more.
Once the GraphQL types (both schema types and operations) are identified, the code generator comes into play. It collaborates with various sets of plugins to craft specific code snippets and types tailored to your needs.
Let's delve into this process as it pertains to the @graphql-codegen/typescript plugin:
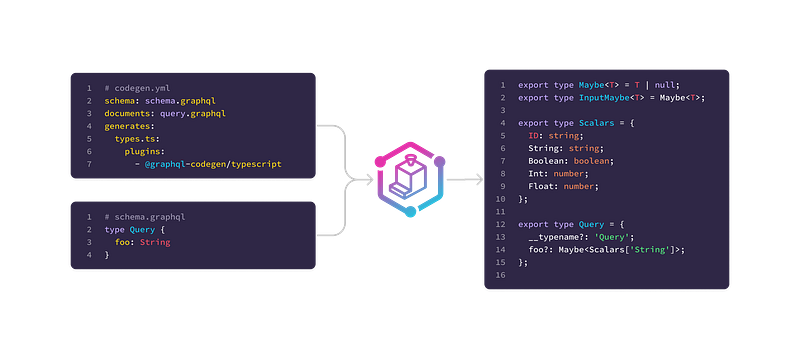
GraphQL Code Generator Flow Chart
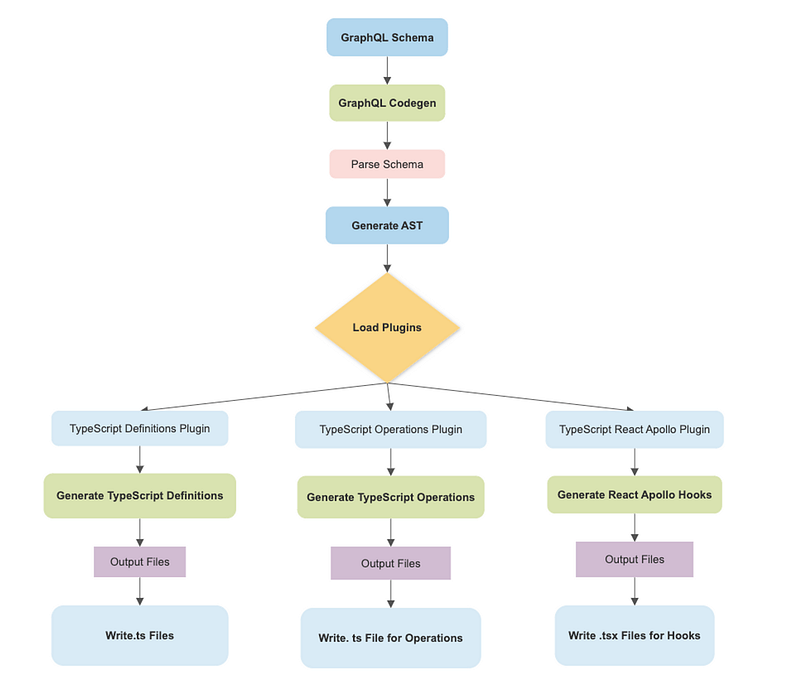
Within our flow chart, we harnessed the power of TypeScript in combination with TypeScript-Operations and TypeScript-React-Apollo for seamless GraphQL integration. Beyond that, a wealth of GraphQL plugins stands ready to elevate our development journey.
Now that we've explored the GraphQL code generator, its significance, and its mechanics, it's time to seamlessly incorporate it into our project.
Getting Started
Step 1: Setup
Create a new project react/nextJs by running the following command
npx create-next-appor,
Clone the project by running these commands and skip the next steps-
git clone <git@github.com:RathiAnkxrx/codegen-setup.git>
cd codegen
yarn install
yarn dev
Step 2: Install dependencies
Applications that use Apollo Client require two main packages apollo/client and graphQL. Run the following command to install both packages-
yarn add @apollo/client graphql
In our example application, we're going to use Star Wars API
Step 3: Initialise Apollo Client
import { ApolloClient, InMemoryCache, ApolloProvider } from '@apollo/client';
Next, we'll ApolloClient and connect react using ApolloProvider; here, uri is our graphQL server URL, and the cache is an instance of InMemoryCache, which Apollo Client uses to cache data after fetching them.
export default function App({ Component, pageProps }: any) {
  const client = new ApolloClient({
    uri: "<https://swapi-graphql.netlify.app/.netlify/functions/index>",
    cache: new InMemoryCache(),
  });
  return (
    <ApolloProvider client={client}>
      <Component {...pageProps} />
    </ApolloProvider>
  );
}
Apollo Client has been configured. Now to generate relevant types of Query and Mutation we need GraphQL Codegen CLI as we discussed earlier.
Step: 4 Install graphQL Codegen dependencies
In addition, we're installing extra packages that include plugins designed to generate query types, pre-built hooks, and functions.
yarn add @graphql-codegen/cli @graphql-codegen/typescript @graphql-codegen/typescript-operations @graphql-codegen/typescript-react-apollo
Step 5: Create a codegen.ts file
To set things up, navigate to your project's root directory. Here, create a file named codegen.ts. Then, copy and paste the following content into this newly created file.
import { CodegenConfig } from "@graphql-codegen/cli";

const config: CodegenConfig = {
  schema: "<https://swapi-graphql.netlify.app/.netlify/functions/index>",
  documents: ["src/services/graphql/*.graphql"], // where all graphql queries are written
  ignoreNoDocuments: true, // for better experience with the watcher
  generates: {
    "src/types/graphql.tsx": {
      plugins: [
        "typescript",
        "typescript-operations",
        "typescript-react-apollo",
      ],
      config: {
        skipTypename: false,
        withHooks: true,
        withHOC: false,
        withComponent: false,
      },
    },
  },
};

export default config;
Let's start by breaking down the contents of the CodegeConfig file:
schema: This is the URL of your GraphQL server.documents: For larger applications, handling numerous queries can become complex. To keep our code organized, we're adopting a pagewise query file system.src/types/graphql.tsx: This is where all the generated data will be stored.plugins: A series of plugins work together to generate types, hooks, and components. You can explore more available Codegen Plugins.
But what if your API needs an authentication token? Or what if you're dealing with multiple APIs that can't coexist in the same folder? In such cases, the following configuration can come to the rescue.
import type { CodegenConfig } from "@graphql-codegen/cli";
const SCHEMA_URL = "http:/anyUrl/graphql";
const config: CodegenConfig = {
  generates: {
    "src/types/__generated__/withToken/graphql.tsx": {
      documents: "src/services/graphql/withToken/**/*.graphql",
      schema: [
        {
          [SCHEMA_URL]: {
            headers: {
              Authorization:
                "Bearer " + process.env.AUTH_TOKEN,
            },
          },
        },
      ],
      plugins: [...], //same as of previous example
      config: {...},
    },
    "src/types/__generated__/withoutToken/graphql.tsx": {
      documents: "src/services/graphql/withoutToken/**/*.graphql",
      schema: SCHEMA_URL,
      plugins: [...],
      config: {...},
    },
  },
};

export default config;
Step 6: Head to package.json and add these scripts
 "scripts": {
    ...
    "generate": "graphql-codegen --config codegen.ts"
  },
It's finally time to generate types; go ahead and open your terminal and run yarn generate or npm generate.
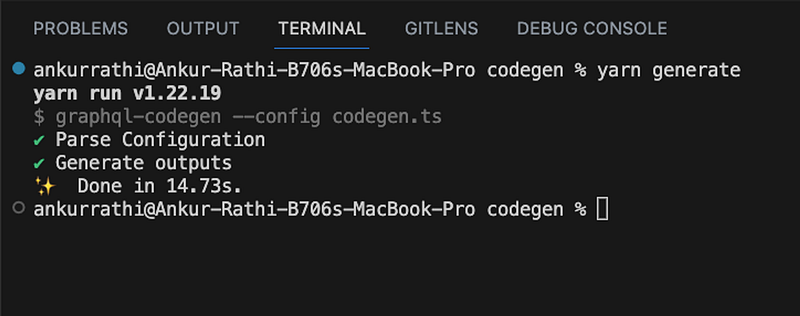
If you come across something like this, congratulations – you've just unlocked the finest GraphQL frontend experience, complete with fully typed Queries and Mutations! Now, let's delve into what we've accomplished and how to make the most of it.
Writing GraphQL Queries
In the past, we employed the useQuery hook from @apollo/client by passing the query into the hook to retrieve data, as shown below:
import { useQuery } from "@apollo/client";
import { gql } from "@apollo/client";

export default function Home() {
  const GET_ALLFILMS = gql`
    query AllFilms {
      allFilms {
        films {
            ...
        }
      }
    }
  `;
  const { data, loading , error } = useQuery(GET_ALLFILMS);
  return <>...</>
}
And with the help of generated hooks, we can directly use them instead of useQuery
import styles from "./styles/page.module.css";
import { useAllFilmsQuery } from "../types/graphql";
export default function Home() {
  const { data , loading , error} = useAllFilmsQuery();
  return  <>...</>
}
useAllFilmsQuery()hook gets triggered as soon as the page URL hits.If there is a case when you only want to hit query after some action like a button click we have
useAllFilmsLazyQuery
import styles from "./styles/page.module.css";
import { useAllFilmsLazyQuery } from "../types/graphql";

export default function Home() {
  const [fetchFilms, {data, loading , error}] = useAllFilmsLazyQuery();
  const handleClick = () => {
    fetchFilms({
      variables : { /// if variable is required
        }
    });
  };

  return (
    <main className={styles.main}>
      <button onClick={handleClick}>Fetch Films</button>
    </main>
  );
}
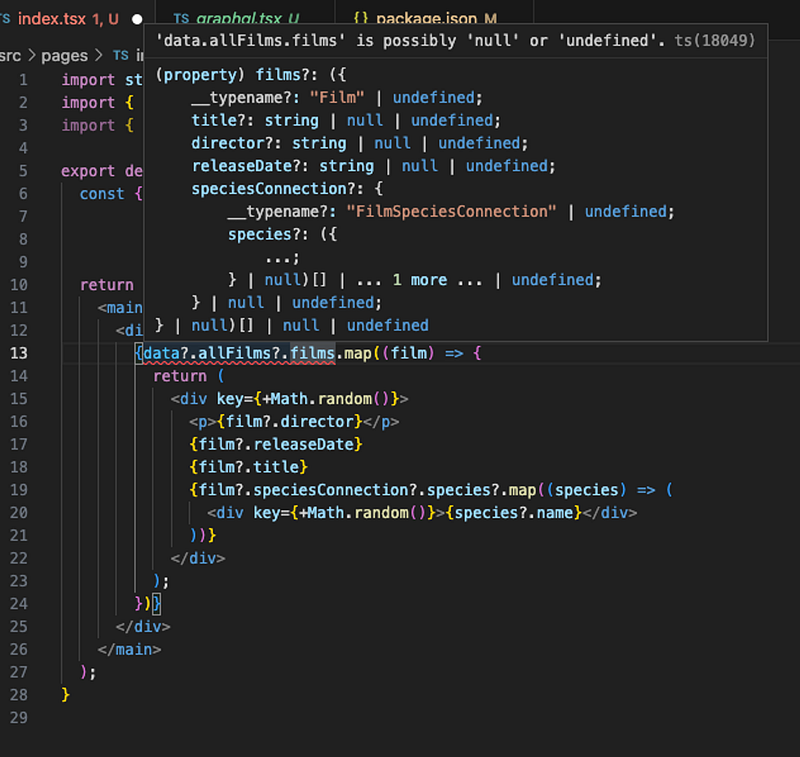
When dealing with deeply nested data, it's a common challenge to lose track of key pairs or run into errors caused by potential null | undefined values. Debugging such errors can be quite a headache.
The major benefit of adopting this approach, in my view, is twofold: type safety and time efficiency. By doing so, our IDE's IntelliSense becomes a guiding light, offering insights into the structure of the data response. This accelerates app development and ensures early detection of bugs during code composition.
Generate More than Just Types
As mentioned earlier, codegen plugins offer more than just type and hook generation. One such plugin is typescript-react-apollo, designed to generate both Higher Order Components (HOC) and Query Components.
Creating React Components with Apollo
Navigate to the codegen.ts file and switch withComponent to true. Then, execute yarn generate in your terminal.
 config: {
  skipTypename: false,
  withHooks: true,
  withHOC: false,
  withComponent: true,
  },
And then use it in your code:
<AllFilmsComponent>
{({ data, loading, error }) => {
  return (
    <div className={styles.grid}>
      {data?.allFilms?.films?.map((film) => {
        return (
          <div key={+Math.random()}>
            <p>{film?.director}</p>
            ...
          </div>
        );
      })}
    </div>
  );
}}
</AllFilmsComponent>
Type Destructuring Tips:
Accessing specific key values within an object offers several methods, one being object["someKey"]. Now, applying a similar approach, let's dive into type destructuring.
In our scenario, consider the presence of allFilms within the data structure. To determine its type, we start with the overall data type – AllFilmsQuery (matching your query's name, appended with "QUERY"). The type of allFilms is then represented as AllFilmsQuery["allFilms"].
However, situations can arise where your external data nests deeply, potentially with parent elements that are either null or undefined. In a specific case, like allFilms, it could be an array with the possibility of being null or undefined.
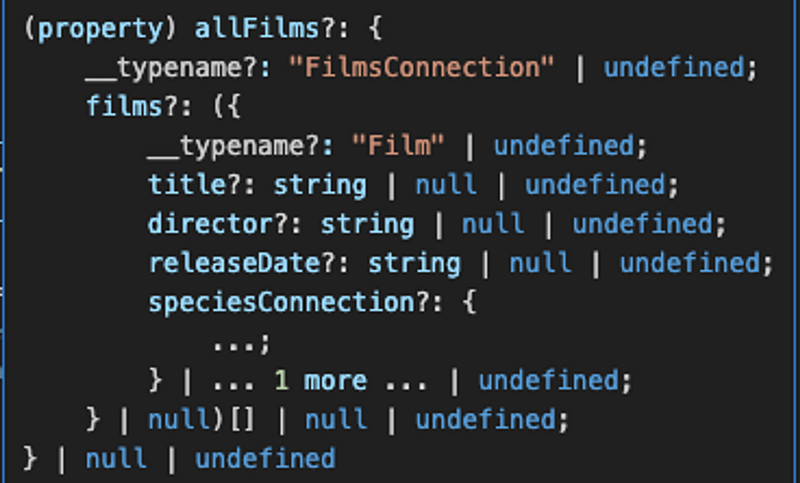
Then how to get what would be the type of films object. For this, we can not simply use AllFilmsQyery["allFilms"][0].
First, select NonNullable value of AllFilmsQuery and pick
allFilmssomething like this-NonNullable<AllFilmsQuery['allFilms']>And then using the same logic select films
NonNullable<NonNullable<AllFilmsQuery["allFilms"]>["films"]>
This method is very useful while looping through data or passing nested values in child components.
Conclusion:
In this article, our goal was to clarify the necessity of codegen in your project, outlining how it operates and bridges the gap between GraphQL and TypeScript.
When crafting apps, my focus is on crafting code that's both easy to understand and straightforward, all while minimizing excessive effort. This approach has proven instrumental in reaching this aim.
Feel free to reach out with any questions, suggestions, or insights you might have. If you find this information intriguing and potentially valuable to others, don't hesitate to share it with them.
This article is written by Ankur Rathi.