NFT Project Series Part 8: Introduction to Solidity and Creating Our Smart Contract
Learn How to Build a Smart Contract in Ethereum Rinkeby using Solidity
In the last part, we completed our Web 2.0 part of the tutorial series. Starting from this part of our series, we are entering into the domain of Web 3.0. We're going to build a full-stack Ethereum app and deploy our contract to the Rinkeby Test Network (so that we don't have to care about 30% tax even if we are from India!). While doing so, we will also learn about Solidity, Smart Contracts, and local development with Hardhat. By the end of this article, we will have an on-chain mechanical keyboard generator smart contract (NFT Minter app) where we can view other users' keyboards, and send an ETH tip to our favorite NFT keyboard.
Before you start, few words of promotion. This whole series is inspired by Pointer Tutorial - Solid Solidity. In this particular article, we will find many similar (even exact in some places) code and explanation. So, all credit for the Solidity part goes to the Pointer Team. Go ahead and give it a read and earn an NFT even! Now, back to the article, let's begin!
Setup Our Project
Let's start with our initial setup of solidity smart contract project. Create a new folder named backend/smart-contract. Then, open the terminal inside it and type:
npm init -y
This initializes the npm directory. Then we run the following command to install the required packages to start creating our smart-contract:
npm install -D hardhat@^2.8.0 @nomiclabs/hardhat-waffle@^2.0.0 ethereum-waffle@^3.0.0 chai@^4.2.0 @nomiclabs/hardhat-ethers@^2.0.0 ethers@^5.0.0
Once these are installed, we run:
npx hardhat init
Then, we choose the option Create basic project as shown below:
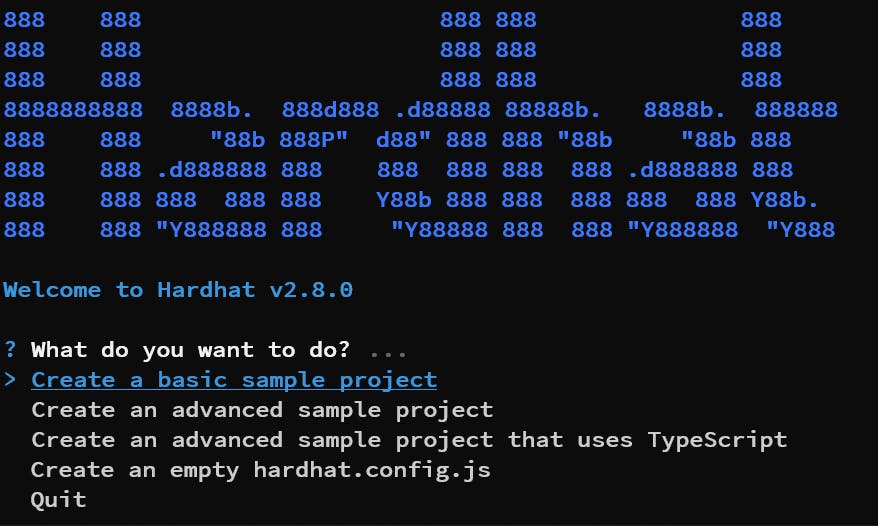
Finally, press enter and enter till its done. We will have this folder structure at the end of setup:
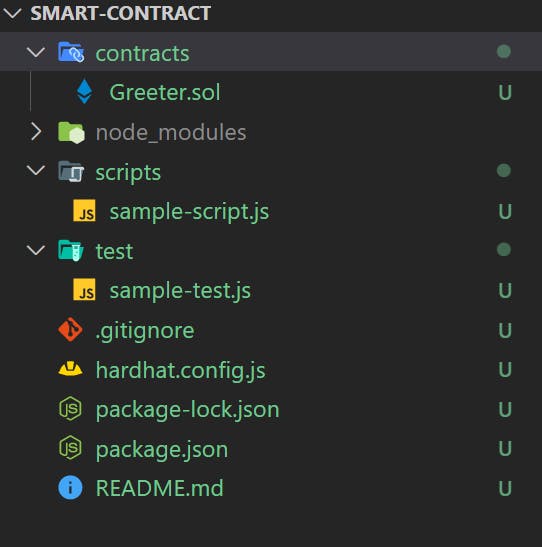
Now just for a quick test that everything is setup properly, we run:
npx hardhat test
and we should see some something like this:
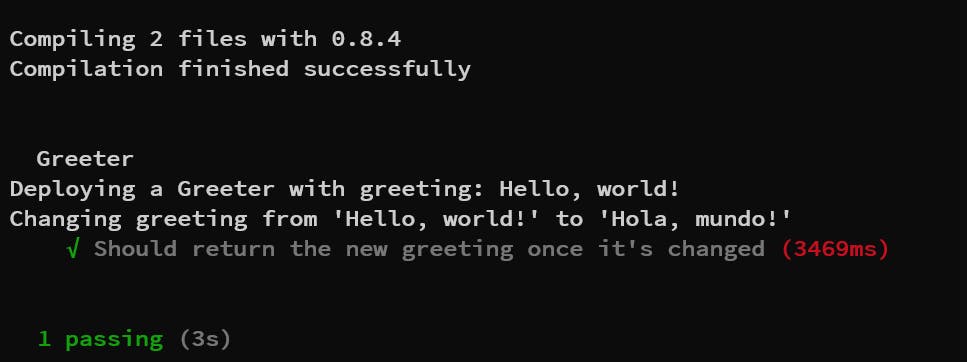
This means that everything is correct and our setup is done. We can now start building our smart contract for this project.
Writing Our Smart Contract
Let me first tell here that smart contract is nothing but a backend code deployed in byte code format on the blockchain. That's it. The word is fancy but there is nothing "smart" about it neither we have to be some great genius to learn how to code in it.
With that out of the way, let's rename the file contracts/Greetings.sol to contracts/Keyboards.sol and inside it, we write:
//SPDX-License-Identifier: Unlicense
pragma solidity ^0.8.0;

import "hardhat/console.sol";

contract Keyboard {
    string[] public keyboards;

    function getKeyboards() public view returns (string[] memory) {
        return keyboards;
    }
}
Let's break it down line by line:
// SPDX-License-Identifier: Unlicense
This is the license identifier. It could be MIT, ISC, etc.
Then we have:
pragma solidity ^0.8.0;
This here is the version of solidity we are using in this project to compile the same. It works similar to NPM versioning, meaning above 0.8.0 but not higher than 0.9.0. Anytime this is changed, we must change the same in hardhat.config.js.
Finally, we have:
contract Keyboards {
  string[] public keyboards;

  function getKeyboards() view public returns(string[] memory) {
    return keyboards;
  }
}
This is a solidity smart contract. It's similar to OOP classes. It contains:
Data stored in a state variable keyboards. This state variable is deployed in blockchain at a specific address known as smart contract address. In a nutshell, it means that this variable is a small unit of self contained database in itself. If it changes for us, it changes for everyone. They are persistent in nature.
Function getKeyboards, to retrieve our keyboards present in the blockchain.
Both of these in our contract are public in their scope. It means that they can be used externally and internally both. Apart from that, we also have private scope which can only be used internally in the contract and not even in derived contracts. We are not using those here. Finally, we may also have constructor which executes first when the smart contract is executed.
Now let's go and run our contract at this point. For this, we first need to go to scripts folder and rename sample-script.js to keyboard.js (not required!). Now, clean the file and write:
async function main() {
  const keyboardsContractFactory = await hre.ethers.getContractFactory(
    'Keyboard'
  );
  const keyboardsContract = await keyboardsContractFactory.deploy();
  await keyboardsContract.deployed();

  console.log('Contract deployed to:', keyboardsContract.address);

  const keyboards = await keyboardsContract.getKeyboards();
  console.log('We got the keyboards!', keyboards);
}

main()
  .then(() => process.exit(0))
  .catch((error) => {
    console.error(error);
    process.exit(1);
  });
and now run:
npx hardhat run scripts/keyboard.js
We will see something like the image below:

This means our code is perfect. Now let's check it line by line:
const keyboardsContractFactory = await hre.ethers.getContractFactory(
    'Keyboard'
  );
  const keyboardsContract = await keyboardsContractFactory.deploy();
  await keyboardsContract.deployed();

  console.log('Contract deployed to:', keyboardsContract.address);
Note that there is no need to import hre. When we run hardhat command in terminal, it takes care of it. Then, we are using getContractFactory() method inside hre.ethers and supply the exact contract name of our contract Keyboard. We then deploy() and wait for it to deploy. Finally, we print the address where we deployed. This is our smart-contract address.
Then, we have:
const keyboards = await keyboardsContract.getKeyboards();
console.log('We got the keyboards!', keyboards);
Here, we are using our contract method we created named getKeyboards() using our keyboardsContract we defined above. Then, we are printing it to see what is the data stored in it. It should be empty at this point as shown in the image above.
One important note here for a moment; we don't really need a getter method in our contract. We can directly use the variable we created or are returning inside the getter to behave the same way. This is part and parcel of solidity itself.
Till now, we saw how easy is it to get the data in our smart contract. But remember, we are not storing a string value in our keyboard. It's an object. In solidity, we can use struct to create our own object structure like:
    enum KeyboardKind {
        SixtyPercent,
        SeventyFivePercent,
        EightyPercent,
        Iso105
    }

   struct _Keyboard {
        KeyboardKind kind;
        // ABS = false, PBT = true
        bool isPBT;
        string filter;
        address owner;
    }

    function getKeyboards() public view returns (_Keyboard[] memory) {
        return keyboards;
    }

   function create(
        KeyboardKind _kind,
        bool _isPBT,
        string calldata _filter
    ) external {
        _Keyboard memory newKeyboard = _Keyboard({
            kind: _kind,
            isPBT: _isPBT,
            filter: _filter,
            owner: msg.sender
        });

        keyboards.push(newKeyboard);
    }
Let's decode this one at a time. We use enum to define the kind of Keyboard. Then, the boolean is used to define type of keyboard, string is used to define filter value used in our styles CSS and finally, the address is used to define the owner.
Then, in our create function, we are taking three values and then storing it inside our blockchain memory so to say. We are getting these three values from the frontend form and then creating a new object in memory of type Keyboard and then pushing the new created object inside our keyboards array.
Notice that we are not passing an address parameter at all. In any Solidity function, msg.sender is always set to the address that called the function. This is great feature to say the least.
Now let's go back to our keyboard.js script file and then add these two lines before reading the keyboards:
// deployment code...
const keyboardTxn1 = await keyboardsContract.create(0, true, "hue-rotate-90");
 await keyboardTxn1.wait();
// read keyboards code ...
In essence, this is creating the dummy test value in our keyboards array. So now our full code will look like:
async function main() {
  const keyboardsContractFactory = await hre.ethers.getContractFactory(
    'Keyboard'
  );
  const keyboardsContract = await keyboardsContractFactory.deploy();
  await keyboardsContract.deployed();

  console.log('Contract deployed to:', keyboardsContract.address);

  const keyboardTxn1 = await keyboardsContract.create(0, true, 'hue-rotate-90');
  await keyboardTxn1.wait();

  const keyboards = await keyboardsContract.getKeyboards();
  console.log('We got the keyboards!', keyboards);
}

main()
  .then(() => process.exit(0))
  .catch((error) => {
    console.error(error);
    process.exit(1);
  });
Now, let's run the script again to deploy and create one default entry:
npx hardhat run scripts/keyboard.js
this will give the following output:
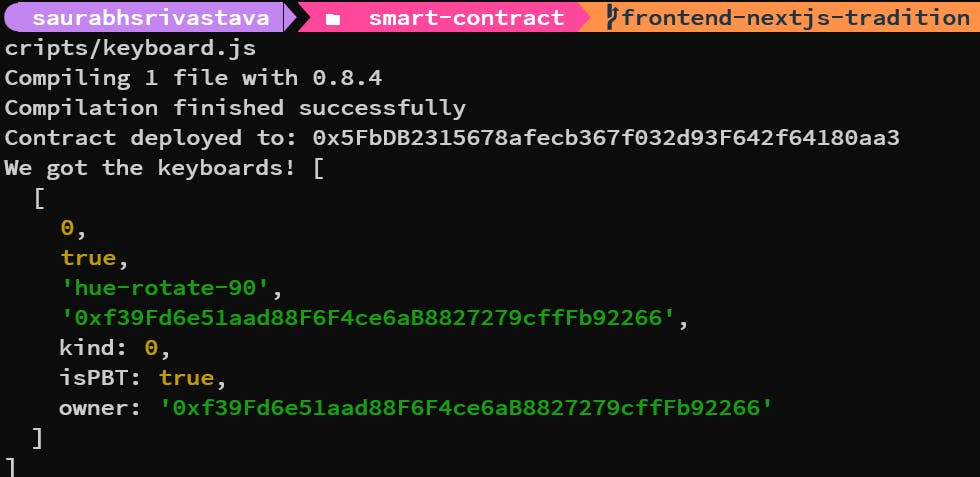
At this point, the only thing left in our contract is the tipping functionality. Do note that we never made this feature in Web 2.0 side of things. Why? Because it's quite hectic. Especially when we add the complexity of which payment system works in which country. But here, it's going to be easy and universal. So, let's add a new function in our code:
function tip(uint256 _index) external payable {
        address payable owner = payable(keyboards[_index].owner);
        owner.transfer(msg.value);
}
This function is marked as payable, meaning that when we call it, we can send it Ethereum! The contract can do whatever it wants with the money sent to it! It can just hold onto it if it wants to, a contract has its own balance. In our case, owner.transfer method immediately pays the incoming value msg.value to the owner of the keyboard we are getting from keyboards[_index].owner. We can write all sorts of logic here. 0.02% fee charge for each transfer, or 5% cash back!
Finally, we change our keyboard.js script to see how it behaves now:
async function main() {
  const [owner, anotherOwner] = await hre.ethers.getSigners();
  const keyboardsContractFactory = await hre.ethers.getContractFactory(
    'Keyboard'
  );
  const keyboardsContract = await keyboardsContractFactory.deploy();
  await keyboardsContract.deployed();

  console.log('Contract deployed to:', keyboardsContract.address);

  const keyboardTxn1 = await keyboardsContract.create(0, true, 'hue-rotate-90');
  await keyboardTxn1.wait();

  const keyboardTxn2 = await keyboardsContract
    .connect(anotherOwner)
    .create(1, false, 'grayscale');
  await keyboardTxn2.wait();

  const balanceBefore = await hre.ethers.provider.getBalance(
    anotherOwner.address
  );
  console.log(
    'anotherOwner balance before!',
    hre.ethers.utils.formatEther(balanceBefore)
  );

  const tipTxn = await keyboardsContract.tip(1, {
    value: hre.ethers.utils.parseEther('1000'),
  }); // tip the 2nd keyboard as owner!
  await tipTxn.wait();

  const balanceAfter = await hre.ethers.provider.getBalance(
    anotherOwner.address
  );
  console.log(
    'anotherOwner balance after!',
    hre.ethers.utils.formatEther(balanceAfter)
  );

  const keyboards = await keyboardsContract.getKeyboards();
  console.log('We got the keyboards!', keyboards);
}

main()
  .then(() => process.exit(0))
  .catch((error) => {
    console.error(error);
    process.exit(1);
  });
Here, we have used getSigners() method to get the addresses of two users. We then use the second user to create a keyboard as well. We check the balance before the tip amount of one ETH and after the tip. We find the following results as shown below:
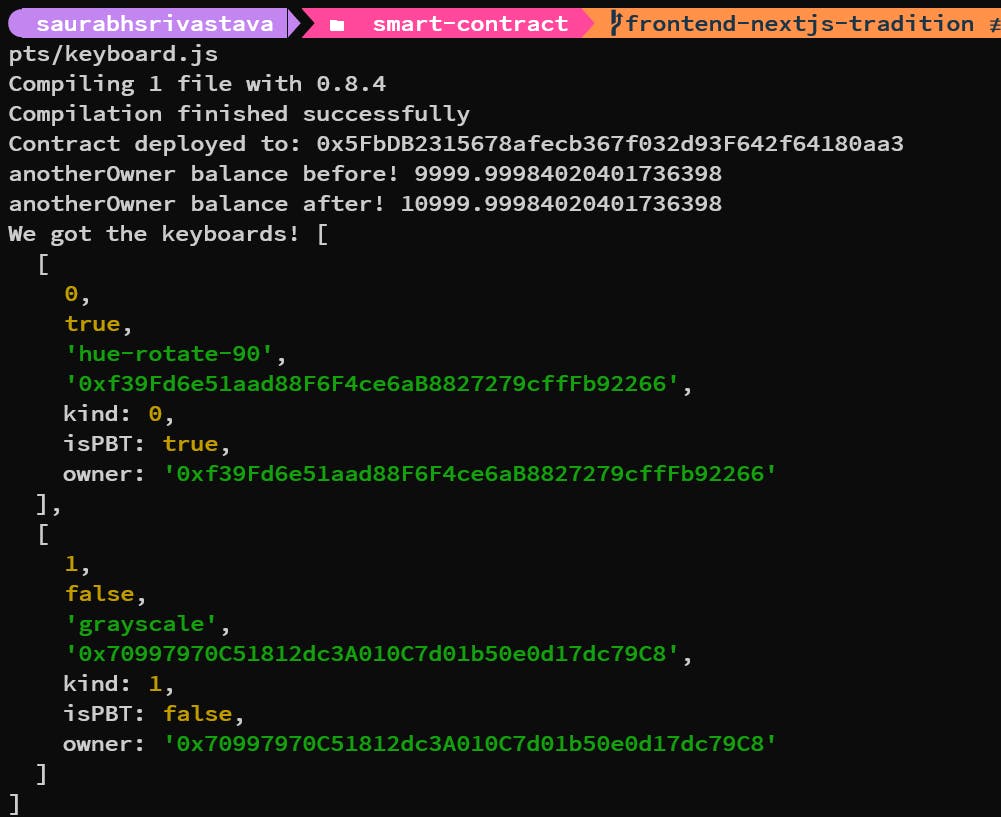
Do take a note that the payment is made in wei, which is the smallest denomination of an ether. Specifically, one ether = 1,000,000,000,000,000,000 wei (10^18). The ethers library includes some functions to convert between wei and ether so that we don’t need to try to write that number in our code! So we use parseEther("1000") to convert 1000 ether to 10^21 wei.
Note that when we get the balance we get that in wei too, so we use formatEther to convert that to ether!
And that ends our Smart Contract code section. All that's needed is to deploy it on the Rinkeby Test network.
Deploying Our Contract
There are two things needed for deployment in the testnet:
Metamask with test network enabled and then Rinkeby selected. Also, some Rinkeby present in it. We can use
Rinkeby Faucetto get the test ETH.Our wallet's
PRIVATE KEY.A word of caution! NEVER SHARE THE PRIVATE KEY WALLET WITH ANYONE. NEVER EVER! THAT'S LIKE GIVING THE ACCESS TO OUR BANK ACCOUNT TO SOME OTHER PERSON. DON'T DO IT!
Phew! With that big warning out of the way, it's better to be cautious and make sure the development wallet is different from HODL wallet.
So, once we have these two things, we go to our contract and create a scripts/deploy.js script:
async function main() {
  const keyboardsContractFactory = await hre.ethers.getContractFactory(
    'Keyboard'
  );
  const keyboardsContract = await keyboardsContractFactory.deploy();
  await keyboardsContract.deployed();

  console.log('Contract deployed to:', keyboardsContract.address);
  const keyboards = await keyboardsContract.getKeyboards();
  console.log('We got the keyboards!', keyboards);
}

main()
  .then(() => process.exit(0))
  .catch((error) => {
    console.error(error);
    process.exit(1);
  });
Then, we are going to our hardhat.config.js file and change some settings like:
module.exports = {
  solidity: '0.8.4',
  networks: {
    rinkeby: {
      url: process.env.NODE_API_URL,
      accounts: [process.env.RINKEBY_PRIVATE_KEY],
    },
  },
};
We are modifying our module.exports in a nutshell to include rinkeby network. Now create a .env file and write:
NODE_API_URL=https://rinkeby.infura.io/v3/9aa3d95b3bc440fa88ea12eaa4456161
RINKEBY_PRIVATE_KEY=<YOUR_PRIVATE_ETHEREUM_KEY>
The NODE_API_URL is taken from RPC INFO directly. We can have our own if we want using Alchemy or Infura, but this is fine I guess! Don't forget to add your private key of the wallet. One can search how to do so in metamask site.
AGAIN! NEVER SHARE THIS WITH ANYONE. NEVER STORE IT IN CLOUD. NEVER EVER!
Then, we run the following command:
npx hardhat run scripts/deploy.js --network rinkeby
And this will deploy our smart contract to our blockchain. It will give you an address which we must copy and save. This address is going to be used in frontend as this is the Smart Contract Address. Apart from this, we also will need the re-compiled ABI json file inside contracts/Keyboard.sol/Keyboard.json in our frontend as well to call the functions. One can go through this file if they want!
Final Words
This ends our Solidity Smart Contract Tutorial. In the next article we will start modifying our frontend in Angular to make it work with this smart contract! Hope it was a learning read! See you in the next article. Bye!

