Ready for Continuous Testing? Your Jenkins Foundation for Automation (Part 1)
Learn Jenkins CI/CD from a tester's viewpoint. Setup Jenkins on macOS, explore Freestyle vs Pipelines, and prep for Part 2: Practical project integration.
Originally published on GeekyAnts Blog · By Prathamesh Ingale, Software Engineer in Testing at GeekyAnts · May 29, 2025

In today's fast-paced software development world, automation testers need to understand the bigger picture of how modern applications reach production. The continuous workflow model — encompassing code, build, test, and deploy stages — has fundamentally transformed how development teams operate.
The Continuous Philosophy
The continuous philosophy advocates that code be integrated often, so that integration becomes a non-event. Builds are triggered automatically based on commit and merge actions and the success of upstream builds. In summary:
- Each integration is verified by an automated build (including tests).
- Automate the complete build-test-deploy cycle to ensure activities always run in the same order.
- Build and test each code modification to find problems early, when they are easier to fix.
"Continuous Integration does not get rid of bugs, but it does make them dramatically easier to find and remove." — Martin Fowler
Continuous Integration (CI) is the frequent, automatic integration of code. All new and modified code is automatically tested with the master code.
Continuous Delivery (CD) is the natural extension of CI. It ensures the code is always ready to be deployed, although manual approval is required to actually push software to production.
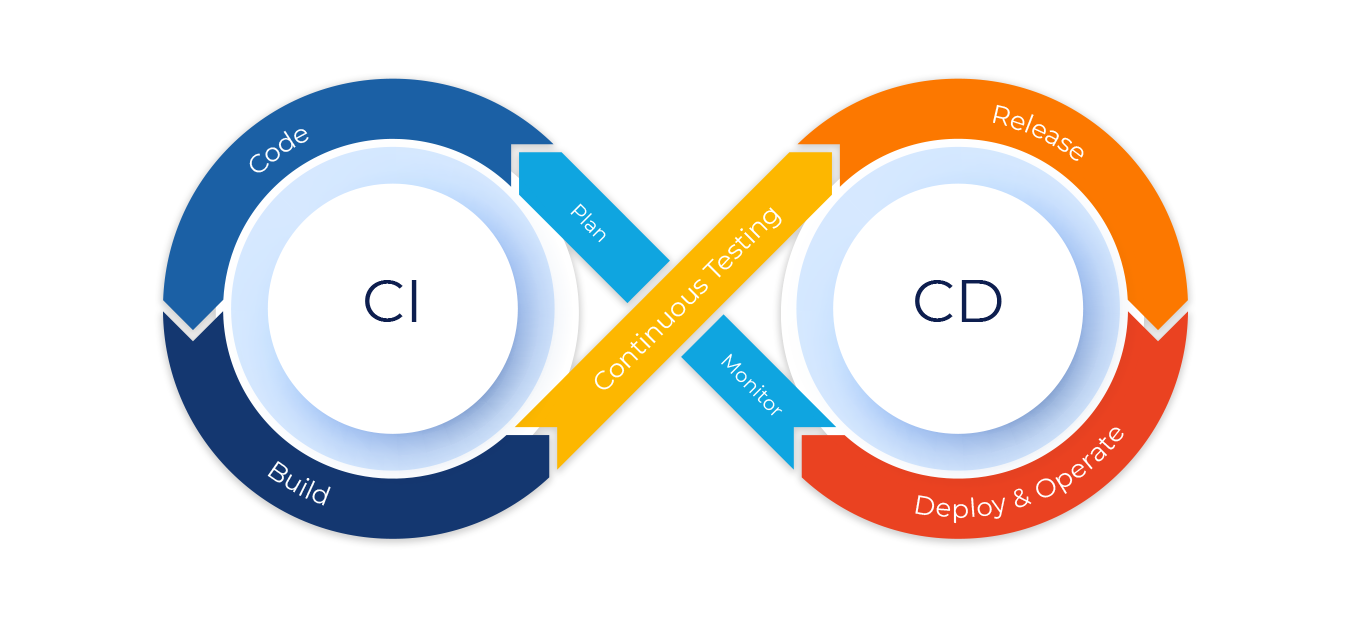
Continuous Deployment automatically deploys all validated changes to production. Frequent feedback enables issues to be found and fixed quickly.
To successfully implement continuous delivery, it is essential to have a collaborative working relationship with everyone involved. You can then use Delivery Pipelines — automated implementations of your product's lifecycle.
What is Jenkins?
Jenkins is an open-source automation server that facilitates continuous integration and continuous delivery (CI/CD) practices.
It enables developers to automate various tasks involved in software development, such as building, testing, and deploying applications. With Jenkins, you can establish a robust and reliable CI/CD pipeline that automatically integrates code changes and delivers high-quality software at a rapid pace.
Jenkins is built on Java, so it can run on any machine that has Java installed. It is also highly extensible — you can add new features and functionality by installing plugins.
Key Vocabulary Before You Get Started
Before diving into Jenkins, it helps to know these terms:
- Version Control System (VCS) — A system that tracks changes to source code and allows multiple developers to collaborate. Examples: Git, SVN, Mercurial.
- Build — The process of converting source code into an executable or deployable software artifact. Involves compiling, linking, and packaging.
- Artifact — A file or collection of files generated during the build process, such as a compiled binary, library, or archive.
- Pipeline — In Jenkins, a series of automated steps that define the CI/CD workflow. Typically includes stages like build, test, and deployment.
- Job — A task or project in Jenkins that can be executed, such as building, testing, and deploying applications.
- Node/Agent — A machine or server on which Jenkins runs builds and executes jobs. Can be the Jenkins server itself or a separate connected machine.
- Master — The central Jenkins server responsible for managing configuration and distributing tasks to agents/nodes.
- Workspace — A directory on the Jenkins agent where a job's code and artifacts are stored during the build process.
- Trigger — An event that initiates the execution of a Jenkins job, such as code commits, a schedule, or a manual trigger.
- Plugin — An extension that adds additional functionality to Jenkins. Jenkins has a vast ecosystem of plugins integrating with various tools and technologies.
- Post-build Actions — Actions performed after the build process, such as archiving artifacts, sending notifications, or triggering downstream jobs.
How to Install Jenkins on macOS
Prerequisites
Before installing Jenkins, make sure you have:
- macOS 10.13 (High Sierra) or later
- Admin privileges on your Mac
- Homebrew package manager installed
To install Homebrew, open Terminal and run:
/bin/bash -c "$(curl -fsSL https://raw.githubusercontent.com/Homebrew/install/HEAD/install.sh)"
Step 1: Install Java Development Kit (JDK)
Jenkins requires Java to run. Check your current Java version:
java -version
Install the latest LTS version of Java via Homebrew:
brew install openjdk@17
Step 2: Install Jenkins via Homebrew
brew install jenkins-lts
Step 3: Start the Jenkins Service
brew services start jenkins-lts
Step 4: Access Jenkins
Open your web browser and navigate to http://localhost:8080. You'll be prompted to unlock Jenkins with an initial admin password.
Retrieve the password with:
cat /Users/$USER/.jenkins/secrets/initialAdminPassword
Replace $USER with your macOS username if necessary. Copy the displayed password and paste it into the "Administrator password" field in your browser.
Step 5: Customize Jenkins
After unlocking, you'll be guided through:
- Installing plugins — Choose "Install suggested plugins" (recommended for beginners) or "Select plugins to install"
- Creating an admin user — Set up your username, password, and other details
- Instance configuration — Confirm the Jenkins URL (typically
http://localhost:8080)
After completing setup, you'll be redirected to the Jenkins dashboard.
Note: For comprehensive installation instructions including video guides, check the official Jenkins documentation:
How to Integrate Your Automation Code with Jenkins
Integrating automation projects with Jenkins offers three main approaches:

| Approach | Best For |
|---|---|
| Freestyle Project | Flexible, UI-based configuration for straightforward setups |
| Maven Project | Maven-based builds and automation |
| Pipeline | Code-based approach using Jenkinsfile for advanced workflows |
Each integration method has distinct advantages and limitations. The best choice depends on your project requirements and complexity.
Jenkins Freestyle Project for Automation Testing
A Freestyle project is Jenkins' most basic project type — it lets you configure build steps through a web interface rather than code. It's particularly useful for automation testers who:
- Need a quick setup without writing pipeline scripts
- Want to execute Maven-based Selenium test suites
- Require straightforward test execution and reporting
Step 1: Create a New Freestyle Project
- Navigate to the Jenkins dashboard
- Click "New Item"
- Enter a project name (e.g.,
Selenium-TestNG-Suite) - Select "Freestyle project" and click "OK"
Step 2: Configure Source Code Management
- Scroll to "Source Code Management"
- Select Git (or your preferred SCM)
- Enter your repository URL containing your Maven-Selenium-TestNG project
- Configure credentials if needed
- Specify the branch to build (e.g.,
*/main)
Step 3: Set Build Triggers
Under "Build Triggers", choose how you want tests to run:
- Poll SCM — Run tests when code changes are detected
- Build periodically — Schedule tests using cron syntax
- Trigger remotely — Allow tests to be triggered via API
Step 4: Configure Build Environment
- Check "Delete workspace before build starts" for clean test runs
- Configure the JDK version that matches your project requirements
Step 5: Add Build Steps
- Click "Add build step" → "Invoke top-level Maven targets"
- Select your Maven installation
- Enter goals:
clean test -DsuiteXmlFile=testng.xml
Step 6: Configure Test Reports
- Add post-build action → "Publish TestNG Results"
- Set TestNG XML report pattern:
**/target/surefire-reports/testng-results.xml
- Set TestNG XML report pattern:
- Add post-build action → "Publish HTML Reports"
- HTML directory:
**/test-output/ExtentReports/ - Index page:
ExtentReport.html - Report title:
Selenium Test Execution Report
- HTML directory:
Step 7: Configure Email Notifications
- Add post-build action → "Email Notification"
- Enter recipient emails
- Check "Send separate emails to individuals who broke the build"
Advantages for Automation Testers
- User-friendly — Configuration through UI, no coding knowledge required
- Quick Setup — Ideal for straightforward Maven-Selenium test execution
- Visual Feedback — Easy-to-access test reports and logs
- Flexible — Simple to modify test parameters without pipeline changes
Limitations
- Limited Workflow Logic — Complex test flows are difficult to implement
- Reusability Challenges — Configurations can't be easily shared across projects
- Version Control — UI configurations aren't tracked in source control
Jenkins Pipelines for Automation Testing
A Jenkins Pipeline defines your entire automation workflow as code, offering better version control and more flexibility than Freestyle projects. Ideal for automation testing frameworks with simple to complex execution needs.
Think of a Pipeline as a script that orchestrates all the steps needed to build, test, and potentially deploy your automation project.
This "Pipeline-as-Code" approach offers several advantages:
- Version Control — Your build and test process is tracked in Git, with history, branching, and pull requests for pipeline changes.
- Code Review — Pipeline definitions can be reviewed by team members, ensuring consistency and best practices.
- Reproducibility — The pipeline definition ensures your automation process is executed consistently every time.
- Scalability — Pipelines can handle complex workflows with parallel execution and conditional steps.
- Visibility — Jenkins provides excellent visualization of pipeline execution, showing the status of each stage.
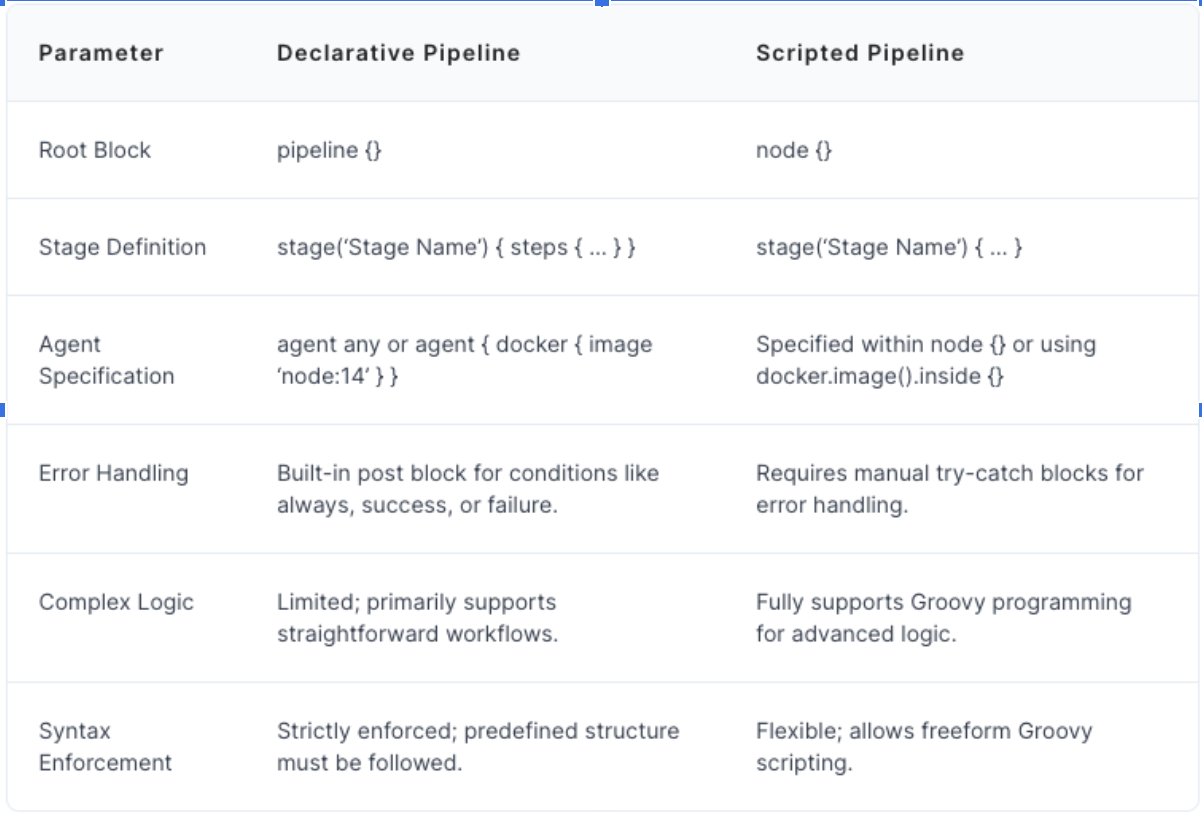
Types of Jenkins Pipelines
Jenkins offers two syntaxes for defining Pipelines:
1. Declarative Pipeline
The more recent and recommended approach — structured, readable, with predefined sections like agent, stages, and steps.
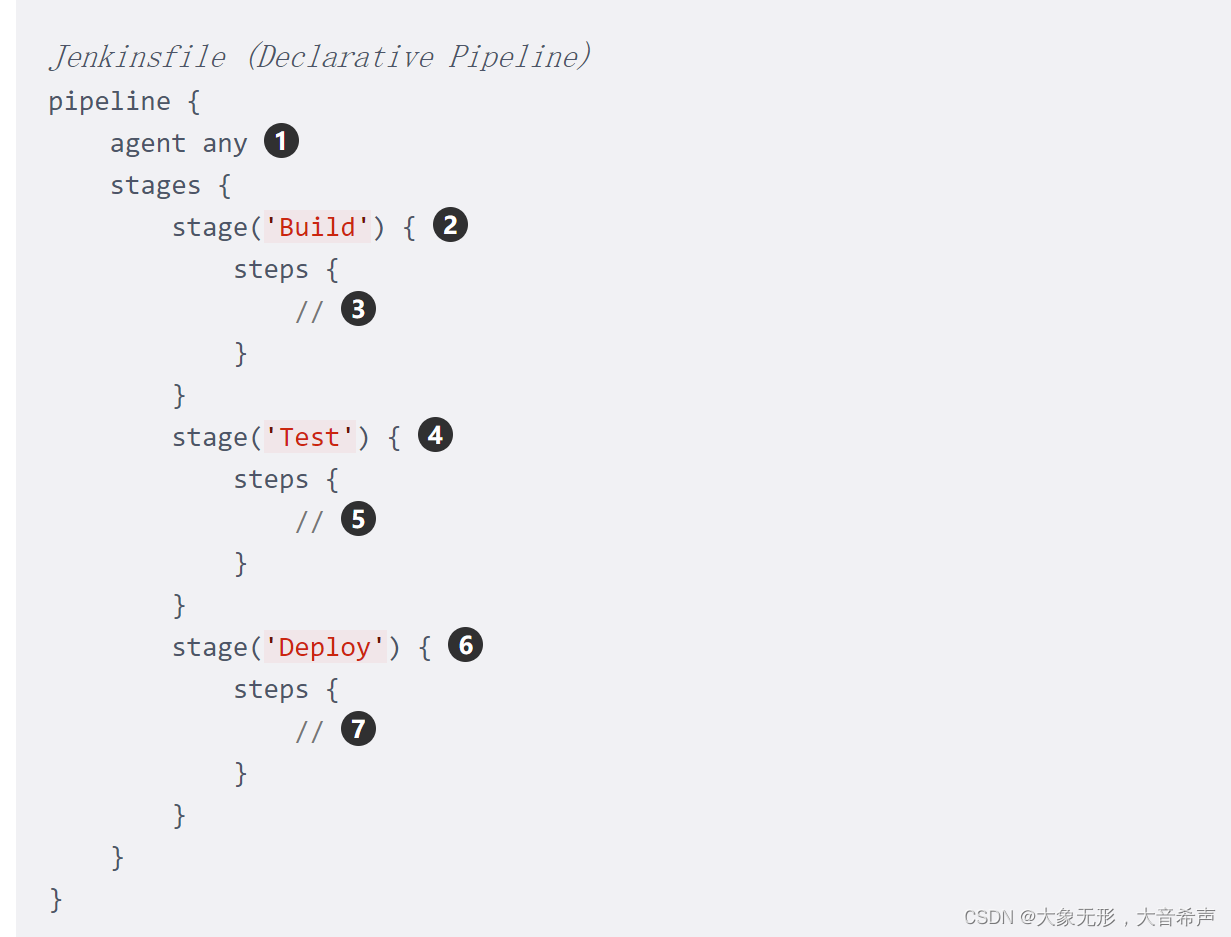
pipeline {
    agent any

    stages {
        stage('Build') {
            steps {
                sh 'mvn clean compile'
            }
        }
        stage('Test') {
            steps {
                sh 'mvn test -DsuiteXmlFile=testng.xml'
            }
        }
        stage('Report') {
            steps {
                publishHTML([
                    reportDir: 'test-output/ExtentReports',
                    reportFiles: 'ExtentReport.html',
                    reportName: 'Selenium Test Report'
                ])
            }
        }
    }

    post {
        always {
            testNG '**/target/surefire-reports/testng-results.xml'
        }
        failure {
            mail to: 'team@example.com',
                 subject: "Build Failed: ${env.JOB_NAME}",
                 body: "Check Jenkins for details: ${env.BUILD_URL}"
        }
    }
}
Key elements:
| Element | Purpose |
|---|---|
pipeline |
The overall container for the entire pipeline |
stages |
Groups of related steps (e.g., "Build," "Test," "Deploy") |
stage |
A specific named step in the process |
steps |
The actual commands to execute (e.g., compile, run tests) |
post |
Actions to run after all stages (notifications, reports) |
2. Scripted Pipeline
The original Jenkins Pipeline syntax — leverages the full power of Groovy scripting for maximum flexibility and control. More complex to write and maintain, but useful for advanced scenarios.
node {
    stage('Checkout') {
        checkout scm
    }

    stage('Build') {
        sh 'mvn clean compile'
    }

    stage('Test') {
        try {
            sh 'mvn test -DsuiteXmlFile=testng.xml'
        } catch (Exception e) {
            currentBuild.result = 'FAILURE'
            throw e
        } finally {
            testNG '**/target/surefire-reports/testng-results.xml'
        }
    }
}
Jenkinsfile
A Jenkinsfile is a text-based configuration file that defines a Jenkins pipeline using Groovy-based DSL (Domain-Specific Language). It enables developers to define, version control, and automate CI/CD workflows in a structured manner.
Using a Jenkinsfile streamlines complex workflows, ensures repeatability, and minimizes manual interventions while maintaining transparency and manageability in pipeline configurations.
Benefits of Using a Jenkinsfile
✅ Improved Version Control and Traceability Changes to the pipeline can be tracked, reverted, and reviewed using Git. A Jenkinsfile stored in Git allows reverting to a previous configuration if a recent pipeline update causes build failures.
✅ Better Collaboration and Code Review Teams can collaborate on pipeline configuration like any other code, enabling peer reviews and better quality assurance. A pull request can be created to propose pipeline updates, allowing team members to review before merging.
✅ Consistency Across Builds The same Jenkinsfile can be reused across environments, ensuring consistent behaviour in builds, tests, and deployments. Identical build steps for both staging and production environments prevent discrepancies during deployment.
✅ Ease of Automation and Scaling Pipelines are easier to replicate and scale since the configuration is encapsulated in a single file. Adding a new project to Jenkins requires only copying an existing Jenkinsfile template and modifying parameters.
✅ Transparency and Documentation The pipeline logic is written in a human-readable format, doubling as documentation for understanding workflows. Clear stages like "Build," "Test," and "Deploy" provide instant insight into the CI/CD process — especially valuable for new team members.
Sample Jenkinsfile for Selenium + TestNG
pipeline {
    agent any

    tools {
        maven 'Maven-3.9'
        jdk 'JDK-17'
    }

    environment {
        SUITE_FILE = 'testng.xml'
    }

    stages {
        stage('Checkout') {
            steps {
                git branch: 'main',
                    url: 'https://github.com/your-org/your-selenium-project.git'
            }
        }

        stage('Build') {
            steps {
                sh 'mvn clean compile'
            }
        }

        stage('Run Tests') {
            steps {
                sh "mvn test -DsuiteXmlFile=${env.SUITE_FILE}"
            }
        }

        stage('Publish Reports') {
            steps {
                publishHTML([
                    allowMissing: false,
                    reportDir: 'test-output/ExtentReports',
                    reportFiles: 'ExtentReport.html',
                    reportName: 'Extent Test Report',
                    keepAll: true
                ])
                testNG '**/target/surefire-reports/testng-results.xml'
            }
        }
    }

    post {
        success {
            echo '✅ All tests passed!'
        }
        failure {
            mail to: 'qa-team@yourcompany.com',
                 subject: "❌ Test Failure: \({env.JOB_NAME} #\){env.BUILD_NUMBER}",
                 body: "Build failed. View details at: ${env.BUILD_URL}"
        }
        always {
            cleanWs()
        }
    }
}
Quick Comparison: Freestyle vs Pipeline
| Feature | Freestyle Project | Declarative Pipeline | Scripted Pipeline |
|---|---|---|---|
| Configuration | UI-based | Code (Jenkinsfile) | Code (Groovy) |
| Version Control | ❌ No | ✅ Yes | ✅ Yes |
| Complexity | Low | Medium | High |
| Parallel Execution | Limited | ✅ Yes | ✅ Yes |
| Reusability | ❌ Low | ✅ High | ✅ High |
| Best For | Quick setups | Most teams | Advanced use cases |
What's Coming in Part 2?
In Part 1, we've covered:
- ✅ The continuous philosophy — CI, CD, and Continuous Deployment
- ✅ What Jenkins is and its core vocabulary
- ✅ Installing Jenkins on macOS step-by-step
- ✅ Freestyle Projects — setup, configuration, and limitations
- ✅ Jenkins Pipelines — Declarative vs Scripted
- ✅ Jenkinsfile — benefits and real examples
In Part 2, we'll take everything a step further with a practical, hands-on integration of a real Selenium + TestNG automation project into Jenkins — including parallel test execution, environment-specific configurations, and integrating with GitHub webhooks for automatic test triggers.
Stay tuned! 🚀
Want to build robust, CI/CD-powered QA automation pipelines? Talk to GeekyAnts.