

A Brief How-To On Freehand Sketching On Google Maps
How to draw a freehand sketch on Google Maps instead of drawing a rigid polygon to mark a particular area.

Search for a command to run...
How to draw a freehand sketch on Google Maps instead of drawing a rigid polygon to mark a particular area.
Hey! Very helpful article ....can you please the same thing on React Native ??
Can you use this tool to write notes on an interactive face of google maps? I survey thousands of acres of land for renewable energy and am looking to hand write notes on google maps or google earth so I can simultaneously see my site boundaries and my location.
Hi! I have a question! Is it possible to freehand sketch with this tool with the 3D activated in satelite mode? Thanks
Yes, we can.
Arun Pougajendy That's so cool. I've been looking for an alternative to scribblemaps.com that lets me sketch on the 3D version of google maps. On the other hand, that website lets me control the thickness and opacity of the pencil tool.
Thanks, Appreciate it.
Discover how neo-brutalism is shaping 2026 design trends. See how anti-design principles can create distinct, usable, and memorable product experiences.

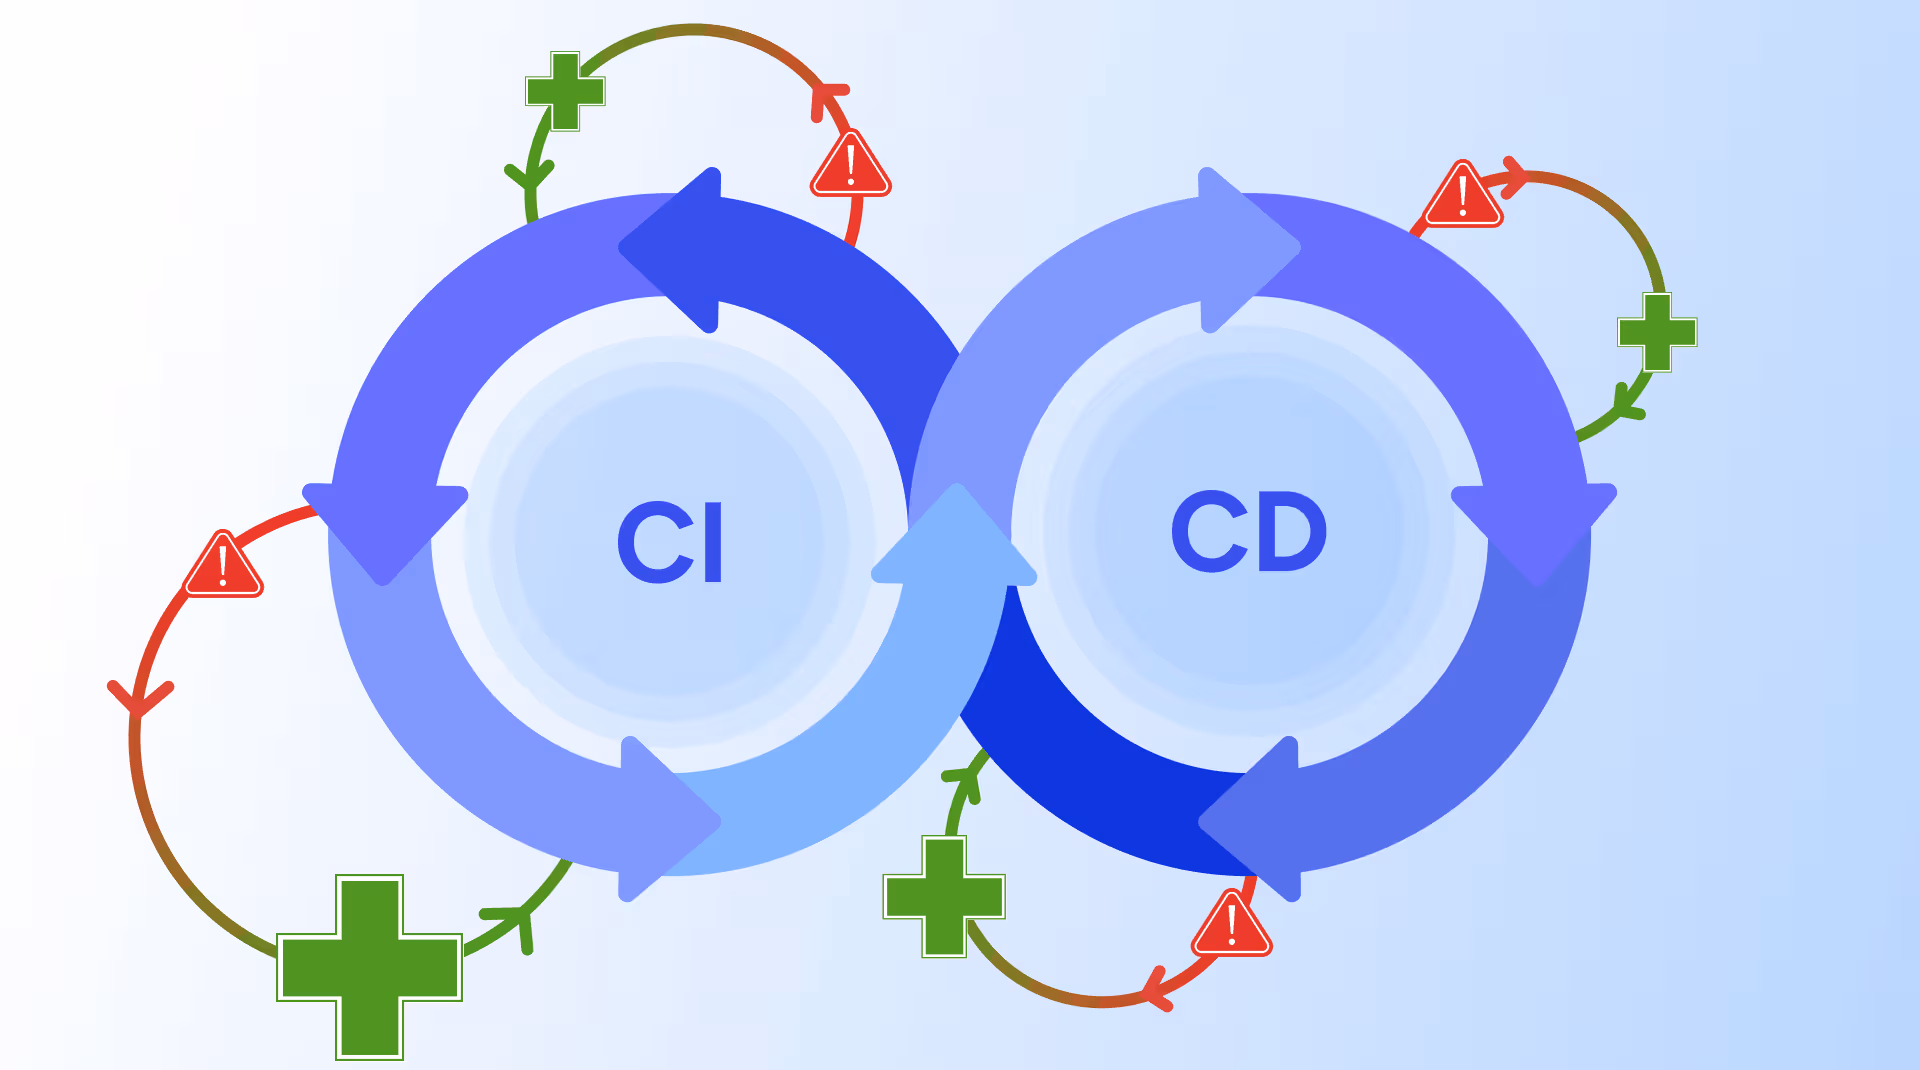
When code breaks a pipeline, developers have to stop working and figure out why. This blog shows how an AI agent reads the error, finds the fix, and submits it for review all on its own.
GeekyAnts built a 5-agent fraud detection pipeline that makes decisions in under 200ms — 15x cheaper than single-model systems, with full explainability built in.

A deep dive into how GeekyAnts built a real-time AI fraud detection system that evaluates transactions in milliseconds using a hybrid multi-agent approach.

A deep dive into how GeekyAnts built an AI-powered Code Healer that analyzes CI/CD failures, summarizes logs, and generates code-level fixes to keep development moving.
GeekyAnts Tech Blog
347 posts
GeekyAnts is an AI-powered digital product engineering and consulting company helping startups, enterprises, and Fortune 500 brands build scalable, future-ready digital solutions. Since 2006, we have delivered 800+ successful projects for 550+ global clients across healthcare, BFSI, retail, logistics, education, and enterprise technology. We help businesses accelerate digital transformation through strategy, design, engineering, and AI-led innovation.
In this modern digital era, everything has been automated from sending mails to visiting the world at the click of a button powered by VR technologies. It's a known fact the almost every product/service provider make use of Google Maps in their applications to conduct research on users' behaviour. Google provides various services when it comes to Maps. This article shows how to draw a freehand sketch and get border co-ordinates on Google Maps using APIs.
This article assumes that the reader has a basic working knowledge of React along with knowledge of Google APIs.
Google provides various map APIs. For our application, we would be using Maps JavaScript API. The following are the steps to enable Google Maps into our project:
Create a project in the Google Console and enable Maps JavaScript API.
Next, generate and save an API key.
For this article, I have created a React app using create-react-app with TypeScript along with google-map-react package for the map component.
Include the API key in the configuration file. You will notice that we would be requiring some special libraries to achieve our goal geometry, drawing. You can execute this by using the following code snippet:
// src/services/config.ts
const config = {
googleMaps: {
  apiKey: '', // Paste your Google API key
  libraries: ['geometry', 'drawing'],
},
};
Next, mount the Google Map component onto the DOM by providing the default center's coordinates and then zoom in.
google-map-react package provides us many props to customize the map component and the most important in this project is the yesIWantToUseGoogleMapApiInternals prop. We need to enable this for our functionality to work as shown:// src/Components/GoogleMap/index.tsx
<GoogleMapReact
ref={(ref: any) => (this.mapView = ref)}
bootstrapURLKeys={{
key: config.googleMaps.apiKey,
libraries: config.googleMaps.libraries,
}}
defaultCenter={this.props.center}
defaultZoom={this.props.zoom}
draggable={!this.state.isDrawable}
yesIWantToUseGoogleMapApiInternals
/>
Once the map is ready, we can drag it to move it around. The only condition being that it should be static when we draw on it. That's where the draggable prop comes in. We can manually control the prop using our local state by using this.
You will notice a DRAW ON MAP button at the top of the map. We need to click it to disable the map drag while enabling the Google Event for listeners. A representation of this is shown below:

We need to add an event listener on the GoogleMapDom to listen to the mousedown event when we want to draw on the map. The code to execute this is given below:
_enableDrawableHelper = () => {
// Clear the old Listeners if exits and attach a new 'mousedown' listener on Map
if (this.mapView) {
  this.mapView.maps_.event.clearListeners(
    this.mapView.googleMapDom_,
    'mousedown',
  );
  this.mapView.maps_.event.addDomListener(
    this.mapView.googleMapDom_,
    'mousedown',
    this._drawFreeHand,
  );
}
};
mousedown event is triggered. Use the following code:const poly = new this.mapView.maps_.Polyline({
clickable: false,
map: this.mapView.map_,
strokeColor: '#42A5F5',
strokeWeight: 3,
});
The purpose of creating a Polyline is to see the line drawn by the user. Once the Polyline is created, we can add a mousemove event listener on the Google Map to track mouse movements. Get the relevant coordinates and assign those coordinates to the Polyline to see the drawn line. Use the code given below to execute this:
// Added mousemove listener to track the user's mouse movement
const move = this.mapView.maps_.event.addListener(
this.mapView.map_,
'mousemove',
(e: any) => {
  poly.getPath().push(e.latLng);
},
);

The next step is to get back to the starting point so that a complete polygon is formed. To achieve that, we need to add a mouseup listener to the Google Map. Once the event is triggered, we can draw the complete path using the Polyline.
To proceed, we need to clear the Polyline from the map and create a polygon using the path provided by the Polyline. Since a polygon is always a closed geometrical shape, the end-point of the Polyline will automatically connect to the start-point of the Polyline drawn. Use the following code:
// Added mouseup listener to check when the user releases the mouse button
this.mapView.maps_.event.addListenerOnce(
this.mapView.map_,
'mouseup',
(e: any) => {
  this.mapView.maps_.event.removeListener(move);
  const path = poly.getPath();
  poly.setMap(null);
  const polygon = new this.mapView.maps_.Polygon({
    clickable: false,
    fillColor: '#42A5F5',
    fillOpacity: 0.25,
    geodesic: true,
    map: this.mapView.map_,
    path,
    strokeColor: '#42A5F5',
    strokeWeight: 3,
  });
  this._polyComplete(polygon);
  this.mapView.maps_.event.clearListeners(
    this.mapView.googleMapDom_,
    'mousedown',
  );
},
);

Once the polygon is complete, we can remove all the listeners from the map.
We still need to get the proper coordinates from the polygon so that we can send them to the API. Use the code given below:
// Helper method to get the coordinates across the polygon line
_polyComplete = (poly: any) => {
this.polygonControllers = poly;
let bounds = '';
const paths = poly.getPaths();
paths.forEach((path: any) => {
  const ar = path.getArray();
  for (let i = 0, l = ar.length; i < l; i++) {
    const lat = ar[i].lat();
    const lng = ar[i].lng();
    bounds += `${lng} ${lat},`;
  }
  // Appending the first coords as last to make a complete polygon
  if (ar[0]) {
    bounds += `${ar[0].lng()} ${ar[0].lat()}`;
  }
});
// Send the bounds to api
_sendToApi(bounds)
};

The reason we set our polygon to a local variable is to facilitate the clearing of the existing polygon to draw a new one. To do this, we just need to remove the polygon's map and use this.polygonControllers.setMap(null);.
This is a working demonstration of what the end-product should look like:

There are many use cases for this functionality, one of them is real estate. Let take an example of a user looking to buy a new home in HSR Layout, Bangalore. Since the users are very particular about where or which place they are looking for, it's difficult for the companies to understand the user's requirements. Instead of giving all the available houses in HSR, this functionality can be used to find out what exactly the user is looking for and give suggestions based on the findings. We can also enable users to mark multiple areas. A pictorial representation is shown below:

This implementation was made possible mainly because of the DOM event listeners provided by the browsers. The browsers are so powerful that they trigger multiple events based on the user interactions based on which we identify the necessary events and add listeners. We can achieve multiple geometry drawings and other functionalities like heat signatures, Street Views, etc. by attaching DOM event listeners on Maps utilising Google Map APIs. Our current world is moving toward a digital future in all aspects. Many organizations (like Google, Amazon, Facebook, etc.) are developing various services and open source software that can be used to improve applications. This is one of my projects using Google's Map APIs. To know more, click here
Hope you look forward to such similar articles!