Cache Busting In React: A Tutorial
An introduction to cache busting and how it can be implemented in React
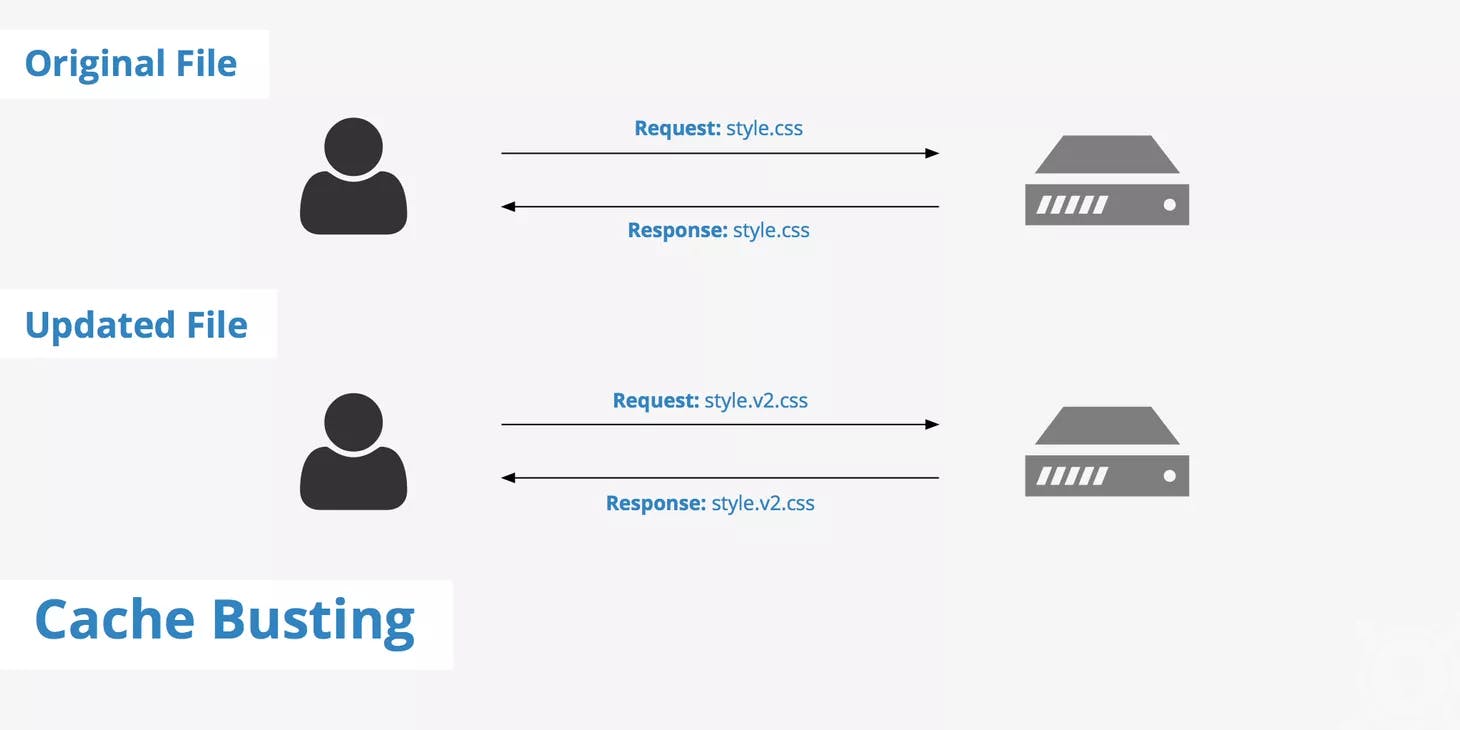
In this article, we are going to discuss cache busting. Now the first thing that comes to mind when you hear of the term is what is it essentially? So, cache busting is basically a technique to tell the browser that the data stored in the cache memory has been changed and it needs to fetch the latest data instead of using the old cached data. To understand this properly let's first understand what is caching?

What is Caching?
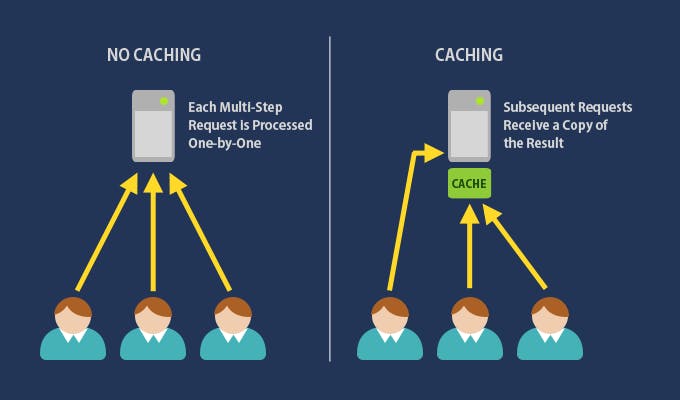
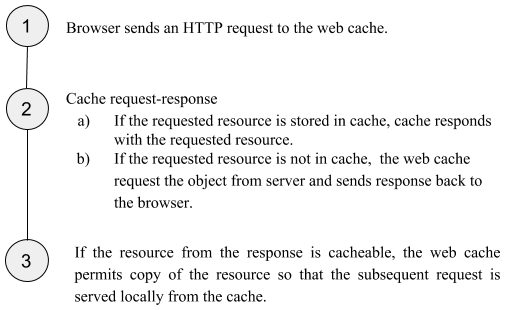
Loading the data from the server again and again on every refresh takes some time and it would seem to the user that our website is slow. So, to overcome this problem we store the frequently used files in the cache memory of the browser for a long period of time. Accessing the data from the cache memory is faster than fetching it from the server every time and it saves time in loading the website. This process of storing frequently used files in the cache memory is called Caching. Refer to the image given below to understand this better:

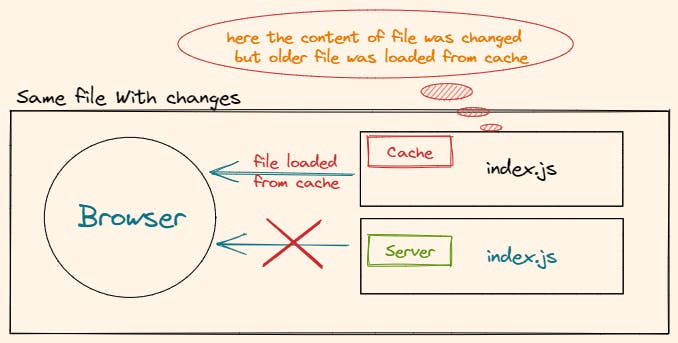
To implement caching, we use HTTP caching. HTTP caching allows us to specify how long a cache should be held for a file name, so that loading the page is pretty fast. Now let’s look into the problem that arises due to the caching by referring to the image given below:

Problem with Caching
Suppose we have our website's CSS file stored in the cache memory with a lifetime of one month. Now, suppose we changed the theme of our website in the CSS file. The next time the browser makes a call to the server, it will not load the new CSS file it gets from the server instead it will use the old cached file till the expiration of that file is reached. This happens because the browser will just check that the name of the file is the same so it will just fetch the old file from the cache memory. So the old user of the website will not be able to see the new changes till 1 month. In the case of CSS, it's not that serious but it becomes a problem, especially when deploying bug fixes and security patches. So cache busting is used to resolve this issue.

Cache Busting
In cache busting, we use various ways to change the names of the files that are loading for every version so that browsers will load them and add them to their cache. Suppose we have a file named index.js and we have a new version of this file ready. Now if we just upload this index.js file, the changes will not be reflected in the browser till the expiration of the current cached file. So we change the name or path of that file so that the browser updates this new file coming from the server.
There are many ways of achieving cache busting on this file. We are gonna learn them all in this article.
1. Filepath versioning
- We can put this file in a different directory every time we make changes in this file i.e we change the path of this file. Enter the following code snippet in your console:
styles/v1/style.css
//file is put into a directory named v1
body
          {
          background-image:url(‘test.svg’);
          background-color:#fff;
          }
styles/v2/style.css
//file is updated and then put into another directory named v2
body
          {
          background-image:url(‘test2.svg’);
          background-color:#fff;
          }
2. Filename versioning
We can give a different name to the file every time we change the content of the file. This way the browser will know the file has been updated. Refer to the following code:
- For
style.css:body { background-image:url(‘test.svg’); background-color:#fff; }
style2.css
//file is updated and its name is changed to style2
body
          {
          background-image:url(‘test2.svg’);
          background-color:#fff;
          }
- For
style.v1.css://this is another way in which we can modify the name body { background-image:url(‘test3.svg’); background-color:#fff; }
NOTE: Ensure that once the file name or path is modified you also need to update its reference in the HTML or JSX file.
Changing filename and file path versioning manually can be a bit irritating and troublesome as we have to change the file name/path every time we make a change in the file and also update its references/imports. And there can be multiple files that are getting cached so in case of updating multiple cached files there are a lot of changes required every time. Webpack can make these things way easier for us.
Webpack
Webpack is a module bundler used to bundle multiple files in a single output file. It provides a method of templating the filenames using bracketed strings called substitutions.
We can add a unique hash in the name of the file (it is also a part of filename versioning). The hash is dependent on the content inside the file and if the content changes the hash will be changed. The contenthash substitution will add a unique hash based on the content of an asset. For example, we have a file called style.css, it will be converted to something like style-67bde1.css where the 67bde1 is the hash generated by the webpack based on the content of the file. Once we change this content, it will change the hash and the filename would be changed which will result in filename versioning and the cache data would not be used in this case.
This code will be put into the webpack.config.js file after installing webpack:
  const path = require('path');
  const HtmlWebpackPlugin = require('html-webpack-plugin');

  module.exports = {
    entry: './src/index.js',
    plugins: [
      new HtmlWebpackPlugin({
       title: 'Output Management',
       title: 'Caching',
      }),
    ],
    output: {
     filename: 'bundle.js',
     filename: '[name].[contenthash].js',
      path: path.resolve(__dirname, 'dist'),
      clean: true,
    },
  };
We don't even need to modify the paths of the updated files , HtmlWebpackPlugin will take care of all this for us. If you want to learn more about webpack and cache-busting with hashing refer to the links provided at the end of the article.
3. Query Strings
We can pass a query string with the file every time we update the file. A query string is a unique set of parameters that can identify separate files within the same file hierarchical path. This is usually done by adding a ? followed by the string that indicates the differences to the end of the file. This can be used for cache-busting because most cache mechanisms will use the query string as a separate file.
- For
style.css?v=1:body { background-image:url(‘test.svg’); background-color:#fff; }
style.css?v=2
body
          {
          background-image:url(‘test2.svg’);
          background-color:#fff;
          }
Query strings on the other hand, have been known to cause caching issues. Some proxies or CDNs aren't even able to cache files that contain query strings and it is recommended not to use them. Additionally, If you run your site through a site speed test, it will likely return a suggestion to remove query strings. Therefore, when using cache busting, try to use file name or file path versioning wherever possible.
Conclusion
In this article, we discussed about caching and how long caches can cause problems without implementing the cache-busting. We also discussed multiple ways of implementing cache busting to resolve this problem. Using this method we can take advantage of setting high expiry value for our cached files while continuing to deliver the most recently updated changes to the users.

