Reactive And Simple State Management With Vuex
An article on simplifying complex code and enhancing reactive state management using Vuex
Table of contents
Introduction
Vuex is a state management pattern that doubles up as a library for Vue.js applications. It serves as a centralized store for all the components in an application with rules ensuring that the state can only be mutated in a predictable fashion as dictated. As Redux is to React, Vuex is to Vue but the main difference is that Redux state is always immutable while Vuex uses mutations to change its state. Its granular reactivity system gives efficient updates and the well-structured design makes it easier to fetch, commit and compute derived data.
Vuex helps in dealing with shared state management efficiently between your Vue components. It may feel a bit verbose at first but as your app starts scaling up, it fits conveniently and its structure starts making more sense. Vuex is inspired by Flux, Redux, and The Elm Architecture, taking in the best of all the three.
Vuex Architecture
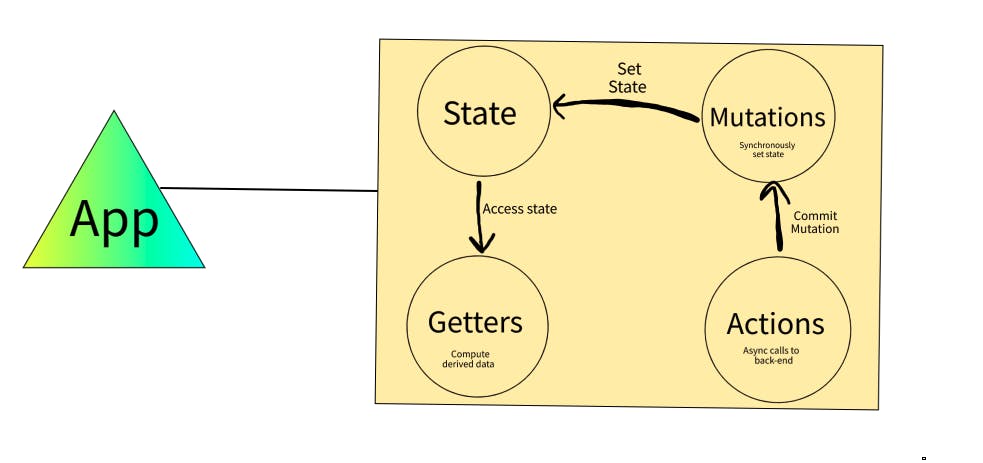
- The state is centralised in the store at app-level.
- The only way to update the state is through mutations, which are synchronous transactions.
- Asynchronous transactions are done through actions.
- Computing derived data based on store state is done through a provision called getters.
- Store can be divided into modules with each having its own state, mutations, actions, and getters.
Vuex gives us the ability to store and share reactive data without trading off performance, testability and maintainability. With its reactivity system, we don't have to keep track of state changes and prop drilling. This is demonstrated in the image given below:

Let's create a shopping cart and integrate Vuex to show real-time updates in this article!!
Getting Started
- You should have a basic understanding of Vue.js and its architecture.
- Install Vue CLI if not already installed using the following code snippet:
npm i @vue/cli -g - Create a folder with the name of your project, for example, say Shopping Cart.
- Open the terminal in your root project and enter the command function. Execute the following command to proceed:
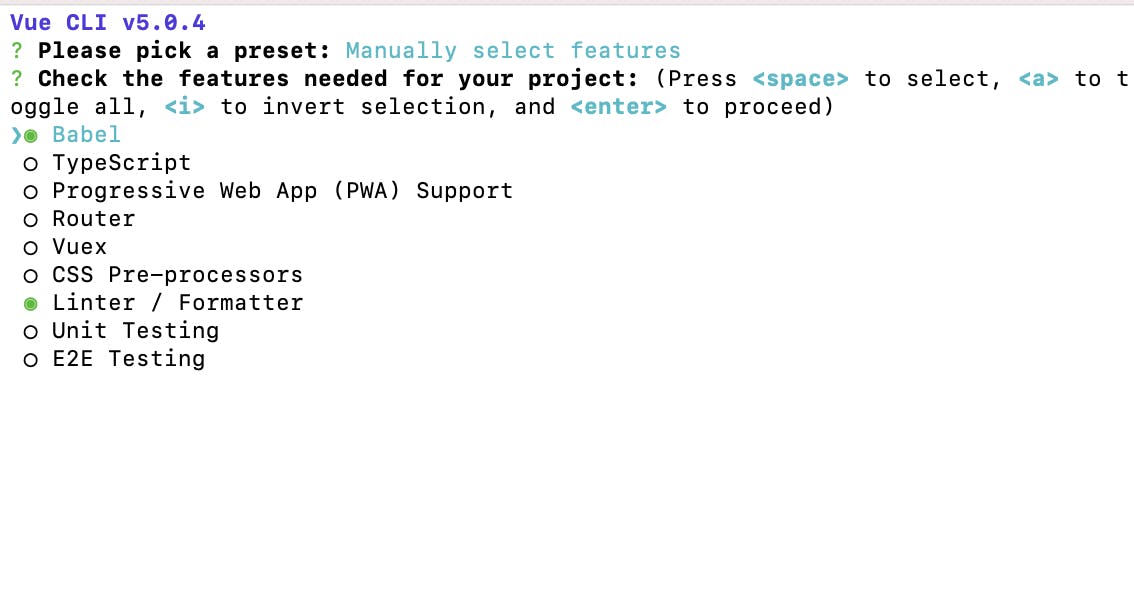
vue create . - It will then ask us to select a preset, and click on manually select features so that we can cherry-pick the required features. On selecting, you can choose features from the options given. Select Vuex 3.x since we will be creating a simple Single Page Application, but you can select other features if you want to scale up the app. Refer to the following image to proceed:

- After executing the above steps, press Enter for the rest of the steps. On completion, look at your
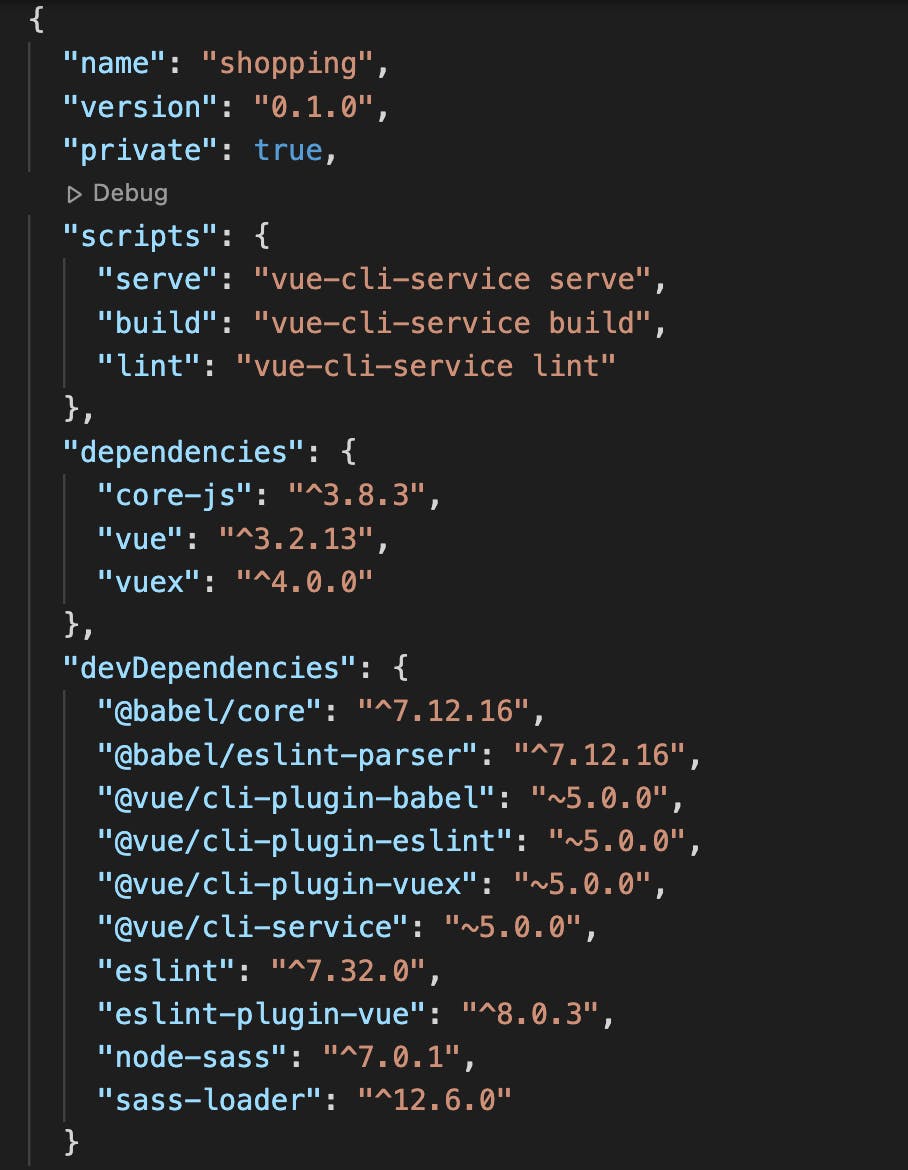
package.jsonto check if all the dependencies were added or not as shown below:

Note: I'm Using custom CSS to design the App but you can use any UI library at your convenience.
Enter the following code snippet into your console to proceed:
npm run serveThis will then opens your app on
localhost. Remove the part of the code which is not required from theApp.vueand the components folder as shown in the image given below:

- Now that our App is up and running, let's set up our Vuex store. Open
index.jsin the store folder where you'll see that state, mutations, getters, and actions are empty. First, let's define our store's state. We'll need certain products to store shopping items and a cart to store the selected items. Run the following code snippet:
state: {
    products: null,
    cart: {},
  }
- Let's generate fake data to fetch shopping items. We'll use fakestoreapi.com to fetch store data in action and enter the following code snippet:
actions: {
    async generateProducts() {
      const res = await fetch("https://fakestoreapi.com/products");
      const data = await res.json();
      this.commit("SET_PRODUCTS", data);
    },
  }
- Commit the data fetched via mutation to set the store's state and let's also add mutations to add and remove items from the cart. The reason we are committing a mutation instead of changing
store.state.productsdirectly is because we want to explicitly track it. This simple convention makes your intention more explicit so that you can reason about state changes in your app better when reading the code. In addition, this gives us the opportunity to implement tools that can log every mutation, take state snapshots, or even perform time travel debugging. Enter the following code snippet into your console to continue:
mutations: {
    SET_PRODUCTS(state, data) {
      state.products = data;
    },
    ADD_TO_CART(state, data) {
      const cart = state.cart;
      cart[Object.keys(cart).length] = data;
      state.cart = cart;
    },
    REMOVE_FROM_CART(state, data) {
      const cart = state.cart;
      const key = Object.keys(cart).find((key) => cart[key] === data);
      delete cart[key];
      state.cart = cart;
    },
  }
- Let's create a basic UI to dispatch our action when the App mounts and displays the generated results using the following code snippet:
<template>
  <div id="app">
    <div class="header">
      <h1>Shopping Cart</h1>
      <shopping-cart />
    </div>

    <section v-if="$store.state.products" class="items-container">
      <item-list
        v-for="item in $store.state.products"
        :key="item.id"
        :item="item"
      />
    </section>
  </div>
</template>

<script>
import ItemList from "./components/ItemList.vue";
import ShoppingCart from "./components/ShoppingCart.vue";
export default {
  components: { ItemList, ShoppingCart },
  name: "App",
  methods: {
    async onMount() {
      await this.$store.dispatch("generateProducts");
    },
  },
  async mounted() {
    await this.onMount();
  },
};
</script>
- Next, let's write our getter functions to get items in the cart and their total value. We can use
$store.stateto fetch the store's state and compute them in Vue's computed method but if more than one component needs to make use of this, we have to either duplicate the function or extract it into a shared helper and import it to multiple places - both are less than ideal. To resolve this, Vuex allows us to define getters in the store which act as computed properties for stores. Execute the following code to continue:
getters: {
    getCartLength(state) {
      return Object.keys(state.cart).length;
    },
    getCartTotal(state) {
      let total = 0;
      Object.entries(state.cart || {}).forEach((data) => {
        const [, item] = data;
        total += item.price;
      });
      return total.toFixed(2);
    },
  },
- We are almost done with implementing the store and main screen's logic part. We just need to define our
ItemListandShoppingCartcomponents. Let's quickly code them and add in their respective logic to add, remove and display items reactively using the following code snippet:
<template>
  <div class="ItemList">
    <div class="image">
      <img :src="item.image" />
      <p class="item-price">${{ item.price }}</p>
      <div class="button-container">
        <div class="item-add-btn">
          <button class="btn" @click="addToCart(item)">+</button>
          <p class="item-length">{{ itemLength }}</p>
          <button class="btn" @click="removeFromCart(item)">-</button>
        </div>
      </div>
    </div>
    <p class="item-name">{{ item.title }}</p>
  </div>
</template>

<script>
export default {
  name: "ItemList",
  props: ["item"],
  data() {
    return {
      size: "",
    };
  },
  computed: {
    itemLength() {
      const cart = this.$store.state.cart;
      return Object.keys(cart).filter((key) => cart[key] === this.item).length;
    },
  },
  methods: {
    addToCart(item) {
      this.$store.commit("ADD_TO_CART", item);
    },
    removeFromCart(item) {
      this.$store.commit("REMOVE_FROM_CART", item);
    },
  },
};
</script>
- Run the following code snippet to proceed to the next step:
<template>
  <div id="ShoppingCart">
    <h3>Cart Details</h3>
    <p>No. of items: {{ $store.getters["getCartLength"] }}</p>
    <p>Total: ${{ $store.getters["getCartTotal"] }}</p>
  </div>
</template>

<script>
export default {
  name: "shopping-cart",
};
</script>
Voila!! w=We are done with the UI and integration! Here's a sneak peek of how the app will look and behave upon completion:

Conclusion
In this article, we have seen how we can create a Vue+Vuex project from scratch and set up a basic store. There's no doubt that Vuex is a great tool and rather than allowing one particular component to change the data directly, we delegate the change to a separate module: the store. In short, it gives developers control and confidence, as it makes understanding and modifying complex code, data or app behavior significantly easier.
Here is the source code of this application for your reference.
See you in the next article!

