What is Blockchain?
A blockchain is a decentralized database that everyone can access. They have an intriguing property where once data is stored in a blockchain, changing it becomes incredibly difficult.
Each block contains the following information:
- Some data that is stored within the block and varies depending on the type of blockchain. It may, for example, keep the specifics of a transaction here.
- The hash of the block, which uniquely identifies the block and all of its contents. Any changes to the block's contents will cause the hash to change.
- The hash of the previous block, which essentially results in a chain of blocks leading to which modifying a single block invalidates all subsequent blocks.
However, hashes alone are insufficient to avoid tampering as powerful computers are capable of computing hundreds of thousands of hashes per second. To combat this, blockchains use a process named proof-of-work, a process where the formation of new blocks takes much longer.
Another method blockchains use for being secure is to be distributed. Instead of relying on a central authority to control the chain, blockchains rely on a peer-to-peer network that anyone may join. The network's nodes come together to form a consensus about which blocks are legitimate and which are not.
What are Smart Contracts?
Smart contracts (also known as decentralized applications or DApps) are similar to conventional contracts; the only distinction being they are electronic. A smart contract is a small computer program that is stored in a blockchain. They can eliminate existing third-party entities from many trustless ecosystems.
But, hold on a second! Why should we place our faith in a smart contract?
Smart contracts inherit some interesting properties since they are stored on a blockchain. They are both immutable and distributed.
The term 'immutable' refers to the fact that once a smart contract is formed, it cannot be modified. So no one can tamper with the terms of the contract.
Since the contract is 'distributed', everyone on the network can verify its results because of which a single individual cannot compel the contract to work in a certain way as this attempt would be detected and marked as invalid by other users on the network.
Building the Blockchain Application
We will write a smart contract that will mirror the working of a financial institution that provides a systematic investment plan. So in our application, the user can regularly deposit a fixed installment and when the total of these installments reaches a certain threshold we will return this total with some return on investment.
1/4. Writing The Smart Contract
The Where and How of using smart contracts:
- Right now, there are a handful of blockchains that support smart contracts, the biggest one being Ethereum. It was specifically created and designed to support smart contracts.
- They can be programmed in a special programming language called Solidity, which is an object-oriented programming language.
- Remix is a powerful, open-source tool that helps you write Solidity contracts straight from the browser. Remix also supports testing, debugging, and deploying smart contracts, and much more.
We are using Remix now because of its better support for Solidity, which will be super useful if we run into any errors.
Inside Remix, open a new file and name it Investment.sol.
We will first start by writing the version of Solidity as shown below:
pragma solidity 0.5.16;
The reason for us using this version is that, though there are versions higher than this, this is the highest that is supported by the Truffle suite (set of tools used for blockchain development, which will be introduced later in the article).
Next, we will create a contract using the keyword 'contract' and the name 'Investment'.
contract Investment { }
After that, we will create the following variables that our smart contract will need:
// amount returned to user
int256 balanceAmount;

// amount deposited by user
int256 depositAmount;

// minimum amount to be deposited by user
int256 thresholdAmount;

// amount to be returned in addition to depositAmount to user
int256 returnOnInvestment;
We have to then initialise the above variables using a constructor, as shown below:
constructor() public {
    balanceAmount = 0;
    depositAmount = 0;
    thresholdAmount = 12;
    returnOnInvestment = 3;
}
Lastly, we will create functions that will perform the required tasks using the variables. Now, we require 4 main operations to be performed in this process:
Function to perform a read operation and return the balance:
// read operation
function getBalanceAmount() public view returns (int256) {
 return balanceAmount;
}
Function to perform a read operation and return the deposit amount:
// read operation
function getDepositAmount() public view returns (int256) {
 return depositAmount;
}
Function to perform a write operation on every installment deposit:
// write operation
function addDepositAmount(int256 amount) public {
 depositAmount = depositAmount + amount;

 if (depositAmount >= thresholdAmount) {
     balanceAmount = depositAmount + returnOnInvestment;
 }
}
Function to perform a write operation on withdrawal of balance:
// write function
function withdrawBalance() public {
 balanceAmount = 0;
 depositAmount = 0;
}
This will complete our smart contract. Feel free to play around with the Solidity Compiler and Deploy & run transactions options in the Remix to compile and deploy the smart contract (though we would do this later using Truffle).
2/4. Building the UI with Flutter
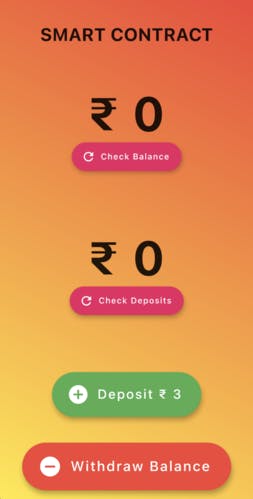
To create a UI for this application here are the three basic things that we will need to do:
- We will first need three variables that will be used to keep track of balance, deposits, and the installment amount (for the sake of simplicity we will fix the installment amount as ₹3).
- Next we will need, two text widgets to display deposits and balance.
- Then we will need four buttons, one each for updating balance, updating deposits, depositing the amount, and withdrawing the balance.
Here is how it would look like:
3/4. Deploying Smart Contract with Truffle and Ganache
Truffle is a world-class development environment, testing framework, and asset pipeline for blockchains using the Ethereum Virtual Machine (EVM), aiming to make life as a developer easier.
Run npm install truffle -g to install Truffle. Then inside the Flutter folder, at the pubspec.yaml level, run truffle init command.
The above command will add an extra bunch of files and folders to the Flutter project. Under the contracts folder, create a new file named Investment.sol and copy the code from Remix, that we wrote in the first step.
Next, go inside the migrations folder and create a new file, named 2_deploy_contracts.js, we need to prefix 2 to maintain the order since we want migrations i.e., 1 to be executed first. Here, 1_initial_migration.js deploys a special Migrations contract, present inside Migrations.sol file, that records the history of previously run migrations. In this file, write the following:
const Investment = artifacts.require("Investment");

module.exports = function (deployer) {
    deployer.deploy(Investment);
};
Here is what we are doing in the above deploy file:
- At the beginning of the migration, we tell Truffle which contracts we'd like to interact with via the artifacts.require() method.
- All migrations must export a function via the module.exports syntax.
- The function exported by each migration should accept a deployer object as its first parameter.
Meanwhile, we will also need to install Ganache which will give us a test blockchain network to work with. Here is how they define themselves:
Ganache is a personal blockchain for rapid Ethereum and Corda distributed application development. You can use Ganache across the entire development cycle; enabling you to develop, deploy, and test your dApps in a safe and deterministic environment.
In Ganache, we will need to link our Flutter project as following:
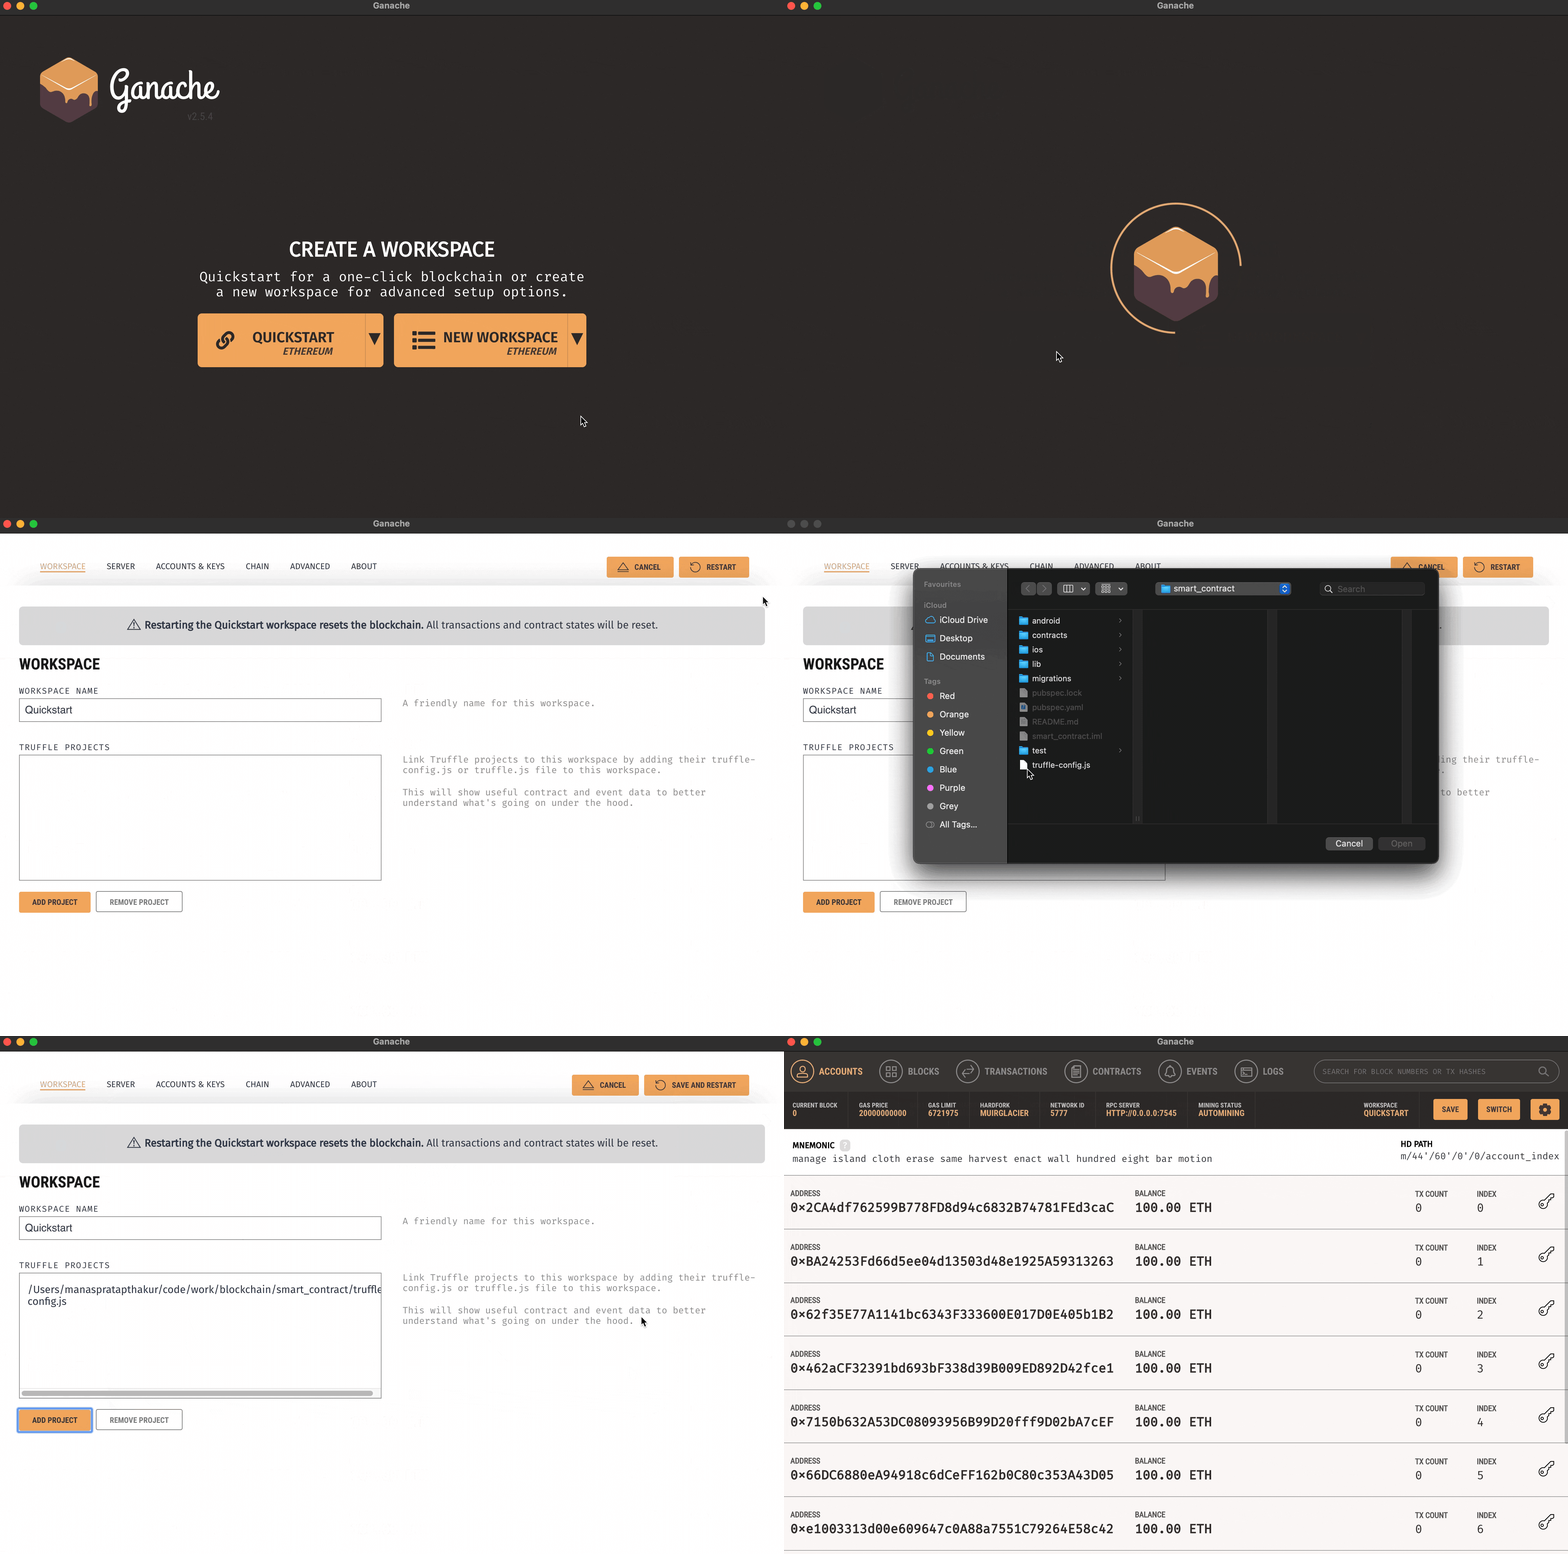
Then in our truffle-config.js, we need to have the following configurations:
module.exports = {
    networks: {
        development: {
        host: "0.0.0.0",
        port: 7545,
        network_id: "*", // Match any network id
        },
    },
    contracts_build_directory: "./src/abis/",
    compilers: {
        solc: {
            optimizer: {
            enabled: true,
            runs: 200,
            },
        },
    },
};
Let us dissect the above configurations to get the following result:
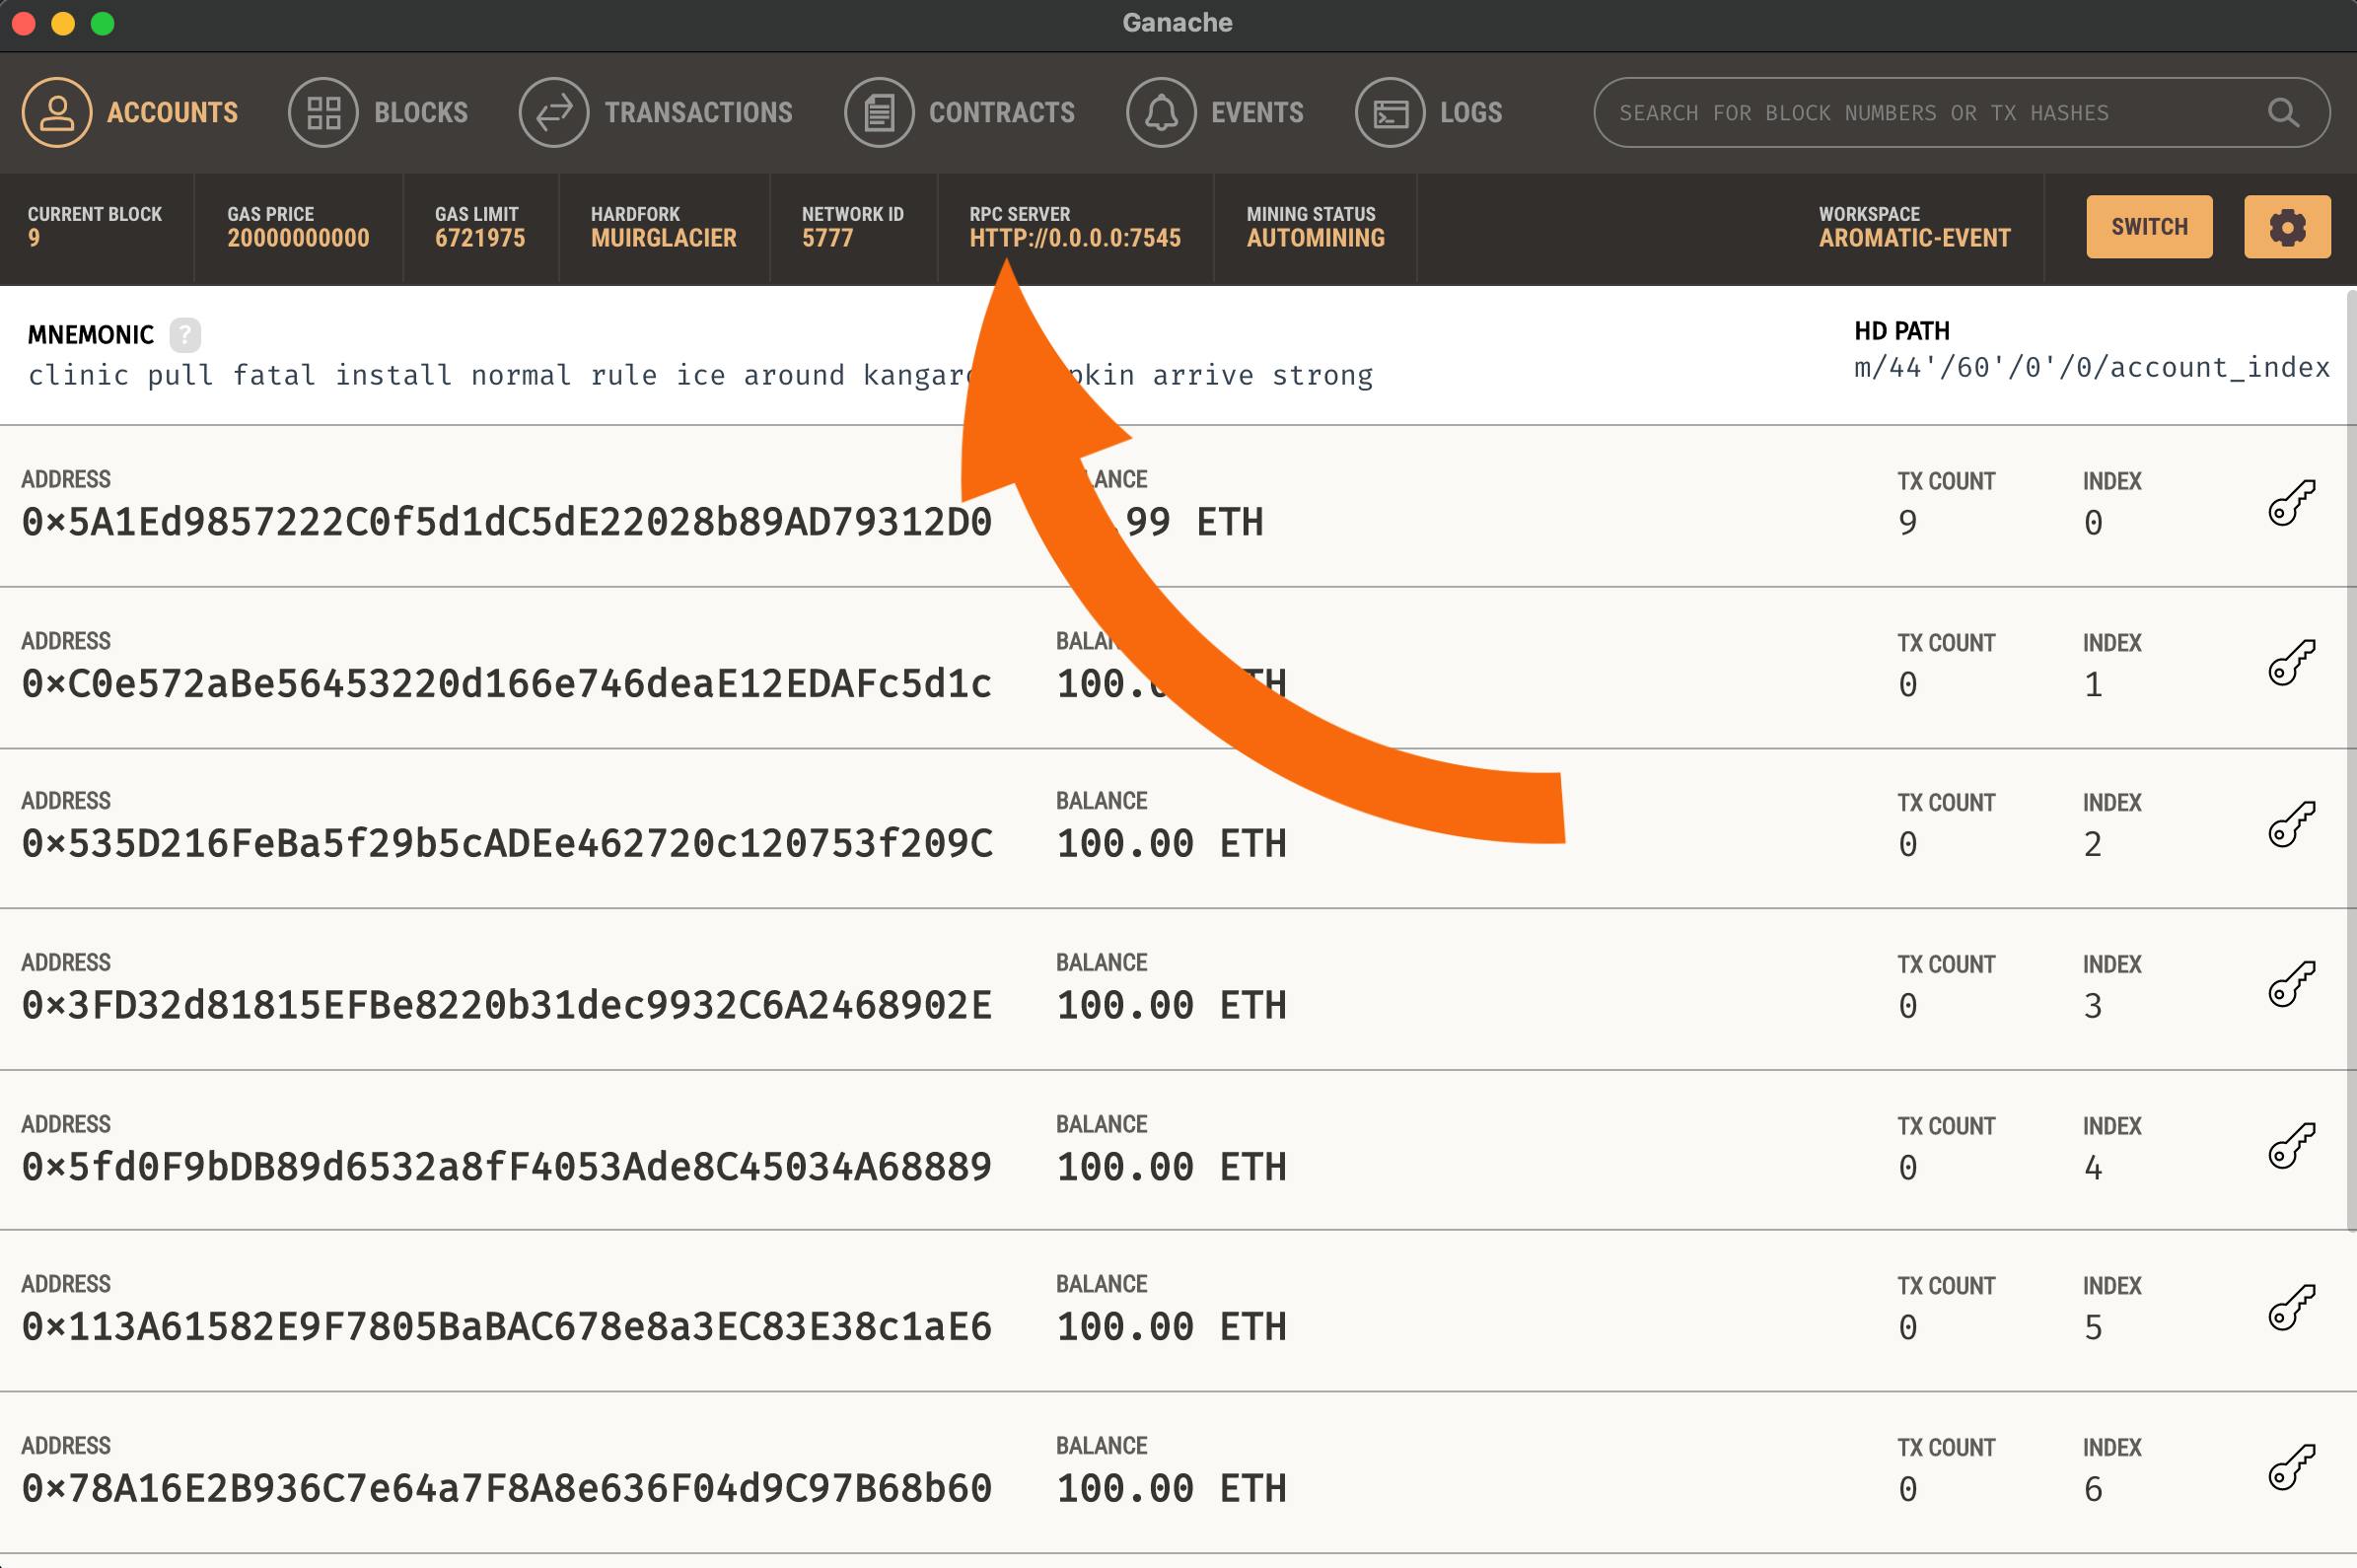
- We can get the host and port information of networks from Ganache as follows:

- In contracts_build_directory, we need to provide the directory where our Contract Application Binary Interface (ABI) will be stored. It is the standard way to interact with contracts in the Ethereum ecosystem.
- In the compilers, solc stands for Solidity Command Line Compiler which Truffle uses. By default, the optimizer will optimize the contract assuming it is called 200 times across its lifetime. A higher number will result in higher deployment costs and cheaper function executions, and vice versa for a lower number.
Lastly, deploy the contract using truffle migrate.
4/4. Setting up Flutter to interact with Smart Contract
To begin with, we will need two packages, web3dart and http.
Web3dart is a dart library that connects to interact with the Ethereum blockchain. It connects to an Ethereum node to send transactions, interact with smart contracts, and much more!
First, we need to initialize a client for each of them:
Client httpClient;
Web3Client ethClient;
String rpcUrl = 'http://0.0.0.0:7545';

@override
void initState() {
    initialSetup();
    super.initState();
}

Future<void> initialSetup() async {
    httpClient = Client();
    ethClient = Web3Client(rpcUrl, httpClient);
}
This will start a client that connects to a JSON RPC API, available at RPC URL. The httpClient will be used to send requests to the RPC server.
We can get the above RPC URL from Ganache:
Then, we can distribute the initialization process into three parts:
Future<void> initialSetup() async {
    httpClient = Client();
    ethClient = Web3Client(rpcUrl, httpClient);

    await getCredentials();
    await getDeployedContract();
    await getContractFunctions();
}
Firstly:
String privateKey =
      '54919c32395f2e6fa422a5791fc5ceb5b0d721416c11382eb183cbf941fc192d';
Credentials credentials;
EthereumAddress myAddress;

Future<void> getCredentials() async {
    credentials = await ethClient.credentialsFromPrivateKey(privateKey);
    myAddress = await credentials.extractAddress();
}
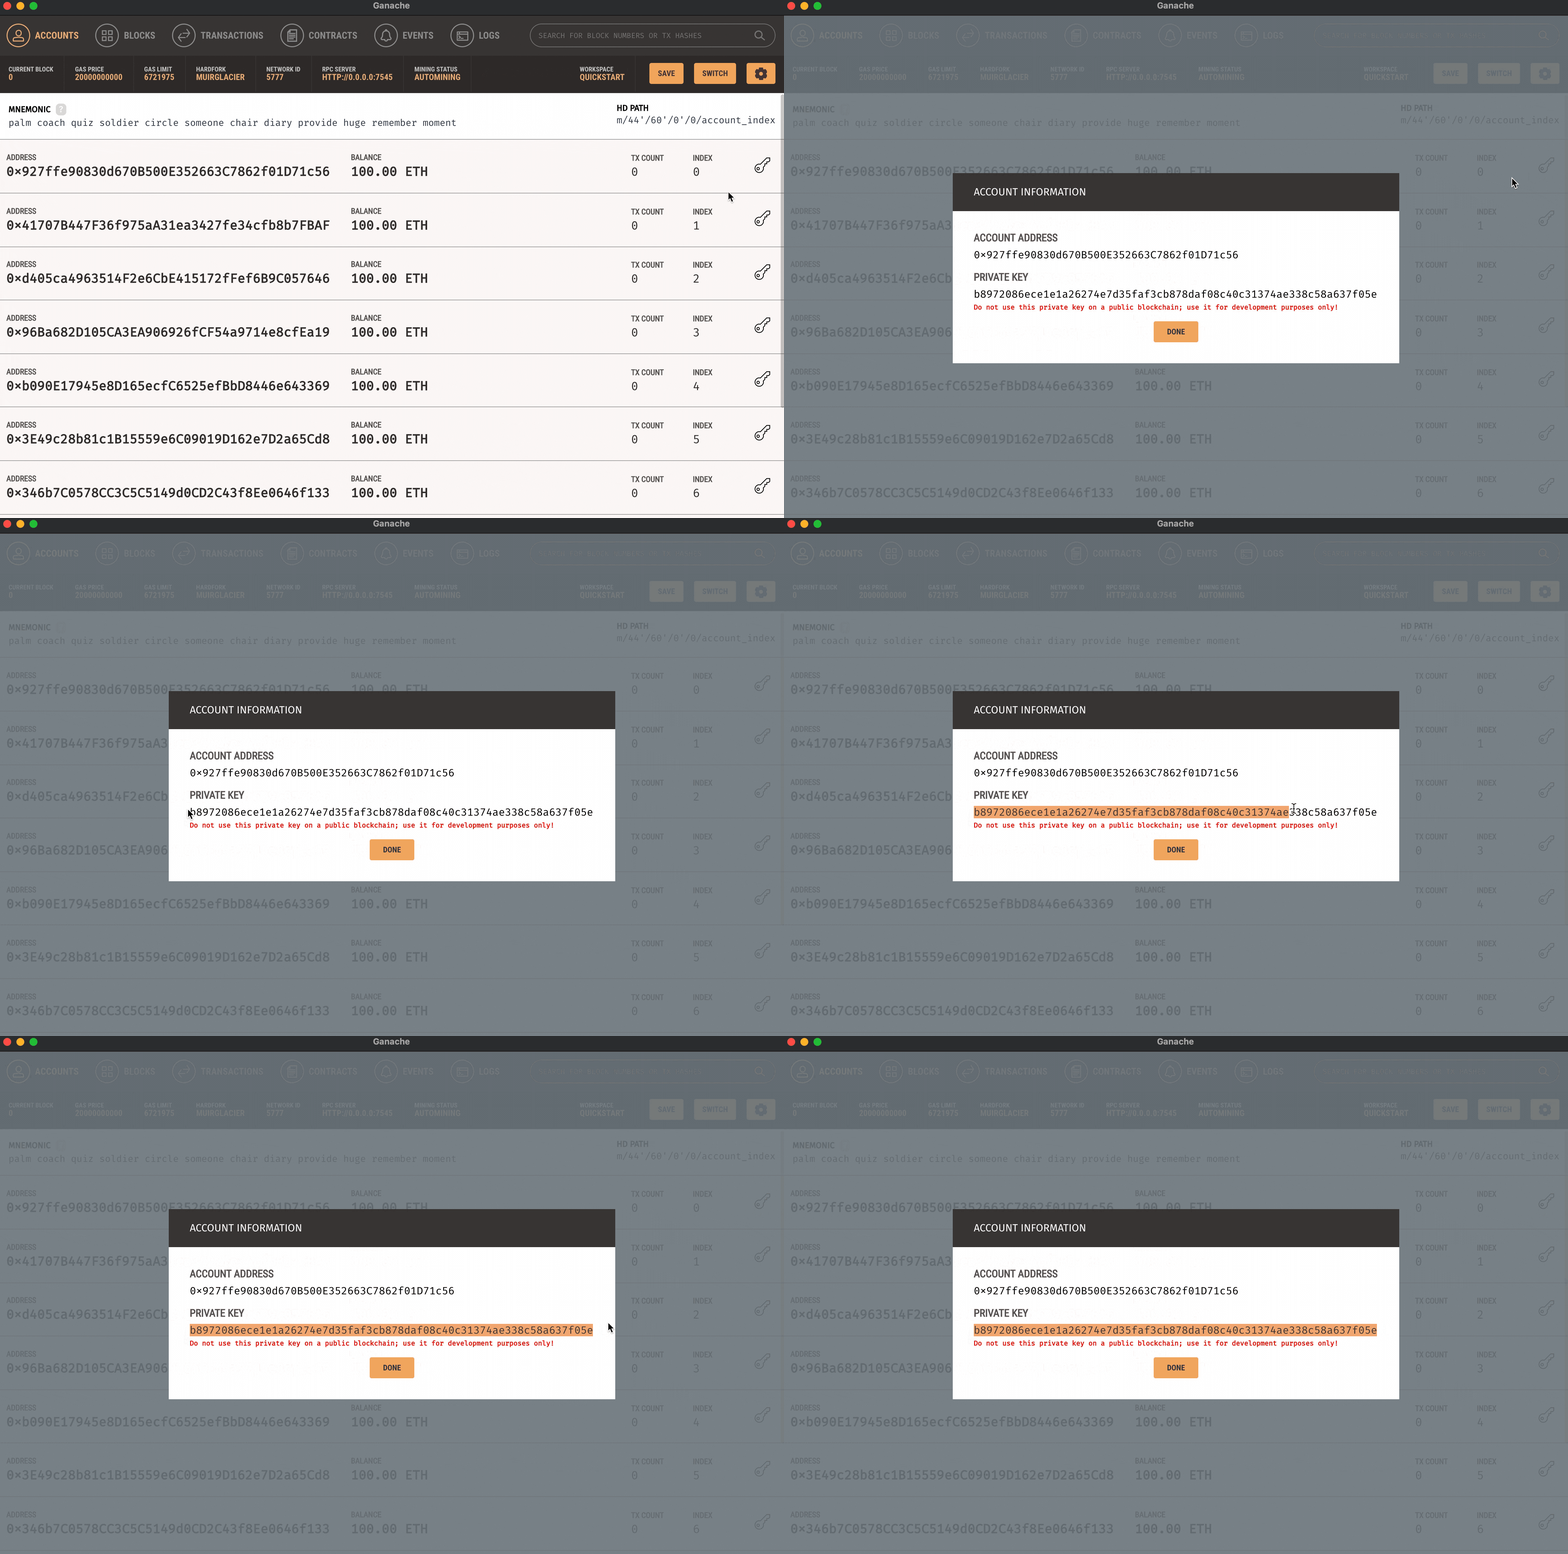
This will construct credentials with the provided privateKey and load the Ethereum address specified by these credentials. Also, for now, we are directly providing the private key, but as a further enhancement to this app, we can configure it to directly fetch the private key from an external wallet (MetaMask for example).
We can get this privateKey from Ganache:
Secondly:
String abi;
EthereumAddress contractAddress;

Future<void> getDeployedContract() async {
    String abiString = await rootBundle.loadString('src/abis/Investment.json');
    var abiJson = jsonDecode(abiString);
    abi = jsonEncode(abiJson['abi']);

    contractAddress =
        EthereumAddress.fromHex(abiJson['networks']['5777']['address']);
}
This will parse an Ethereum address from the hexadecimal representation, which Flutter extracts from the generated ABI from the third step.
Also, to allow Flutter to read the ABI, in pubspec.yaml, add this to assets:
assets:
    - src/abis/Investment.json
Thirdly:
DeployedContract contract;
ContractFunction getBalanceAmount, getDepositAmount, addDepositAmount, withdrawBalance;

Future<void> getContractFunctions() async {
    contract = DeployedContract(
        ContractAbi.fromJson(abi, "Investment"), contractAddress);

    getBalanceAmount = contract.function('getBalanceAmount');
    getDepositAmount = contract.function('getDepositAmount');
    addDepositAmount = contract.function('addDepositAmount');
    withdrawBalance = contract.function('withdrawBalance');
}
This will help us to find all the public functions defined by the contract that has the provided name.
After we are done with the above initialization process, we will need to create one function to read data from the blockchain, and another to write data to the blockchain, as explained below:
To read:
Future<List<dynamic>> readContract(
    ContractFunction functionName,
    List<dynamic> functionArgs,
  ) async {
    var queryResult = await ethClient.call(
        contract: contract,
        function: functionName,
        params: functionArgs,
    );

    return queryResult;
}
This will call a functionName with functionArgs as parameters defined in the contract and returns its result.
And to write:
Future<void> writeContract(
    ContractFunction functionName,
    List<dynamic> functionArgs,
  ) async {
    await ethClient.sendTransaction(
        credentials,
        Transaction.callContract(
            contract: contract,
            function: functionName,
            parameters: functionArgs,
        ),
    );
}
Signs the given transaction using the keys supplied in the credentials object to upload it to the client so that it can be executed.
Lastly, on tap of the buttons that we created in the second step, we need to call the above read and write functions.
- Here is an example where we call the read function to update the balance:
onPressed: () async { var result = await readContract(getBalanceAmount, []); balance = result?.first?.toInt(); }, - And this example is of the write function, where we deposit the installment amount:
onPressed: () async {
  await writeContract(addDepositAmount, [BigInt.from(installmentAmount)]);
},
Sweet! We are done with our decentralized application.
Conclusion
On starting this app with flutter run, here is how the final working version will look like in a mobile (though flutter 2.0 will now allow running the same code on the web and the desktop also):
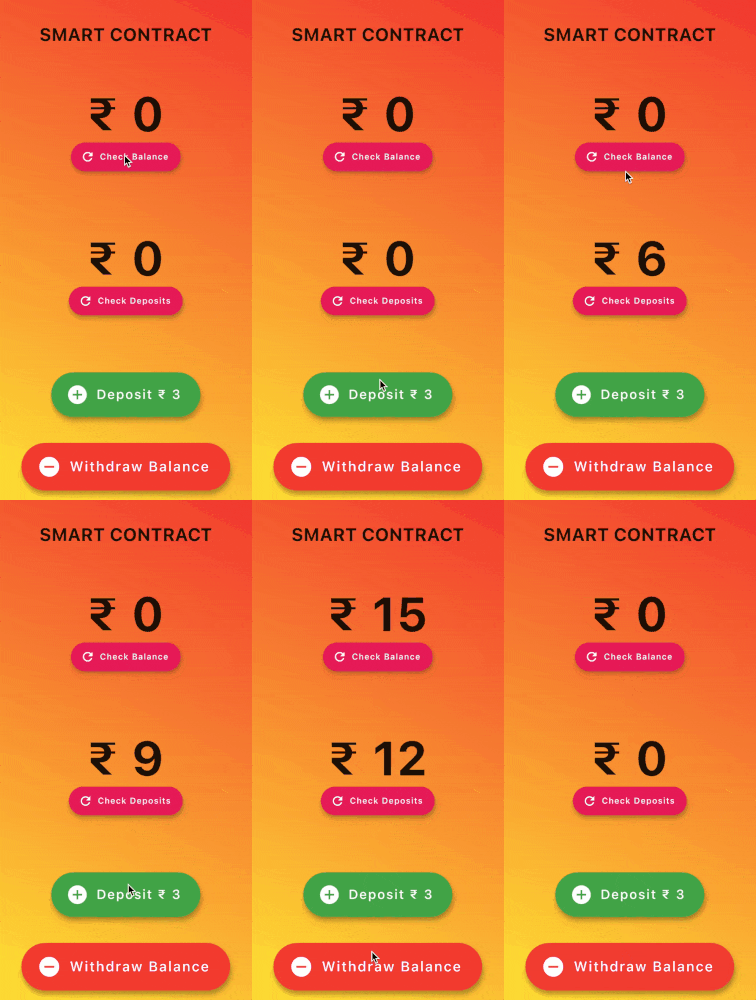
Cool right?! Here, the user can deposit installments of ₹3 to reach a threshold of ₹12. When they do reach this threshold, we return the principal of ₹12 + interest of ₹3 = ₹15 to them. They can now withdraw the amount from this account. Too much mathematics, I know!
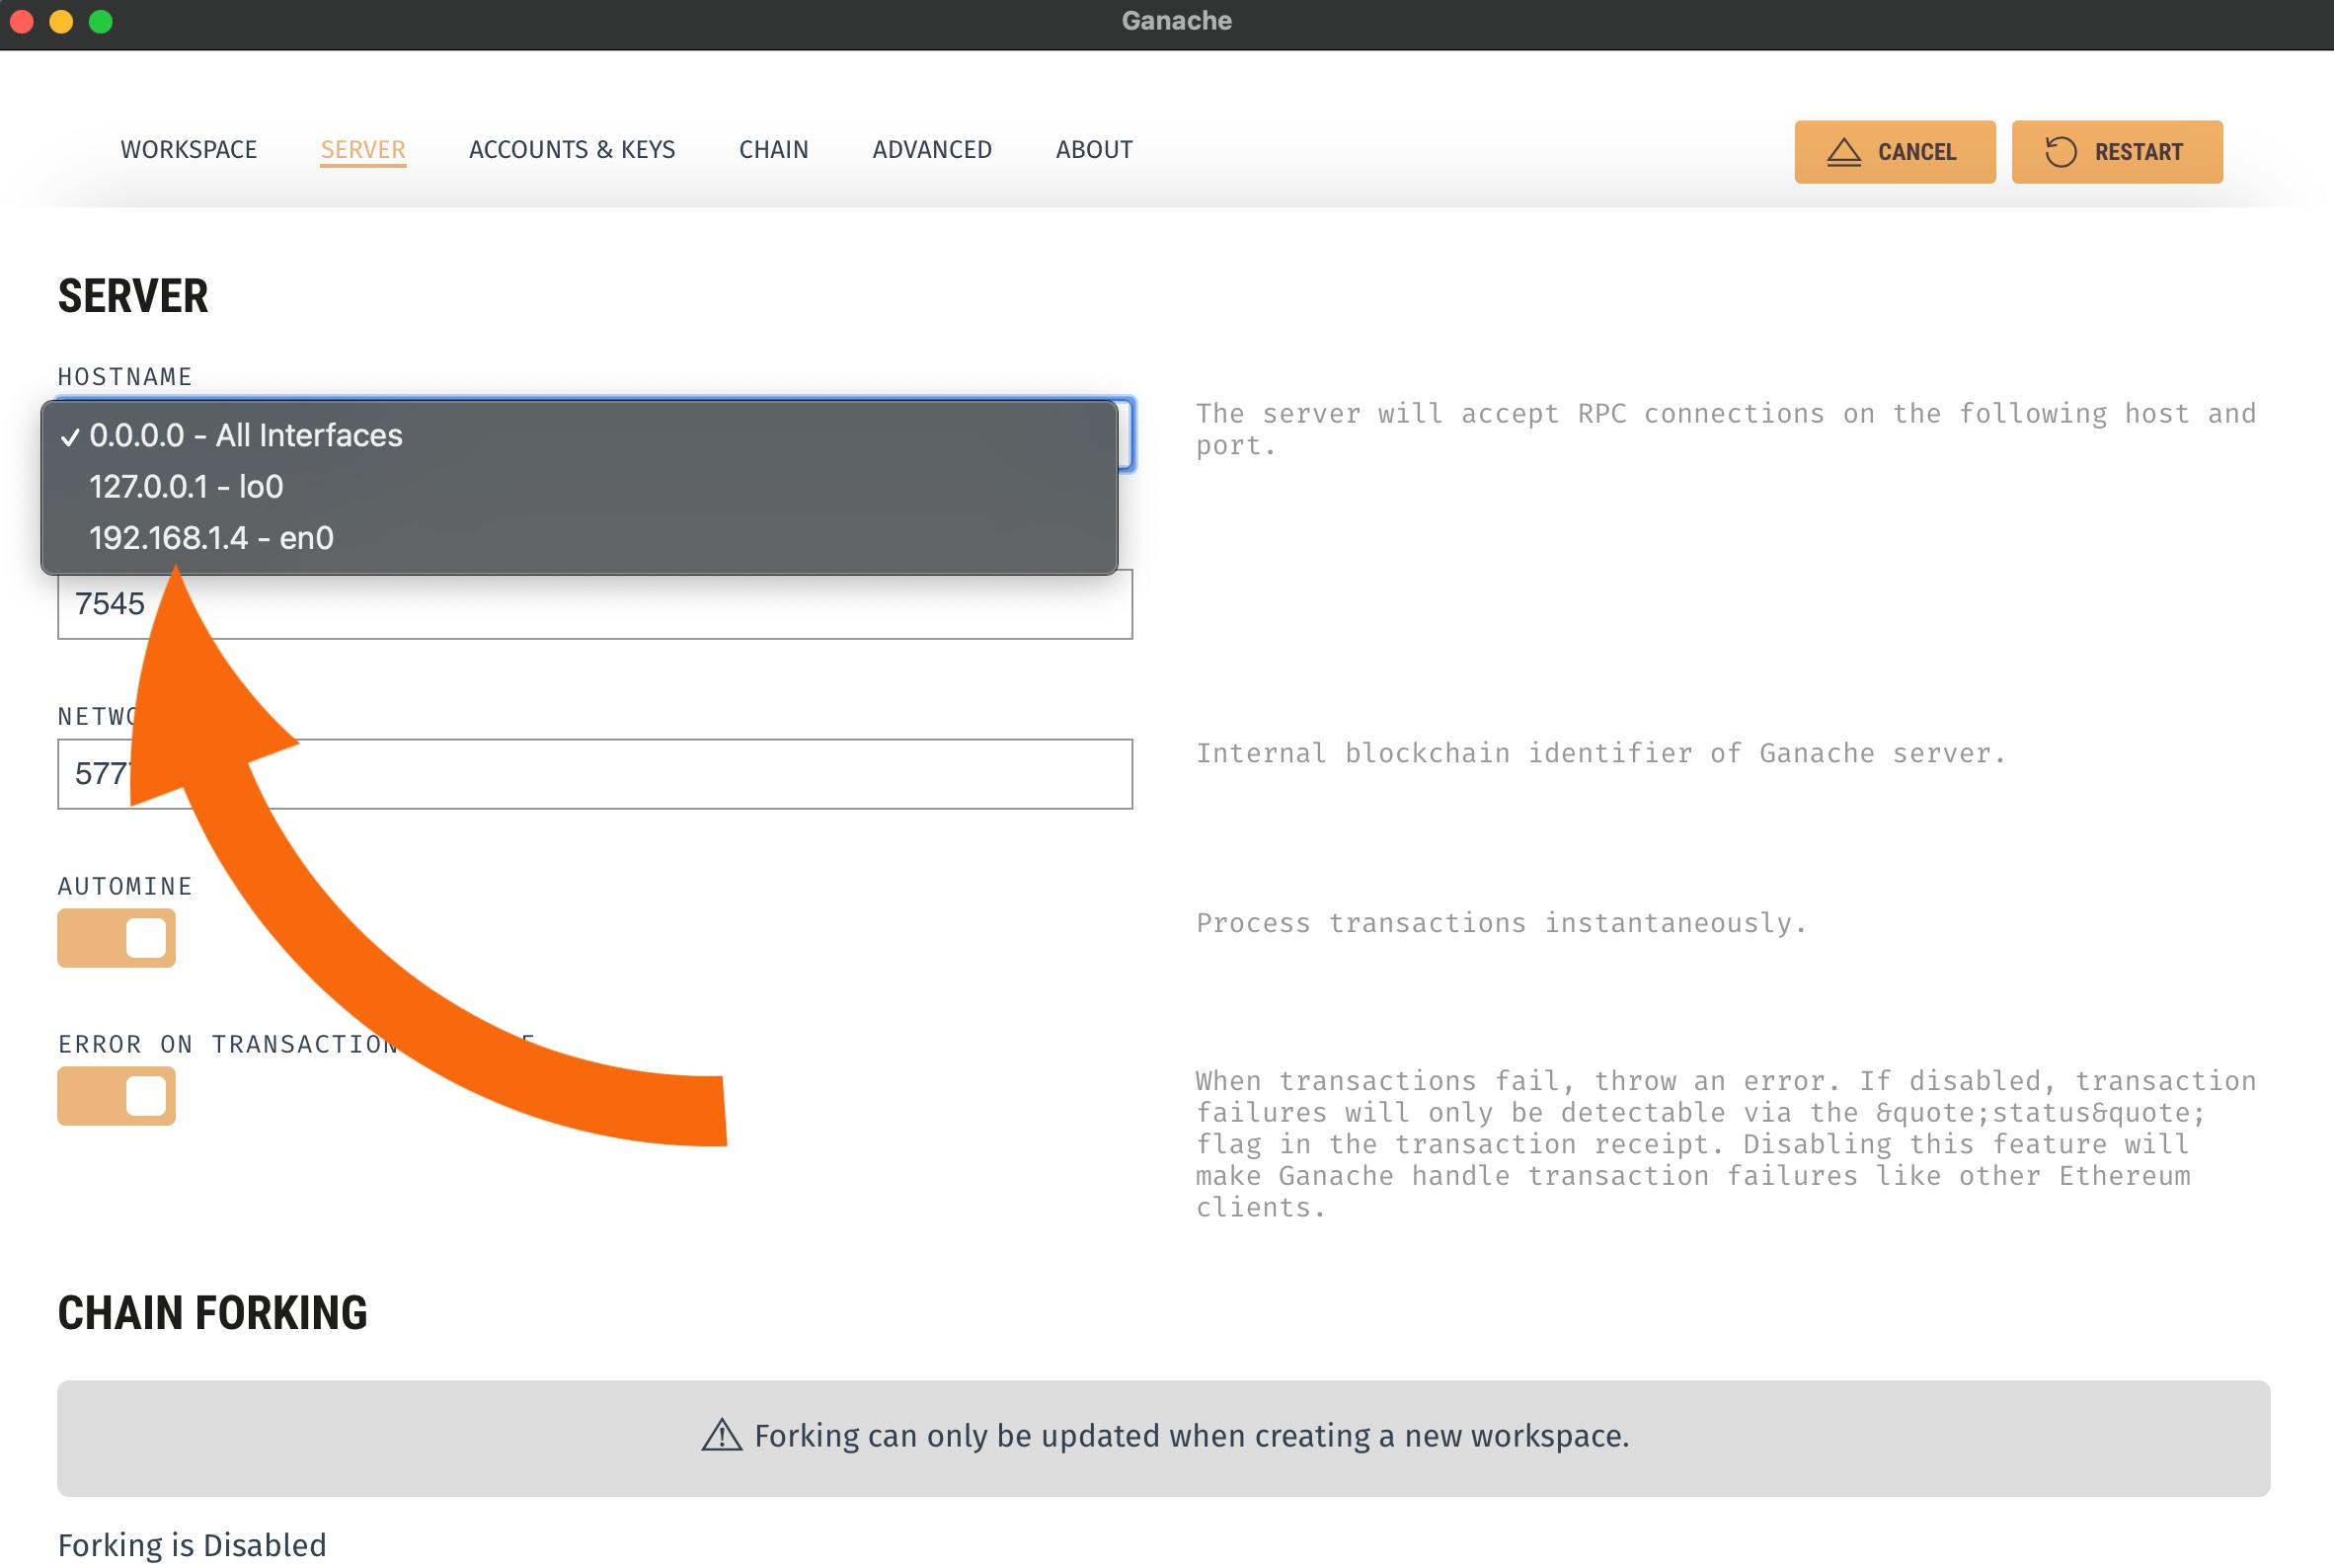
Also, this app will only run on the simulator, for now. To run it on a real device, from the server option in Ganache, choose 192.168.x.x and have the real device connected to the same WiFi as your computer.
You can find the source code of the above application here.
Thanks for reading! Do leave some likes and comments.

