Profiling Flutter Applications Using Performance DevTools
Learn how to profile an inefficient application by using Flutter DevTools

In the previous article, we got an overview of the UI performance tools that can be used on Flutter. As we proceed with this article, let's take this learning further and start with the UI profiling of an inefficient Flutter app. Displaying long lists, handling complex animations or transitions has always been a daunting task for every Flutter developer due to the jank received during this process. In this article, we will be profiling an app that is used to render huge lists having transitions by making use of UI performance tools to identify issues and refactor the code. Towards the end, we will be able to measure how the app's performance has improved after refactoring the code.
Some basic Dos and Don'ts:
- Only measure the performance of an app when in "Profile" mode. Do not measure performance when in "Debug" mode.
- Only measure the performance on a real device. Do not measure in an iOS simulator or Android emulator as Flutter doesn't allow you to run the required Profile mode on a simulated device.
- For the best results, choose the slowest device possible and use the same device throughout for measuring the performance.
Simulators or emulators have differences in hardware when compared to real devices. Additional checks like assertions are added to aid development when using the debug mode and the code is compiled JIT(just in time); whereas in profile or release mode, code is precompiled to transmit native instructions i.e AOT(ahead of time) which makes it more preferable for this process.
The Code:
- Run your app in Profile mode using the following code:
flutter run --profile
- Next, click on the generated link to access the Flutter DevTools as shown below:

- Now, you should be able to see the Flutter DevTools as shown in the picture:

- The UI profiling can be started afresh by clearing the timeline after the first build. To do this, click on the "Clear" button present at the top left and enable the performance overlay to overlook the UI and raster threads like discussed in the previous article. Refer to the picture given below:
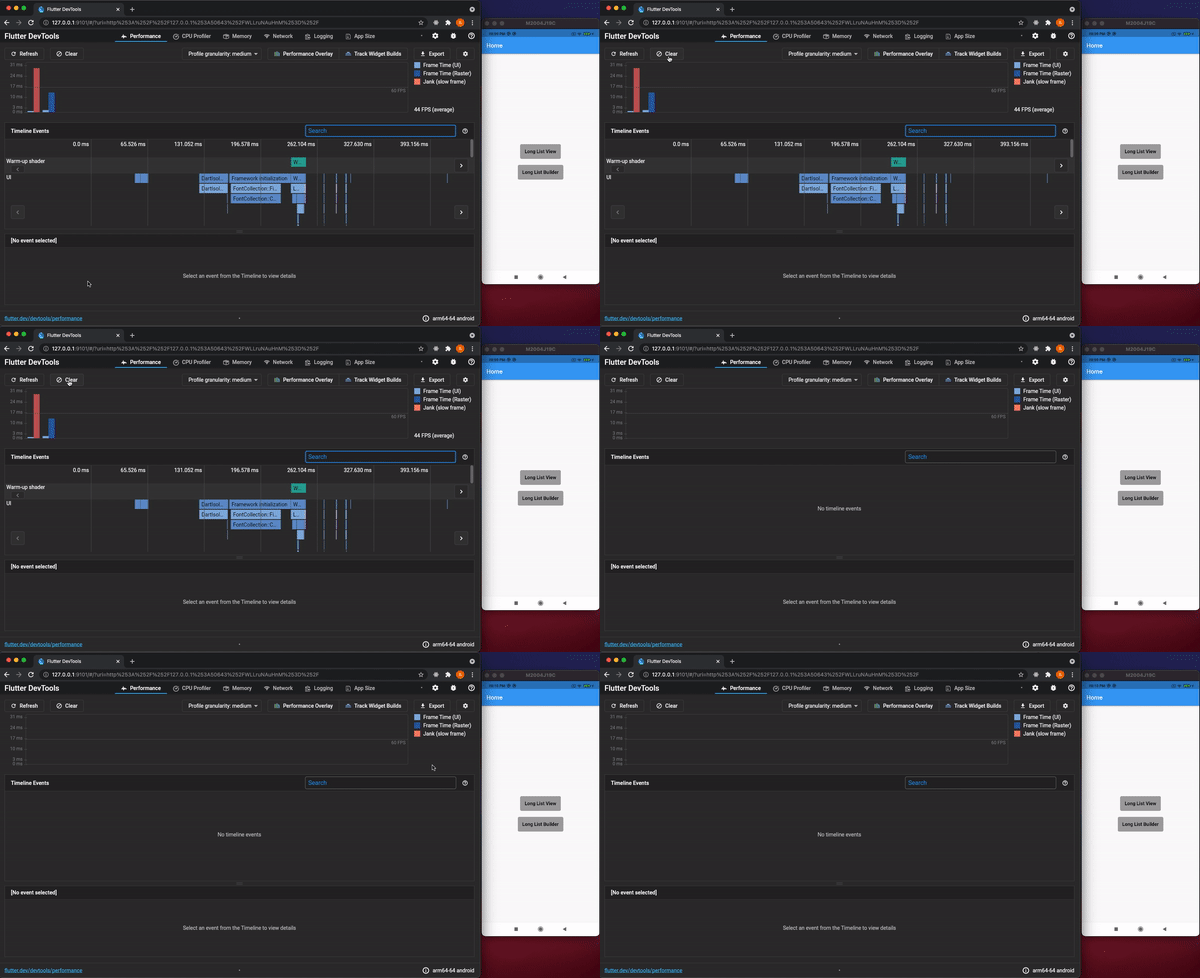
- In the given example, a simple list view having ten thousand items have been rendered with each item having a user image and user name along with an additional slide-in transition for each item.

- It can be observed that building such a simple list was heavier on the UI thread and Raster thread with some frames taking more than the sixteen milliseconds recommended to be rendered. (Refer to the previous article to know why it has to be rendered in 16ms).


- Next, use the following code to implement the
ListViewfor your application:
import 'package:flutter/material.dart';
import 'package:ui_profiling/utils/utils.dart';

class LongListView extends StatefulWidget {
  LongListView({
    Key key,
  }) : super(key: key);

  @override
  _LongListViewState createState() => _LongListViewState();
}

class _LongListViewState extends State<LongListView>
    with SingleTickerProviderStateMixin {
  AnimationController _controller;
  Animation<Offset> _offsetAnimation;
  @override
  void initState() {
    super.initState();
    _controller = initialiseController(const Duration(milliseconds: 700), this);
    _offsetAnimation = setAnimation(_controller);
  }

  @override
  void dispose() {
    _controller.dispose();
    super.dispose();
  }
@override
  Widget build(BuildContext context) {
    return Scaffold(
      appBar: AppBar(
        title: Text("Lengthy List View"),
      ),
      body: ListView(
        children: [
          for (var i = 0; i < 10000; i++) _buildLongList(i, _offsetAnimation)
        ],
      ),
    );
  }

  Widget _buildLongList(var index, Animation animation) {
    return SlideTransition(
      position: animation,
      child: Card(
        elevation: 11,
        margin: EdgeInsets.symmetric(vertical: 10, horizontal: 10),
        child: Padding(
          padding: EdgeInsets.all(10.0),
          child: Row(
            crossAxisAlignment: CrossAxisAlignment.start,
            children: [
              ClipRRect(
                borderRadius: BorderRadius.circular(5),
                child: Container(
                    margin: EdgeInsets.only(
                      right: 20,
                    ),
                    width: 100,
                    height: 100,
                    child: CircleAvatar(
                      backgroundImage:
                          AssetImage("assets/images/${getImage(index)}"),
                    )),
              ),
              Padding(
                padding: EdgeInsets.only(top: 15, bottom: 15),
                child: Text(
                  '${getUserName(index)}',
                  style: TextStyle(fontSize: 18, fontWeight: FontWeight.bold),
                ),
              ),
            ],
          ),
        ),
      ),
    );
  }
- Refer to the picture given below to understand the significance of this code:

- It can be observed that the frame took 38.4 milliseconds to load on the UI thread. After digging deep into the UI thread and analysing the results, we can see that
_buildLongListis the element that is poorly performing and we can get around to addressing this error.

- From the picture shown above, it's observed that the frame took 16.9 milliseconds to load on the raster thread and the performance of the widget has improved with most of the time being consumed by
Slide transition,ClipRRect, andImage widget.
Causes that need to be addressed:
ListViewis a large individual widget with ten thousand items but it isn't possible to display more than five at the same time.Each list item has nearly nine widgets(
SlideTransition,Card,Padding,ClipRRect,AssetImage, etc.) which makes building every single item on the list difficult.ClipRRecttends to be an expensive widget when there are animations involved.Images used in the example have dimensions(3744 × 5616) that are not compatible with the required size of the
Image container(100 x 100). The images have to be decompressed from 3744 x 5616 to 100 x 100 which makes the entire process tedious.
Possible solutions:
We can load the visible list view items with the help of the
ListView.builderwhich only renders the items visible on the screenEach list item can be replaced with a stateful/stateless widget, which can be split into multiple widgets, instead of having each item return so many widgets.
We can also try adding a border-radius to the container or overlay the opaque corners onto a square instead of clipping it to a rounded rectangle.
- Display images that are being used should match the size of the image container to avoid the extra work of decompression.
- After refactoring the code,
ListViewis here replaced byListView.builderresulting in the following code:
import 'package:flutter/material.dart';
import 'package:ui_profiling/utils/utils.dart';

class LongListBuilder extends StatefulWidget {
  LongListBuilder({
    Key key,
  }) : super(key: key);

  @override
  _LongListBuilderState createState() => _LongListBuilderState();
}

class _LongListBuilderState extends State<LongListBuilder>
    with SingleTickerProviderStateMixin {
  AnimationController _controller;
  Animation<Offset> _offsetAnimation;
  @override
  void initState() {
    super.initState();
    _controller = initialiseController(const Duration(milliseconds: 700), this);
    _offsetAnimation = setAnimation(_controller);
  }

  @override
  void dispose() {
    _controller.dispose();
    super.dispose();
  }

  @override
  Widget build(BuildContext context) {
    return Scaffold(
        appBar: AppBar(
          title: Text("Lengthy List Builder"),
        ),
        body: ListView.builder(
          itemCount: 10000,
          itemBuilder: (context, index) {
            return ListItem(index, _offsetAnimation);
          },
        ));
  }
}
- We can now observe that each
ListItemwidget returns aListCardwidget along with the required transitions for the first ten items on the list as shown below:
class ListItem extends StatelessWidget {
  final int index;
  final Animation animation;

  ListItem(this.index, this.animation);

  @override
  Widget build(BuildContext context) {
    if (index < 10)
      return SlideTransition(
        position: animation,
        child: ListCard(index: index),
      );
    return ListCard(index: index);
  }
}
- Going ahead, the
ListCardwidget in images are separated out into aImageContainerwidget as is shown below:
class ListCard extends StatelessWidget {
  const ListCard({
    Key key,
    @required this.index,
  }) : super(key: key);

  final int index;

  @override
  Widget build(BuildContext context) {
    return Card(
      clipBehavior: Clip.none,
      elevation: 11,
      margin: EdgeInsets.symmetric(vertical: 10, horizontal: 10),
      child: Padding(
        padding: EdgeInsets.all(10.0),
        child: Row(
          crossAxisAlignment: CrossAxisAlignment.start,
          children: [
            ImageContainer(index: index),
            Padding(
              padding: EdgeInsets.only(top: 15, bottom: 15),
              child: Text(
                '${getUserName(index)}',
                style: TextStyle(fontSize: 18, fontWeight: FontWeight.bold),
              ),
            ),
          ],
        ),
      ),
    );
  }
}
- Instead of using
CircleAvatar, we can also take advantage of theBoxDecorationand display the image in the container itself. Use the code given below to implement this:
class ImageContainer extends StatelessWidget {
  const ImageContainer({
    Key key,
    @required this.index,
  }) : super(key: key);

  final int index;

  @override
  Widget build(BuildContext context) {
    return Container(
      decoration: BoxDecoration(
          image: DecorationImage(
            fit: BoxFit.cover,
            image: AssetImage(
              "assets/images/400x300_${getImage(index)}",
            ),
          ),
          borderRadius: BorderRadius.circular(200)),
      margin: EdgeInsets.only(
        right: 20,
      ),
      width: 100,
      height: 100,
    );
  }
}
- Here's a pictorial representation of the results:

Note: Certain expensive widgets like
Opacity,Chip,ShaderMask,ColorFilterandTextwithoverflowShader need to be used with careful consideration as they might triggersaveLayer()` behind the scenes.
Conclusion
In the example that we discussed, the application was designed to be inefficient because of which the profiling was not time-consuming. But if you are trying to profile a production-ready app, you will find that it is arduous to identify the root cause and this often involves dealing between the tradeoffs. The complete code of the app is available at GitHub.
After profiling the user interface of the app, we have learned how we can load huge lists and reduce the unnecessary rebuilding of widgets by splitting a large widget into multiple small widgets along with exploring how images of appropriate size can be maintained to reduce decompression. You can view the widget rebuilt counts for the current screen and frame in the Flutter plugin for Android Studio and IntelliJ.
The article comes to an end here. Hope you enjoyed profiling the Flutter application!